
Pál_K
Cameras. I has it.
In the world of camera repair, there is a market for the Minolta Maxxum 7 automatic aperture stop-down ring (it’s in the body, made of plastic, and there’s a post which eventually breaks. The only solution at the present time is to find a donor body.)
shawn
Mentor
shawn
Mentor
This is an extension for a $50 food dehydrator to allow for filament spools to be dried out. As it is a wide open space it would also work as a dryer for reels and reeled film too. The dehydrator it is sized for has a temp control from 104 degrees to 160 for the heated airflow.
https://www.thingiverse.com/thing:2814779
or for smaller printers:
https://www.thingiverse.com/thing:2795773
To go along with this dryer print out a filament spinner. I drilled a hole in the extension and just print directly from the dryer now. Works great.
Shawn
shawn
Mentor
shawn
Mentor
Finished printing the Rollei accessories. Lens cap and hood fit great. For the light meter cover I had to scale down the center peg by around 8 or 9% for it to fit the cover well and to open and close properly.

Shawn
Shawn
250f8bthere
Newbie
If anyone knows how to access the actuator arm for the Leica Mooly ( for the IIIa and IIIb cameras), I'd the thrilled to donate to the cause of reproducing one or more in some extra-strength printed materials. Anyone have the capacity to created 3d images to be of use?
dmr
Registered Abuser
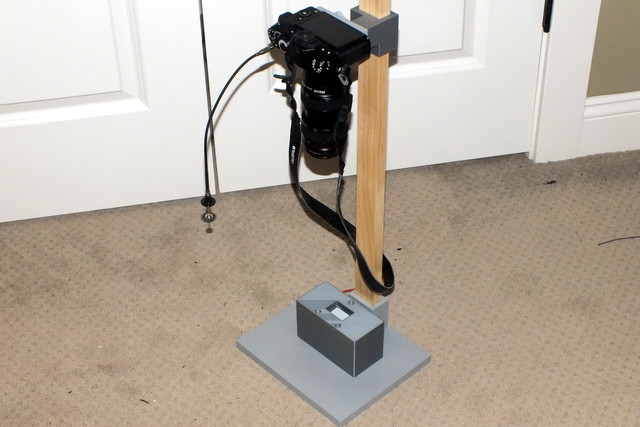
I made a functioning negative/slide scan box and stand, planning ahead for when my 15+ yo film scanner dies. (Please excuse the dirty carpet! This is the spare bedroom at the height of the pandemic.) 
titrisol
Bottom Feeder
olakiril
Well-known
Fuji 35mm f/2 lenshood:

I just couldn't justify the price of the squarehood. 60 euros + shipping for a piece of metal with a bad paint job..
I just couldn't justify the price of the squarehood. 60 euros + shipping for a piece of metal with a bad paint job..
shawn
Mentor
Pentax 6x7 right hand grip
Pentax 6x7 TTL prism shutter ring extender
Pentax 6x7 viewfinder mask for 35mm panoramics integrated dual framelines with/without sprokets
Pentax 6x7 viewfinder mask for 35mm panoramic two versions for sprockets or without sprockets
Pentax 6x7 viewfinder mask for 35mm panoramic with simulated sprockets in mask
The last viewfinder mask link has a suggestion to print the mask in translucent filament so you can see outside of the framing. That might only work with an epoxy printer but it is a cool idea to try. Probably easier to just modify one of the mask STLs to give frame lines but to be open outside the frame lines.
shawn
Mentor
I printed this negative holder and scaled it to be 150mm long. It works very well.
I designed a light mask/camera holder for my GFX50R with Pentax 645 120mm f4 Macro lens that I use for scanning.

This will sit on a piece of rubber on top of my light box with a cutout for the negative area and the holder will slide into it.

The lens will fit down into the top of the cone and rest on the ridge inside. As long as I measured correctly the height is such that with the camera focused on the negative it will be the proper height away to scan full height of the negative using full height of the sensor. For wider negatives (I scan up to 6x24) I just shoot multiple images and pano blend them in LR.
I designed this bulky so it is a 25 hour print job. If I redo I'd keep the wide base but make the walls closer together for less infill. Inside will be painted flat black and have flocking applied.
Will likely be building the same sort of thing for 35mm scanning using this holder. Maybe with two different heights for when I am scanning half frame (with a close up filter) and for regular scanning.
I've been digital scanning in a dark room, using a tripod and masking the light table. That takes a lot more setup time to make sure everything is squared up. This should be much quicker and won't need to be in the dark.
I designed a light mask/camera holder for my GFX50R with Pentax 645 120mm f4 Macro lens that I use for scanning.
This will sit on a piece of rubber on top of my light box with a cutout for the negative area and the holder will slide into it.
The lens will fit down into the top of the cone and rest on the ridge inside. As long as I measured correctly the height is such that with the camera focused on the negative it will be the proper height away to scan full height of the negative using full height of the sensor. For wider negatives (I scan up to 6x24) I just shoot multiple images and pano blend them in LR.
I designed this bulky so it is a 25 hour print job. If I redo I'd keep the wide base but make the walls closer together for less infill. Inside will be painted flat black and have flocking applied.
Will likely be building the same sort of thing for 35mm scanning using this holder. Maybe with two different heights for when I am scanning half frame (with a close up filter) and for regular scanning.
I've been digital scanning in a dark room, using a tripod and masking the light table. That takes a lot more setup time to make sure everything is squared up. This should be much quicker and won't need to be in the dark.
shawn
Mentor
Successful test!
Using construction paper as a mask.


I built this with a filter on the lens in case I needed to get a few mm closer. Height is basically perfect, I have edge to edge of the negative with a touch extra so I can be sure I am lined up properly with the sensor.

Next up is painting the interior flat black and then putting felt flocking inside to kill all the reflections.
Then designing and printing this for 35mm.....
Using construction paper as a mask.
I built this with a filter on the lens in case I needed to get a few mm closer. Height is basically perfect, I have edge to edge of the negative with a touch extra so I can be sure I am lined up properly with the sensor.
Next up is painting the interior flat black and then putting felt flocking inside to kill all the reflections.
Then designing and printing this for 35mm.....
shawn
Mentor
Before flocking

After adding flocking to the inside of the cone and to the top of the negative holder

After adding flocking to the inside of the cone and to the top of the negative holder
shawn
Mentor
35mm scanning setup. This is again for the Pentax 645 120mm f4 macro lens on a GFX50R. +1 filter on the 120mm.

No flocking inside yet, just testing.

I added a 7mm spacer ring inside. That gets the negative exactly focused with the lens fully extended.

Might try a +2 filter to see if I can get image height edge to edge. The sprockets will be nice if I shoot 35mm in the Pentax 6x7.
I've got another version of this designed for half frame scanning using a 77mm Marumi DHG Achromat +5 lens on the 120mm macro. Will be printing that shortly.
No flocking inside yet, just testing.
I added a 7mm spacer ring inside. That gets the negative exactly focused with the lens fully extended.
Might try a +2 filter to see if I can get image height edge to edge. The sprockets will be nice if I shoot 35mm in the Pentax 6x7.
I've got another version of this designed for half frame scanning using a 77mm Marumi DHG Achromat +5 lens on the 120mm macro. Will be printing that shortly.
shawn
Mentor
Made an adapter for these to use with the Panasonic S1R and the Sigma 105mm f2.8 Macro lens. The Sigma is great, totally internal focus so it made getting the distance really easy since the lens length doesn't change when it focuses. Using the sensor shift high resolution mode I scanned a roll from the Pentax 6x7 in less than 10 minutes.


After cropping the 6x7 negatives are 152 megapixel.
After cropping the 6x7 negatives are 152 megapixel.
boojum
Mentor
Really very interesting
titrisol
Bottom Feeder
My models are available on thangs
There are a few lenshoods, tripod adapters, etc.
There are a few lenshoods, tripod adapters, etc.
shawn
Mentor
Just designed this for my M5....

Test fit is good, just a friction fit.

Printed in white as that is what was loaded. Will probably redo in black next time I have that in the printer.
Test fit is good, just a friction fit.
Printed in white as that is what was loaded. Will probably redo in black next time I have that in the printer.
shawn
Mentor
titrisol
Bottom Feeder
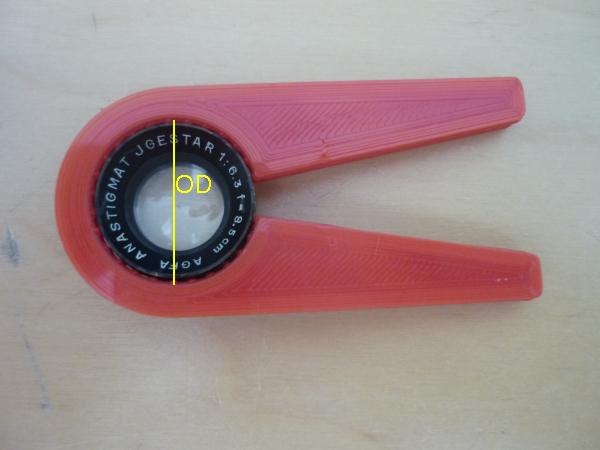
Flexi-clamps or wrenches for separating filters or lens elements (like the AGFAs)
 thangs.com
If you need other sizes let me know
thangs.com
If you need other sizes let me know
Lens wrenches - 3D model by titrisol on Thangs
These lens wrenches work to separate elements in classic cameras The Outer Diameter (OD) determines the size (+/- 2mm) You can scale X and Y for larger/smaller
Share:
-
This site uses cookies to help personalise content, tailor your experience and to keep you logged in if you register.
By continuing to use this site, you are consenting to our use of cookies.