
optikhit
Photo gear player
We are still talking about a Certo Six camera? One made by the Certo company? Like this one? http://farm1.static.flickr.com/24/95680544_6b63a6c527.jpg?v=0 I don't understand why you'd need to take the cover and struts off. You remove that black ring surrounding the lens (the one with the writing on it). What you need to do will become pretty self-evident after that.
") Yes, you are right. Thanks.
Yes, you are right. Thanks.Marcin
Newbie
What is a minimal focusing distance for CertoSix?
Brian Legge
Mentor
You remove that black ring surrounding the lens (the one with the writing on it).
That is one trick I never figured out - how do you do that without some sort of slot for a spanner to grab?
I just acquired a Certo Six with a small amount of fungus between the elements. It may be early enough to clean but I can't figure out how to remove the front or rear element on this camera.
Removing the rear element on the Moskva was simple; it just screwed out. I expected the same here but I didn't want to force anything. There are two retaining rings - one which I assume holds the rear element together and one which I assume attaches the shutter to the camera.
Am I missing something here?
graywolf
Well-known
This is the tool that is made for that:
http://www.micro-tools.com/store/P-LRSET/Lens-Ring-Tool-Set.aspx
Unfortunately, they are currently out of stock. As you can see they are just round rubber things you press against the retainer ring and turn. The friction is all that is needed. I have on occassion found a plastic cap that will fit down in there and rolled a tube of masking tape pressed it flat and folded around the edge of the cap, it works fine but is a very temporary tool.
cmug
Member
DIY repair Certo Six / How glue glass on metal
DIY repair Certo Six / How glue glass on metal
I bought an Certo Six recently. The viewfinder doesn't work. The directions to open the camera, explained on this forum helped my a lot.
So I start cleaning, first impression is that the beamsplitter and mirror is OK. I don't touch them, because I read the coating will wipe off easily. The other lenses are real dirty.
I got another 2 problems. First the small lens near your eye has fallen out. And I see no screw that hold this tiny lens on it place? Is this lens hold on its place by a glue ? If I wanted to re-glue it, that the best glue I can use ? I want a glue that makes repair in the future possible, so it must be soluble I hate modern glue as silicone sealant for this purpose. Can I use Shellac ?
Other problem I have with the shutter knob. It seems its need a re-adjustments. If I push it downwards, some times its still not enough to release the shutter. There is outside right near the bellows a screw that in my opinion needs readjustment. But that screw is fixed with some kind of paint or glue. Is there an way so solve the paint/glue on this screw. If I would try it in this conditions I 'll damage the screw.
already thanks for help, see pictures also
http://imageshack.us/photo/my-images/341/certo1a.jpg/
http://imageshack.us/photo/my-images/851/certo2a.jpg/
Last edited:
George71
Newbie
With the help of this thread I successfully repaired my Certo Six. I thought I'd share what I learned.
I had trouble sliding the replacement beamsplitter into the bracket. Though I got the Edmund Optics 2.0mm glass it was a hair thicker than the original. The solution was to carefully bend out the tabs on the beamsplitter bracket with needle nose pliers. It wasn't so much bending as it was an iterative process of applying torque to the tabs and then seeing if the glass would slide in.
For the fully reflective mirror I found cheap glass on Ebay. You can do the same by searching for "front surface mirror" or "first surface mirror". You don't need the exact thickness. You can go thinner and shim the back side with card stock or film clippings. Make sure to orient the silvered surface outward to avoid refraction through the glass. To cut all the glass I used a carbide scribe and snapped the pieces over a straight bit of wire. I practiced on cheap glass before I cut the beam splitter.
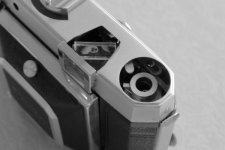
After I replaced the mirrors my rangefinder was out of alignment. Through trial and error I figured out what to do. To fix it you'll need some ground glass and a loupe to check focus at the film plane. If you don't have ground glass you might be able to fake it with some plexiglass and Scotch Magic Tape stuck to one side. When checking the focus make sure the glass rests on the same surface that the film rests on. If you look here that would be the silver horizontal surfaces above and below the lens. (The vertical dark bars on either side of the lens are actually depressed relative to the film plane. Don't rest the glass on them or you'll end up with a front focusing problem.)
To adjust the rangefinder loosen the beam splitter assembly (screw A in the attached photo). Focus the ground glass on a far away object. Swivel the beamsplitter until the rangefinder aligns on the object. Then tighten screw A. If the vertical alignment is off you may need to shim the assembly with paper or something. Now focus the film plane on a close object, within a few meters or closer. If you're lucky the rangerfinder will now be perfectly aligned on this object. If it's not then you'll need to loosen screw B. Then rotate C, which is not a screw but a cam, to adjust the throw. You may have to repeat the above steps several times checking both near and far focus until the rangefinder is aligned at both ends of the scale. Then tighten B and put a dab of shellac or some removable adhesive over B and C to make sure they stay put.
To complicate things the eyepiece lens assembly D swivels and is pulled by a spring forcing it into a position that's different from the position it'll be in when the top cover is back on. This causes a shift in the rangefinder patch. Therefore you'll need to temporarily put the top cover back on and do a final adjustment of the beamsplitter assembly to correct for this shift (see the 2nd photo). Then with the cover still on tighten the assembly and apply a bit of removable adhesive to the edges of the assembly to make sure it stays put. Then put the whole thing back together and shoot a test roll.
After I did all this my Certo Six has perfect focus. The 3rd photo was a test at f2.8.
I had trouble sliding the replacement beamsplitter into the bracket. Though I got the Edmund Optics 2.0mm glass it was a hair thicker than the original. The solution was to carefully bend out the tabs on the beamsplitter bracket with needle nose pliers. It wasn't so much bending as it was an iterative process of applying torque to the tabs and then seeing if the glass would slide in.
For the fully reflective mirror I found cheap glass on Ebay. You can do the same by searching for "front surface mirror" or "first surface mirror". You don't need the exact thickness. You can go thinner and shim the back side with card stock or film clippings. Make sure to orient the silvered surface outward to avoid refraction through the glass. To cut all the glass I used a carbide scribe and snapped the pieces over a straight bit of wire. I practiced on cheap glass before I cut the beam splitter.
After I replaced the mirrors my rangefinder was out of alignment. Through trial and error I figured out what to do. To fix it you'll need some ground glass and a loupe to check focus at the film plane. If you don't have ground glass you might be able to fake it with some plexiglass and Scotch Magic Tape stuck to one side. When checking the focus make sure the glass rests on the same surface that the film rests on. If you look here that would be the silver horizontal surfaces above and below the lens. (The vertical dark bars on either side of the lens are actually depressed relative to the film plane. Don't rest the glass on them or you'll end up with a front focusing problem.)
To adjust the rangefinder loosen the beam splitter assembly (screw A in the attached photo). Focus the ground glass on a far away object. Swivel the beamsplitter until the rangefinder aligns on the object. Then tighten screw A. If the vertical alignment is off you may need to shim the assembly with paper or something. Now focus the film plane on a close object, within a few meters or closer. If you're lucky the rangerfinder will now be perfectly aligned on this object. If it's not then you'll need to loosen screw B. Then rotate C, which is not a screw but a cam, to adjust the throw. You may have to repeat the above steps several times checking both near and far focus until the rangefinder is aligned at both ends of the scale. Then tighten B and put a dab of shellac or some removable adhesive over B and C to make sure they stay put.
To complicate things the eyepiece lens assembly D swivels and is pulled by a spring forcing it into a position that's different from the position it'll be in when the top cover is back on. This causes a shift in the rangefinder patch. Therefore you'll need to temporarily put the top cover back on and do a final adjustment of the beamsplitter assembly to correct for this shift (see the 2nd photo). Then with the cover still on tighten the assembly and apply a bit of removable adhesive to the edges of the assembly to make sure it stays put. Then put the whole thing back together and shoot a test roll.
After I did all this my Certo Six has perfect focus. The 3rd photo was a test at f2.8.
Attachments


Ron (Netherlands)
Well-known
There is so many valuable info here on adjusting the Certo 6 folder. This thread should be a sticky!
BobBill
Established
There is so many valuable info here on adjusting the Certo 6 folder. This thread should be a sticky!
+1. Add me to "should be a sticky" list!
BobBill
Established
I must relate...found out Cert6 push/slip-on lens shade/filter diameter...is 42mm.
jgrainger
Established
I realise this is quite a thread revival. Having recently obtained a Certo Six and done some servicing on it, I'd like to put some of my findings online so they're preserved - and before I forget.
I'm going to assume that anyone reading this has already removed (or is prepared to remove) the lens and shutter in order to access the screws etc, and obviously, the following is my findings - if you read this and break your camera then thats your responsibility.
Regarding the focusing, essentially, the lever on the front has the same effect (but to a much milder extent) as just starting to push the folding struts to close the camera.
To access the focusing lever, the front piece of leather on the middle section of the lens door needs to be peeled back, there are then 2 screws which when removed, allowing the front piece to be lifted off the lens door. The focusing lever is held with 1 screw, with a further 4 around the edge of the focusing lever bearing, and 1 on the inside to fasten one end of the linkage.
There are 4 screws to hold the sliding rail in place (which pushes the part of the front standard/ folding structure) in order to alter the tilt / in & out position of the lens standard. 2 of these 4 screws are slightly longer, the longer ones fasten into the front holes - to reach the 2 bars normally covered by the front piece. the 2 shorter screws go at the back - into the removable / loose bits of brass (be careful not to loose these if unfastening the screws).
Under that is a shiny shim which is slipped under the head of the screw located at an angle near the front edge of the door.
Possible lubrication points in this part of the camera are the bearing assembly for the focusing lever, the linkage, the sliding part held by the 4 screws inside the door.. and, possibly less likely to be stiff - the folding linkages/ pivots.
After doing this my own camera can be focused with just my right thumb while my right middle finger rests on the shutter release.
Jonathan
Radost
Established
Would adjusting the focusing lever correct the range finder? I just purchased a camera that goes past infinity and is not accurate through the scale.I realise this is quite a thread revival. Having recently obtained a Certo Six and done some servicing on it, I'd like to put some of my findings online so they're preserved - and before I forget.
I'm going to assume that anyone reading this has already removed (or is prepared to remove) the lens and shutter in order to access the screws etc, and obviously, the following is my findings - if you read this and break your camera then thats your responsibility.
Regarding the focusing, essentially, the lever on the front has the same effect (but to a much milder extent) as just starting to push the folding struts to close the camera.
To access the focusing lever, the front piece of leather on the middle section of the lens door needs to be peeled back, there are then 2 screws which when removed, allowing the front piece to be lifted off the lens door. The focusing lever is held with 1 screw, with a further 4 around the edge of the focusing lever bearing, and 1 on the inside to fasten one end of the linkage.
There are 4 screws to hold the sliding rail in place (which pushes the part of the front standard/ folding structure) in order to alter the tilt / in & out position of the lens standard. 2 of these 4 screws are slightly longer, the longer ones fasten into the front holes - to reach the 2 bars normally covered by the front piece. the 2 shorter screws go at the back - into the removable / loose bits of brass (be careful not to loose these if unfastening the screws).
Under that is a shiny shim which is slipped under the head of the screw located at an angle near the front edge of the door.
Possible lubrication points in this part of the camera are the bearing assembly for the focusing lever, the linkage, the sliding part held by the 4 screws inside the door.. and, possibly less likely to be stiff - the folding linkages/ pivots.
After doing this my own camera can be focused with just my right thumb while my right middle finger rests on the shutter release.
Jonathan
I know realize that having a camera like that is 100% dependent on the range finder since there is no focusing on the lens.
Radost
Established
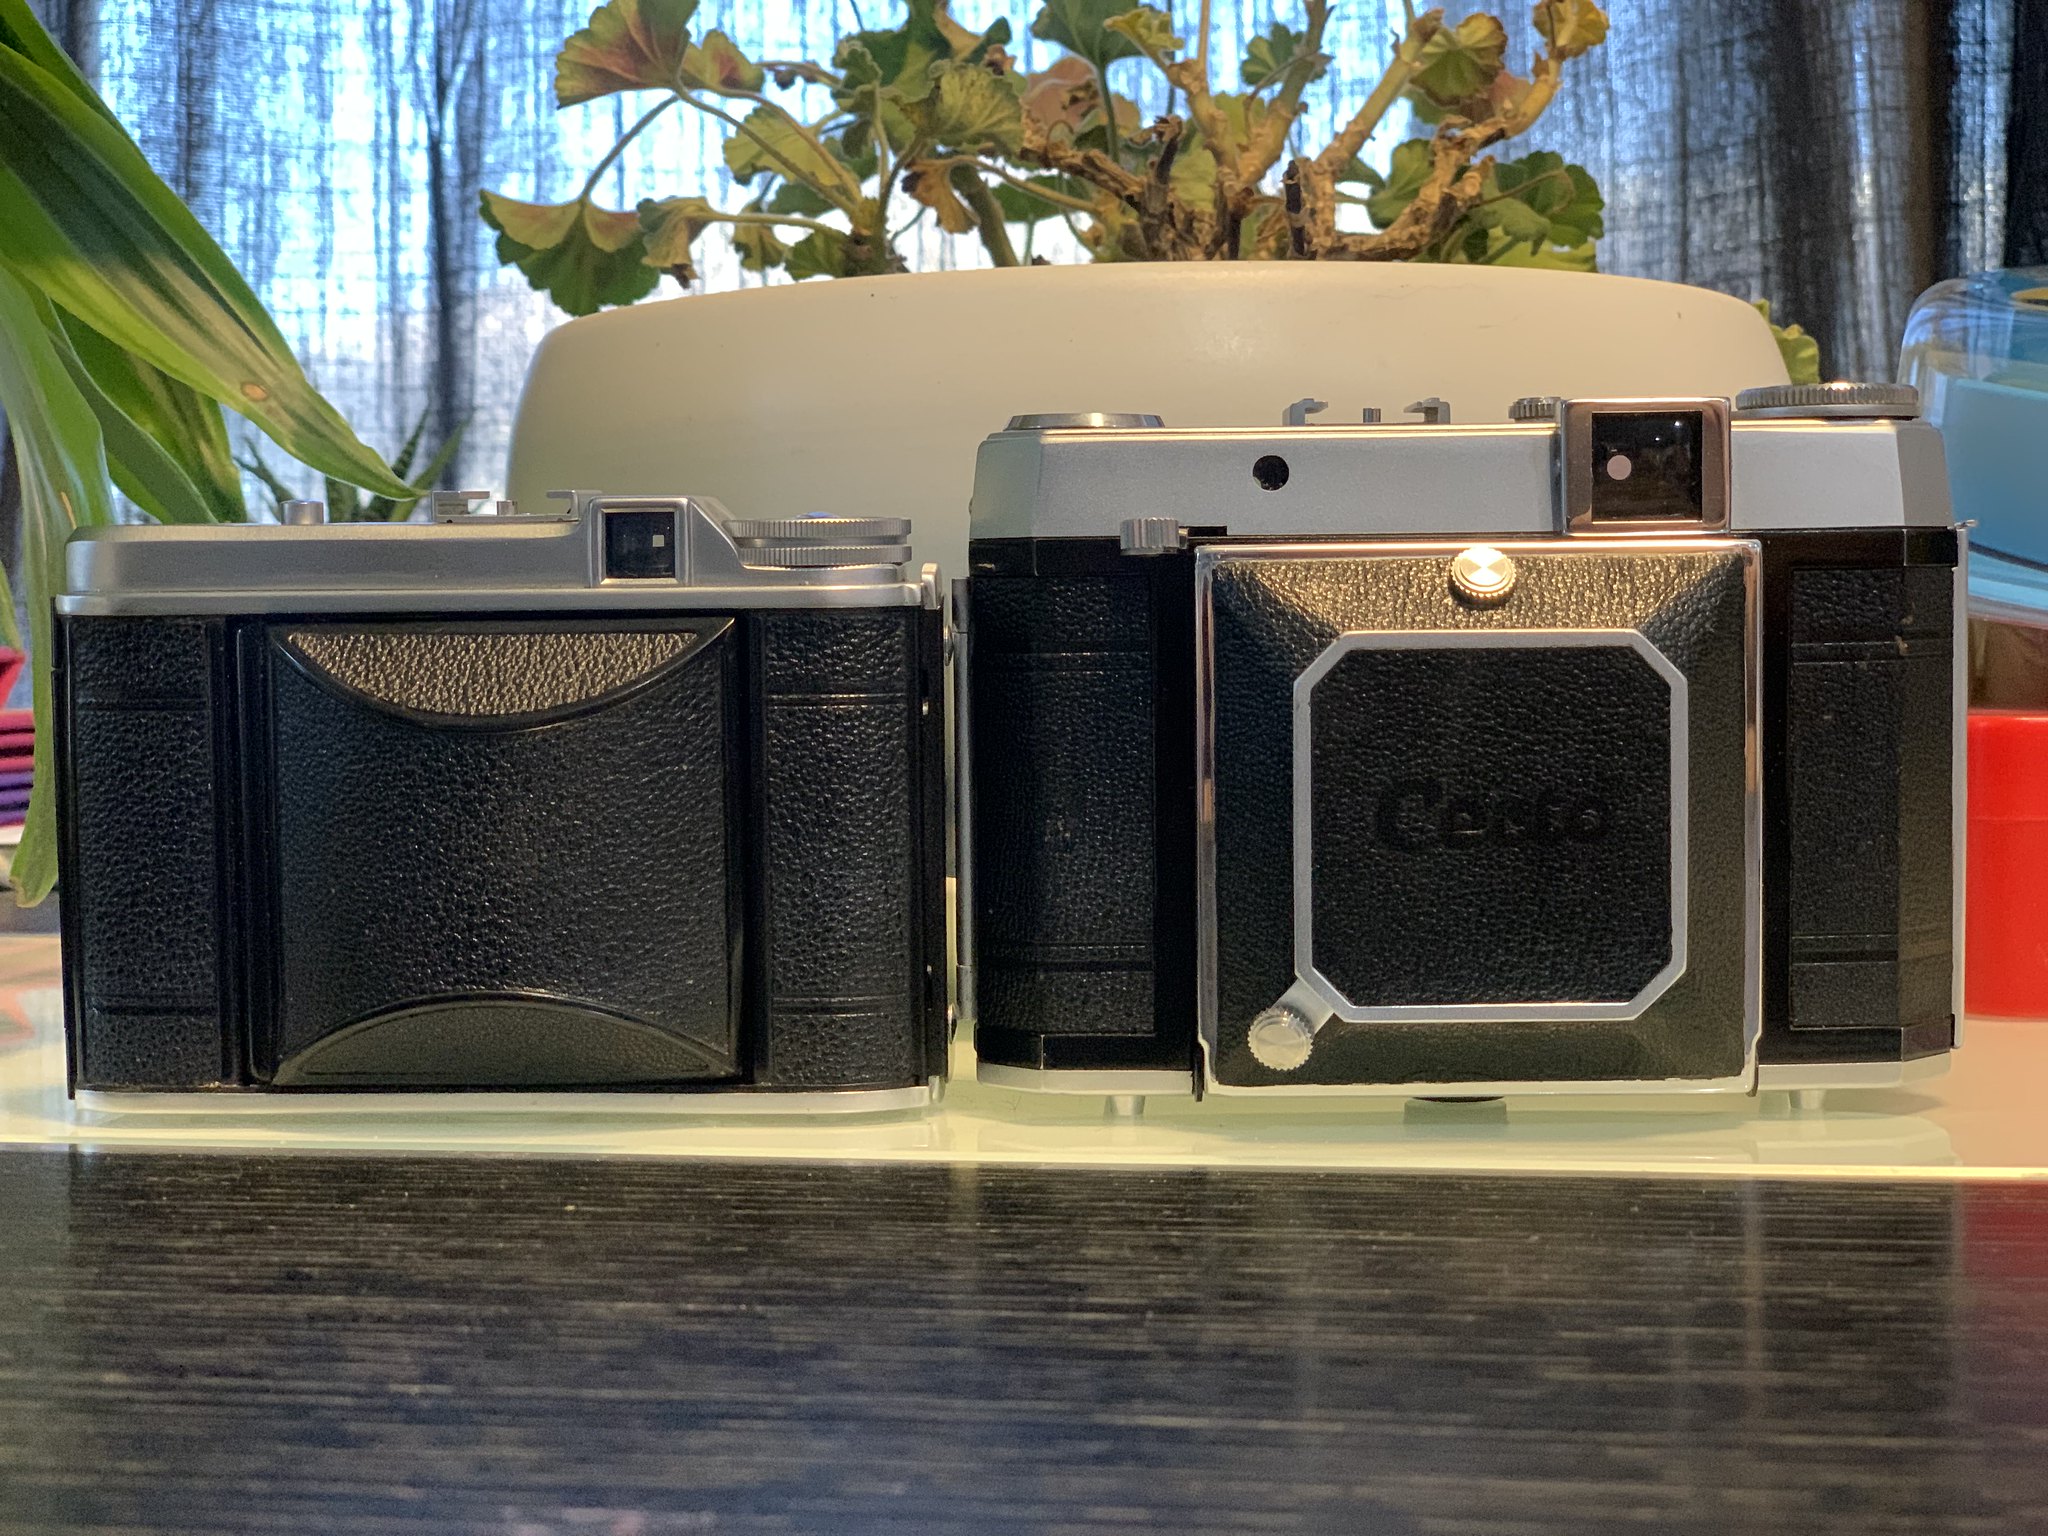
The PerkeoII size
Radost
Established
How do you remove the lens?
I realise this is quite a thread revival. Having recently obtained a Certo Six and done some servicing on it, I'd like to put some of my findings online so they're preserved - and before I forget.
I'm going to assume that anyone reading this has already removed (or is prepared to remove) the lens and shutter in order to access the screws etc, and obviously, the following is my findings - if you read this and break your camera then thats your responsibility.
Regarding the focusing, essentially, the lever on the front has the same effect (but to a much milder extent) as just starting to push the folding struts to close the camera.
To access the focusing lever, the front piece of leather on the middle section of the lens door needs to be peeled back, there are then 2 screws which when removed, allowing the front piece to be lifted off the lens door. The focusing lever is held with 1 screw, with a further 4 around the edge of the focusing lever bearing, and 1 on the inside to fasten one end of the linkage.
There are 4 screws to hold the sliding rail in place (which pushes the part of the front standard/ folding structure) in order to alter the tilt / in & out position of the lens standard. 2 of these 4 screws are slightly longer, the longer ones fasten into the front holes - to reach the 2 bars normally covered by the front piece. the 2 shorter screws go at the back - into the removable / loose bits of brass (be careful not to loose these if unfastening the screws).
Under that is a shiny shim which is slipped under the head of the screw located at an angle near the front edge of the door.
Possible lubrication points in this part of the camera are the bearing assembly for the focusing lever, the linkage, the sliding part held by the 4 screws inside the door.. and, possibly less likely to be stiff - the folding linkages/ pivots.
After doing this my own camera can be focused with just my right thumb while my right middle finger rests on the shutter release.
Jonathan
Radost
Established
Edit: I found out how to do it.With the help of this thread I successfully repaired my Certo Six. I thought I'd share what I learned.
I had trouble sliding the replacement beamsplitter into the bracket. Though I got the Edmund Optics 2.0mm glass it was a hair thicker than the original. The solution was to carefully bend out the tabs on the beamsplitter bracket with needle nose pliers. It wasn't so much bending as it was an iterative process of applying torque to the tabs and then seeing if the glass would slide in.
For the fully reflective mirror I found cheap glass on Ebay. You can do the same by searching for "front surface mirror" or "first surface mirror". You don't need the exact thickness. You can go thinner and shim the back side with card stock or film clippings. Make sure to orient the silvered surface outward to avoid refraction through the glass. To cut all the glass I used a carbide scribe and snapped the pieces over a straight bit of wire. I practiced on cheap glass before I cut the beam splitter.
After I replaced the mirrors my rangefinder was out of alignment. Through trial and error I figured out what to do. To fix it you'll need some ground glass and a loupe to check focus at the film plane. If you don't have ground glass you might be able to fake it with some plexiglass and Scotch Magic Tape stuck to one side. When checking the focus make sure the glass rests on the same surface that the film rests on. If you look here that would be the silver horizontal surfaces above and below the lens. (The vertical dark bars on either side of the lens are actually depressed relative to the film plane. Don't rest the glass on them or you'll end up with a front focusing problem.)
To adjust the rangefinder loosen the beam splitter assembly (screw A in the attached photo). Focus the ground glass on a far away object. Swivel the beamsplitter until the rangefinder aligns on the object. Then tighten screw A. If the vertical alignment is off you may need to shim the assembly with paper or something. Now focus the film plane on a close object, within a few meters or closer. If you're lucky the rangerfinder will now be perfectly aligned on this object. If it's not then you'll need to loosen screw B. Then rotate C, which is not a screw but a cam, to adjust the throw. You may have to repeat the above steps several times checking both near and far focus until the rangefinder is aligned at both ends of the scale. Then tighten B and put a dab of shellac or some removable adhesive over B and C to make sure they stay put.
To complicate things the eyepiece lens assembly D swivels and is pulled by a spring forcing it into a position that's different from the position it'll be in when the top cover is back on. This causes a shift in the rangefinder patch. Therefore you'll need to temporarily put the top cover back on and do a final adjustment of the beamsplitter assembly to correct for this shift (see the 2nd photo). Then with the cover still on tighten the assembly and apply a bit of removable adhesive to the edges of the assembly to make sure it stays put. Then put the whole thing back together and shoot a test roll.
After I did all this my Certo Six has perfect focus. The 3rd photo was a test at f2.8.
Radost
Established
Does your certo focuses/Moves the lever pass infinity? Isn't it supposed to stop at infinity when the lever is all the way to the end?
Mine focuses pass infinity.
Mine focuses pass infinity.
Phil_F_NM
Camera hacker
Do you know when the last time your camera was serviced? Is the shutter accurate? Does it hang on any speeds or bulb? Does bulb fire as 1/25 or 1/30 second?
I as these things because you are trying to fix the rangefinder of this camera and posting to a 3 year old thread hoping that you'll get the video and all the help you need, when the camera needs to be sent in to a real tech who knows these cameras. Good luck and I hope you don't brick it.
Phil Forrest
Radost
Established
Do you know when the last time your camera was serviced? Is the shutter accurate? Does it hang on any speeds or bulb? Does bulb fire as 1/25 or 1/30 second?
I as these things because you are trying to fix the rangefinder of this camera and posting to a 3 year old thread hoping that you'll get the video and all the help you need, when the camera needs to be sent in to a real tech who knows these cameras. Good luck and I hope you don't brick it.
Phil Forrest
The camera was just serviced.
Radost
Established
Do you know when the last time your camera was serviced? Is the shutter accurate? Does it hang on any speeds or bulb? Does bulb fire as 1/25 or 1/30 second?
I as these things because you are trying to fix the rangefinder of this camera and posting to a 3 year old thread hoping that you'll get the video and all the help you need, when the camera needs to be sent in to a real tech who knows these cameras. Good luck and I hope you don't brick it.
Phil Forrest
The move from now on is to learn how to service your own cameras. Very soon nobody will be able to do it.
I have a few cameras that i like and can hopefully be shooting next 40 years.
Phil_F_NM
Camera hacker
If the camera was just serviced, why is the RF out of alignment?
Phil Forrest
Phil Forrest
Moto-Uno
Moto-Uno
Well I sometimes think that just because it went in for service ,that everything was attended to . You bring your car in for an oil change , don't be surprised if they didn't correct the sticking rear passenger electric window switch . Peter
. Peter
Share:
-
This site uses cookies to help personalise content, tailor your experience and to keep you logged in if you register.
By continuing to use this site, you are consenting to our use of cookies.