
I'm surprised by how little information is available on taking this lens apart. I am doing a "hacking Project", and have been supplied a Summarit-M for the experiment. I need to remove the Optics Module from the Focus Mount. It seems like it should "just unscrew", but I'm not willing to force it as there might be a hidden trick. Just removing the three set screws below the aperture ring allow the whole module to rotate, allowing indexing of the F-Stop ring.
The front group DID unscrew, and at least I cleaned the heavy haze out of it.
I would appreciate some help and Tips on this-
Thanks,
Brian
The front group DID unscrew, and at least I cleaned the heavy haze out of it.
I would appreciate some help and Tips on this-
Thanks,
Brian
Tom A
RFF Sponsor
Brian, I have never ventured to take a Summarit apart! If at all possible, I tend to leave lenses to people like you and others who know how.
I will check around for information and if I can find it - pass it on to you.
I have a friend locally who does things like that. Also check with "Vic" on the Nikon site. He takes things like Nikkor 50f1.1's apart!
I will check around for information and if I can find it - pass it on to you.
I have a friend locally who does things like that. Also check with "Vic" on the Nikon site. He takes things like Nikkor 50f1.1's apart!
Last edited:
MikeL
Go Fish
Hi Brian,
I don't know if you saw this, but I left you a post in this thread: clean a summilux
I inserted a pin in a hole covered by a side screw until it engaged. Then I could twist them apart.
Let me know if you have any trouble,
Mike
I don't know if you saw this, but I left you a post in this thread: clean a summilux
I inserted a pin in a hole covered by a side screw until it engaged. Then I could twist them apart.
Let me know if you have any trouble,
Mike
Justin- Thankyou for Summilux info!
Mike- the notes of the differences with the Summarit will be much appreciated.
I've ordered a book that is supposed to cover the Summarit.
Tom- appreciate the help.
I'll follow-up with the results. Mike points out that the Summarit is different from the Summilux, the optics head needs an extra trick to unscrew.
Last edited:
MikeL
Go Fish
Hi Brain,
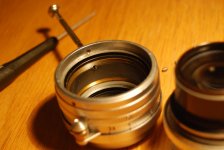
After removing the three ring screws you'll be able to rotate the optics mount freely. Then, insert a pin in the hole and rotate the optics mount until the pin enters the hole in the focus mount ring. In the second photo you can see the whole in the focus mount ring that you'll need to engage.


After removing the three ring screws you'll be able to rotate the optics mount freely. Then, insert a pin in the hole and rotate the optics mount until the pin enters the hole in the focus mount ring. In the second photo you can see the whole in the focus mount ring that you'll need to engage.
Attachments

That was going to by my 419th guess as to how to do it.
Right after breaking out the LASER tip for the Dremel....
Thankyou!
Right after breaking out the LASER tip for the Dremel....
Thankyou!
Ricko of Fla
Established
when you are finished, you need to sent the lens to a pro and have redone.
MikeL
Go Fish
when you are finished, you need to sent the lens to a pro and have redone.
Ricko, Brian is a pro.
But thanks for the helpful post. Nice work.
Well Ricko, this one did quite well after I finished with it.
It did not work out for a conversion for a Carl Zeiss Opton Sonnar. It can be used for a pre-war Sonnar conversion. Now a Pro machine shop might have been able to bore out the parts of the barrel that got in the way. I did not go that far.
As it was, I opened up the glass, cleaned out the haze, tested it, and sent it to its owner overseas.
I'm not a Pro camera repairman. I'm a Pro FORTRAN programmer. But I did have several optical engineers that worked for me.
This Summarit after cleaning the haze out of the surfaces on each side of the Aperture mechanism.


Not bad for a $200 Leitz lens. The front element had a lot of cleaning marks. But the internal haze was the real killer.
It did not work out for a conversion for a Carl Zeiss Opton Sonnar. It can be used for a pre-war Sonnar conversion. Now a Pro machine shop might have been able to bore out the parts of the barrel that got in the way. I did not go that far.
As it was, I opened up the glass, cleaned out the haze, tested it, and sent it to its owner overseas.
I'm not a Pro camera repairman. I'm a Pro FORTRAN programmer. But I did have several optical engineers that worked for me.
This Summarit after cleaning the haze out of the surfaces on each side of the Aperture mechanism.
Not bad for a $200 Leitz lens. The front element had a lot of cleaning marks. But the internal haze was the real killer.
Last edited:
Vickko
Mentor
Wow, I'm amazed.
Wow, I'm amazed.
I would never have guessed.
Vick
Wow, I'm amazed.
I would never have guessed.
Vick
Hi Brain,
After removing the three ring screws you'll be able to rotate the optics mount freely. Then, insert a pin in the hole and rotate the optics mount until the pin enters the hole in the focus mount ring. In the second photo you can see the whole in the focus mount ring that you'll need to engage.
As a sidenote, not all pro repairshops can handle these old lenses and you need to find someone that can work on the "old stuff".
I had a Wartime CZJ SOnnar sent to me AFTER it had been worked on by a professional shop. You think they would have tightened up the retaining rings on the optics before reassembling it.
http://ziforums.com/showthread.php?t=120
The other great thing about being an amateur repairman- making offers on stuff that people send you AFTER fixing it and providing test results.

The lens worked better after undoing the previous repair. That took longer than just repairing it.
And I get to try the conversion again. I have a $20 Parts Summarit heading my way.
I had a Wartime CZJ SOnnar sent to me AFTER it had been worked on by a professional shop. You think they would have tightened up the retaining rings on the optics before reassembling it.
http://ziforums.com/showthread.php?t=120
The other great thing about being an amateur repairman- making offers on stuff that people send you AFTER fixing it and providing test results.
The lens worked better after undoing the previous repair. That took longer than just repairing it.
And I get to try the conversion again. I have a $20 Parts Summarit heading my way.
Indeed. Many of the cameras I paint have had untold numbers of unqualified repair people tear them up inside (and sometimes outside.) And some of these people are pros... ")
Brian, the Summarit-M that is en route, you'll find easy to take apart.
johannielscom
Snorting silver salts
Brian, OT:
did you post a remark on some other thread last week, saying a 90mm collapsible Elmar was easy to clean yourself, since the lens is a boasted 50mm optical design?
I received a 90mm collapsible with some haze on the front element and like to clean it myself if it turns out it can be done easily. Any tips on how to proceed are greatly appreciated!
I'm building up a collection of 50mm Focus Mounts, lenses with Bad Glass.
The Nikkor 5cm F2 focus mount will work well with a CZJ Sonnar 5cm F2, wartime, pre-war, and probably post-war. The Summarit Mount coming in will end up being an M-Mount CZJ Sonnar.
The Nikkor 5cm F2 focus mount will work well with a CZJ Sonnar 5cm F2, wartime, pre-war, and probably post-war. The Summarit Mount coming in will end up being an M-Mount CZJ Sonnar.
Collapsible 9cm Elmar: I did not photograph this procedure, but it only took a few minutes.
1) Remove the Name Ring using a rubber grommet, like that used to pass wiring and cables from a project box. Check the electrical section of an appliance store.
2) Under the name ring is the retaining ring for the front element. It has two holes in it for a spanner. I used a stiff set of needle nosed pliers to undo it. Front element comes off, giving access to the surfaces on each side of the aperture. That's where the haze usually accumulates.
From an old post, made right after I did mine:
YES: I just did this. I used as rubber grommet to take off the name ring. The black rim surrounding the front element holds down the name ring. Once it is off, you will see the two holes for the retaining ring for the front element. I used the needle-nosed pliers seen on my Avatar(edit: changed my Avatar!). Spread apart, they fit the two holes on each side of the lens element. The front element is pressed into place on this metal ring. It comes out as an assembly. Once out, I used ammonia based eyeglass cleaner on it, and the inner surface behind the aperture blades.. No need to go deeper, that did the trick for my lens. Open the aperture blades up all the way when opening the lens.
Last edited:
johannielscom
Snorting silver salts
Collapsible 9cm Elmar: I did not photograph this procedure, but it only took a few minutes.
1) Remove the Name Ring using a rubber grommet, like that used to pass wiring and cables from a project box. Check the electrical section of an appliance store.
2) Under the name ring is the retaining ring for the front element. It has two holes in it for a spanner. I used a stiff set of needle nosed pliers to undo it. Front element comes off, giving access to the surfaces on each side of the aperture. That's where the haze usually accumulates.
Thanks Brian,
sounds real easy, piece of cake. I will proceed with this in the morning. Bedtime now.
irishimage
Member
Hello Brian,
You mentioned in a previous post you had a $20, Summarit lens coming your way..
Dont know if your just using the bayonet fitting and scraping the rest.. but if so i'd be very interested in buying the screws from you.
Its a long story but i have a pretty good ,glass wise that is,Summarit screwmount with some of the screws missing from it and although its in working order,aperture ring is adjustable with only one pin screw in place,would be nice to have the complete set to finish it off.
Noel
alexandre.mur
Newbie
Aperture ring...
Aperture ring...
Hi! I disassembled my summarit, including the aperture ring, because there was no "clicks".
Well, I basically removed the three screws ON the aperture ring. Two of them are quite long, and I can't manage to get them back in! :bang: They go on partially, but when I try to screw them, it blocks, even if I perfectly align the arrow with the maximal aperture (diaphragm is fully opened).
The third screw I removed has a small bearing ball inside. Isn't there an other part meant to be there so that it clicks? If yes, how is it shaped?
Thanks a lot in advance for any reply.
raid
Dad Photographer
Having a Sumamrit lens shell would be awesome. The J-3 looks wimpy when compared with a Summarit.
Share:
-
This site uses cookies to help personalise content, tailor your experience and to keep you logged in if you register.
By continuing to use this site, you are consenting to our use of cookies.