Räuber
Established
I've got a new Sonnar and it is not working. It is an Oberkochen Carl Zeiss Sonnar 50mm f/1,5 in LTM mount. It is one of those strange adapted ones that look like it could be done by Zeiss Oberkochen.
The issue with mine is that the focusing part is not working. The lens looks perfectly fine with lean glass and working aperture. The LTM part however turns in cycles without extending or shortening the lens or stopping at a hard stop. You can turn the focus infinitely but it is very tough to move.
I unscrewed the lens as far as it was possible without removing screws.
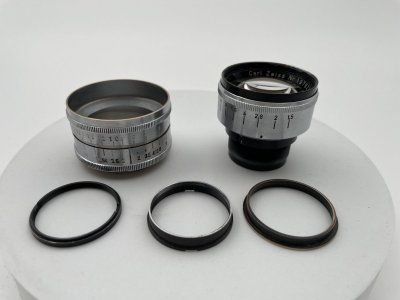
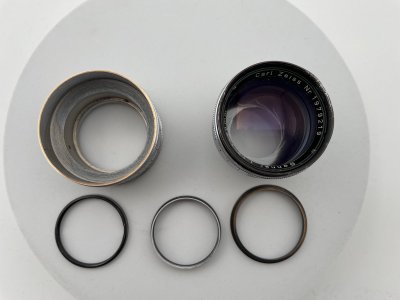
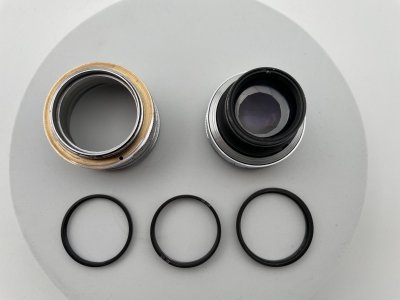
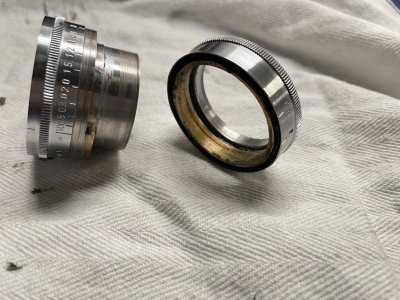
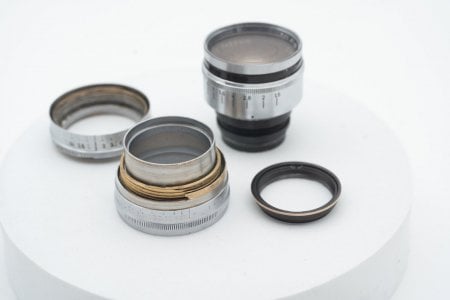
There are 3 rings (front row). 2 of those rings can be screwed to the lens block (left and middle ring). The third ring has no thread (right ring). The middle and right ring seem to form the end part of the lens and are used to screw the LTM part tight to the lens block from the back end of the lens. Therefore you can stick the middle ring into the right ring and screw them both to the lens lens block. The function of the left ring is puzzling me. It was screwed to the highest part to the lens block. In theory it could help to decide how far the lens block would enter into the LTM part but in practice it leads to that the aperture ring can't be used anymore because the lens will turn to easily because it slides on the ring. Maybe some shims or other rings are missing here.
I screwed the ring to the lens block so that you can see what the supposed order could be.
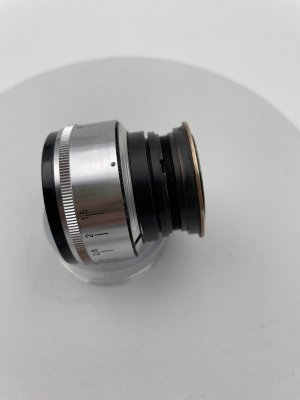
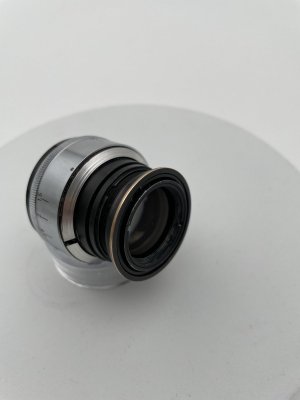
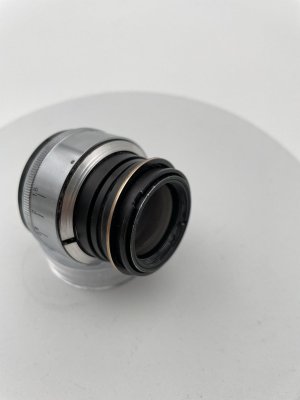
Since the LTM part needs some repair I looked for how to take it apart. Well there is not much to see. There is a tiny hole you can see when looking from the back. And there is one small screw inside the tube... I have no idea how to unscrew this and screw it back without getting nuts.
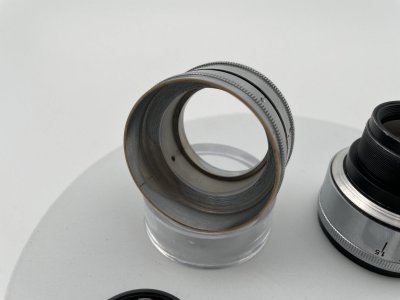
Any idea how to get this lens back to a working state?
The issue with mine is that the focusing part is not working. The lens looks perfectly fine with lean glass and working aperture. The LTM part however turns in cycles without extending or shortening the lens or stopping at a hard stop. You can turn the focus infinitely but it is very tough to move.
I unscrewed the lens as far as it was possible without removing screws.


There are 3 rings (front row). 2 of those rings can be screwed to the lens block (left and middle ring). The third ring has no thread (right ring). The middle and right ring seem to form the end part of the lens and are used to screw the LTM part tight to the lens block from the back end of the lens. Therefore you can stick the middle ring into the right ring and screw them both to the lens lens block. The function of the left ring is puzzling me. It was screwed to the highest part to the lens block. In theory it could help to decide how far the lens block would enter into the LTM part but in practice it leads to that the aperture ring can't be used anymore because the lens will turn to easily because it slides on the ring. Maybe some shims or other rings are missing here.
I screwed the ring to the lens block so that you can see what the supposed order could be.


Since the LTM part needs some repair I looked for how to take it apart. Well there is not much to see. There is a tiny hole you can see when looking from the back. And there is one small screw inside the tube... I have no idea how to unscrew this and screw it back without getting nuts.

Any idea how to get this lens back to a working state?
Last edited:
The ring that you screwed all the way to the aperture ring- I call the "variable Standoff ring", which controls the distance to the image plane when the barrel is in the standard Contax mount. The retaining ring screws in, and the variable stand-off ring is used for position. It usually would not be up against the aperture mechanism. The brass ring- a larger diameter, maybe to hold position in the LTM mount? I would try using the "Variable Stand-off Ring" to control distance, the brass ring is like a "washer" and the barrel will be held in place once the retaining ring is in. The LTM mount looks different from all I've seen, a real custom job.
Hard to tell from just pictures- a real jigsaw puzzle, helps to have it in front of you to try fitting parts.
Hard to tell from just pictures- a real jigsaw puzzle, helps to have it in front of you to try fitting parts.
Räuber
Established
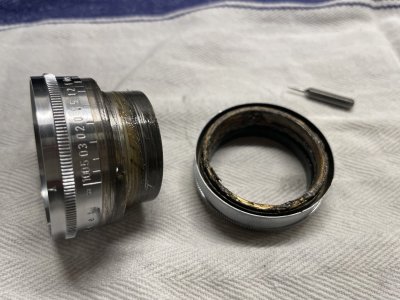
I don't know how but I got it apart.
The hole at the inside tube is only a hole, no screw. I don't know if the hole at the bottom leads to a tiny screw but I tried to use a size 1 screw driver and maybe I unscrewed something or not. In the end I had to use force and pulled the adapter apart under constantly rotating.
You can see the result. It looks a bit gross. What to do next? Cleanup everything and look how it is constructed? The lubricant probably needs replacement.
Cleaned it up a little bit. You can see the hole of the inner tube on the left part. At the right part I found something surprising under the lubricant. It seems like both parts were glued together. The inner tube of the left part was glued to the brass ring of the lower part. I could only bring it apart because the glue stopped working. Or is it something else then glue?
Last edited:
I've seen old grease that hardens as thick as glue- days in acetone or alcohol to get apart.
Is the helical on the right? Does it extend as it is focused? If so- maybe the part was glued in.
Is the helical on the right? Does it extend as it is focused? If so- maybe the part was glued in.
Räuber
Established
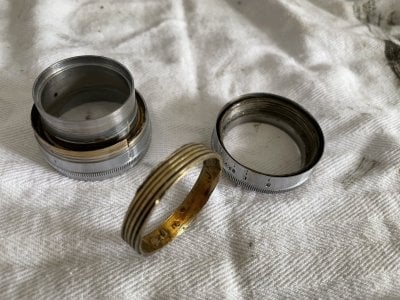
Tried it again with pure force and got it apart. The inner brass ring of the helical was stuck and did not move. I had to kinda break it out of the thread. Cleaned everything up a little bit and here is the result.
It looks to me that the upper part was indeed glued to the brass helical ring. The thing with this ring is it gets stuck pretty easy. Might have happened before and then someone broke the glue with pure force. After this the jammed helical did not focus at all and the lens only turned cycles with a lot of force.
Looks nice and simple but I fear this design is not very good.
It might look like the typical Contax mount thread but when I tried to slide the ring into a disassembled adapter made from a Kiev camera the ring was to big (barely) and screwing the inner tube of the adapter into this one here showed that the Kiev thread is indeed to narrow.
Any ideas how to fix this adapter without jamming it again? I have no idea how the helical should work with a fix stop though.
dexdog
Mentor
Rauber, you are more adventurous than I am! Not only is the design probably not good, the machining of the parts looks crude. Best of luck getting it to work, I am enjoying seeing how this lens was hacked together.
Last edited:
Räuber
Established
An update on this lens.
I have cleaned the inner thread now. All of the hardened glue is gone. Time to work on the next step to get everything together.
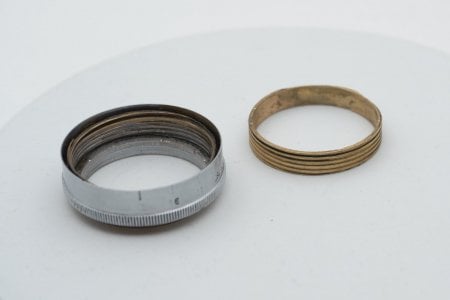
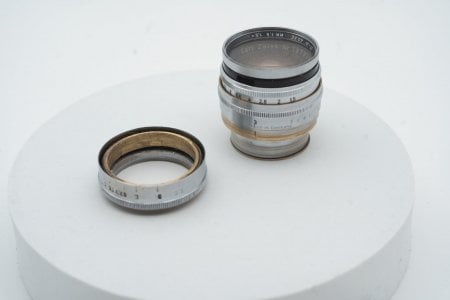
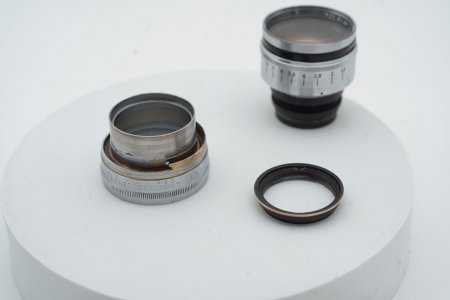
As you see the cleaned brass ring can be screwed into the rear part. The top part can be assembled with the 2 small rear rings.
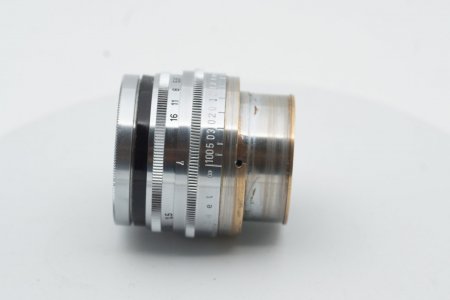
At this angle you can see the strange hole that gives me headache. It looks like a hole for a screw. But there was no screw. I can not see a purpose for a screw too. But there is definitely a purpose to this screw hole. You can see a marking in line with this hole in the inside tube.
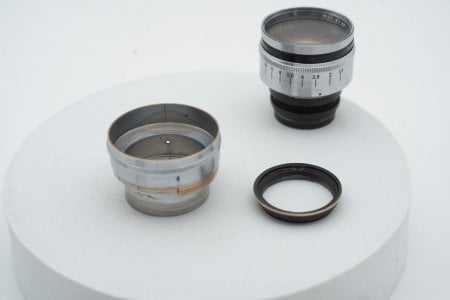
When we talk about markings. At the the bottleneck of the rear end there are 6 engraved horizontal lines. They seem to be a trace of the toolings used. They remind me of the 6 slot spanner used by the Sonnar 5,8cm f/1,5 makers. Coincidence?
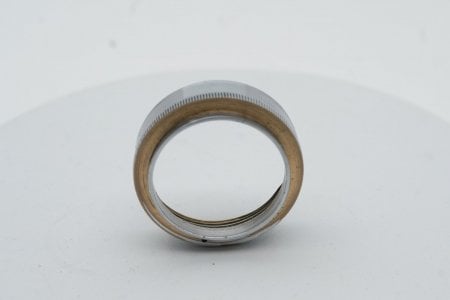
Here are all the parts again.
It is obvious for me that I'm not the first person that tried to take apart this lens. I think the missing screws might be the result of this. There are several signs of scratches on the outside and inside that might be coming from a wrench or other tools to try to get it apart. Maybe even the glued ring is only a solution from someone that got it apart in the past and tried to get it together again...
It looks to me that the brass ring needs to be glued to the top part as shown in the last image. Then you can screw it to the rear part of the lens.
There are 2 caveats. This thread ring does not fit the top part very tight. This thread ring does not fit the rear thread very tight. In botI h cases this thread ring is bad. It will not screw onto the rear thread smoothly. There is a lot of play and all the heavy dismantling have taken its toll to the thread. I fear it will get stuck sometimes in the future again.
I already checked this but my Contax RF adapter made from a Kiev camera does not fit this thread. It will not screw into the thread of this lens. My Kiev adapter has a better tolerance and screws way smoother than this ring. All in all this brass ring feels like a bad engineered and fabricated solution. I had to file down the edges so I do not cut my fingers all the time.
Do I have overlooked something? How can I attach this ring safely to the top part of the lens in a way that it will hold the next decades? Any suggestions? Probably it needs to get glued again onto the lens. What can I do to improve the handling? I think I need to add some lubricant.
Every help is welcome. 😄
I have cleaned the inner thread now. All of the hardened glue is gone. Time to work on the next step to get everything together.


As you see the cleaned brass ring can be screwed into the rear part. The top part can be assembled with the 2 small rear rings.


At this angle you can see the strange hole that gives me headache. It looks like a hole for a screw. But there was no screw. I can not see a purpose for a screw too. But there is definitely a purpose to this screw hole. You can see a marking in line with this hole in the inside tube.

When we talk about markings. At the the bottleneck of the rear end there are 6 engraved horizontal lines. They seem to be a trace of the toolings used. They remind me of the 6 slot spanner used by the Sonnar 5,8cm f/1,5 makers. Coincidence?

Here are all the parts again.

It is obvious for me that I'm not the first person that tried to take apart this lens. I think the missing screws might be the result of this. There are several signs of scratches on the outside and inside that might be coming from a wrench or other tools to try to get it apart. Maybe even the glued ring is only a solution from someone that got it apart in the past and tried to get it together again...
It looks to me that the brass ring needs to be glued to the top part as shown in the last image. Then you can screw it to the rear part of the lens.
There are 2 caveats. This thread ring does not fit the top part very tight. This thread ring does not fit the rear thread very tight. In botI h cases this thread ring is bad. It will not screw onto the rear thread smoothly. There is a lot of play and all the heavy dismantling have taken its toll to the thread. I fear it will get stuck sometimes in the future again.
I already checked this but my Contax RF adapter made from a Kiev camera does not fit this thread. It will not screw into the thread of this lens. My Kiev adapter has a better tolerance and screws way smoother than this ring. All in all this brass ring feels like a bad engineered and fabricated solution. I had to file down the edges so I do not cut my fingers all the time.
Do I have overlooked something? How can I attach this ring safely to the top part of the lens in a way that it will hold the next decades? Any suggestions? Probably it needs to get glued again onto the lens. What can I do to improve the handling? I think I need to add some lubricant.
Every help is welcome. 😄
Last edited:
Share:

