Zuzu
Member
Hi!
I'm just new here, so bear with me please.
I've started scanning my 35mm negatives recently and I've noticed the bluish overcast. I've followed several methods i.e inverting and applying levels/curves to adjust the RGB channels.
I'm still not totally convinced. I feel like I'm missing something. Then I've stumbled upon an article about the orange mask removal, Burton's technique:
https://www.dpreview.com/forums/post/499854
I've tried it several times and followed each step, but still haven't reached the desired outcome. Does anyone know how to tackle this problem efficiently? I'd appreciate it a lot if someone could help me out.
Many thanks!
Mackinaw
Think Different
What kind of software are you using? Photoshop? Lightroom?
Jim B.
Jim B.
charjohncarter
Mentor
I don't know what scanner you use but this is for the Epson scanners. Think most other scanning hardware will have the same type of interface. This write up is from our member Swift1 (Colton Allen). With this the Orange Mask is removed:
http://www.coltonallen.com/getting-the-most-from-color-negative-film-with-your-epson-flatbed/
I do mostly exactly what Colton says, but I do have a few tweaks of my own.
Thanks Colton
http://www.coltonallen.com/getting-the-most-from-color-negative-film-with-your-epson-flatbed/
I do mostly exactly what Colton says, but I do have a few tweaks of my own.
Thanks Colton
Tim Gray
Well-known
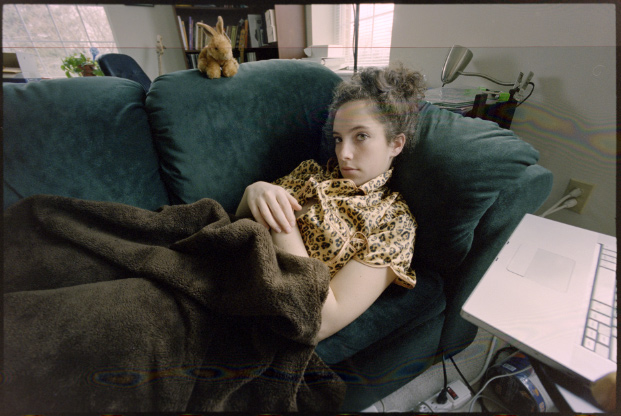
Ok this is going to be quick and dirty. There are a lot of subtle adjustments that can be made. However, after I read through a lot about inverting negatives, and things like ColorPerfect, etc., I convinced myself that short and simple is better.
I like to do these things as extra layers. Note, that if you have sprocket holes in the scan (or image that is not part of the negative) it can mess up the auto adjustments. You can still get there by manually moving sliders though. I do this in Photoshop.
I apologize for the crummy scan below, but it was something I just took experimenting.


I like to do these things as extra layers. Note, that if you have sprocket holes in the scan (or image that is not part of the negative) it can mess up the auto adjustments. You can still get there by manually moving sliders though. I do this in Photoshop.
- Invert the negative
- Apply a curves layer. Select the 'auto' button in the top right corner while holding down Alt/Option. In the dialog, select 'Enhance per channel contrast' and 'Snap neutral midtowns'. That is it. If the color isn't close, you need to go into the individual R,G,B channels and move the endpoints to make the orange mask black.
- In the same adjustment layer, or a new curves layer, select the gray eye dropper and fine tune the color balance by clicking on something neutral. You can also accomplish this by moving the midpoints of the R,G, and B curves left or right in the curve display.
- In the same or new adjustment layer, go to the composite RGB curve and make some adjustments to give you the contrast you want. This can be done with other tools as well.
I apologize for the crummy scan below, but it was something I just took experimenting.
ColSebastianMoran
( IRL Richard Karash )
Tim, that's a pretty good conversion. Looks like it was from a camera-scan.
OP, are you doing a camera-scan? If so...
I recently did a lot of experimentation and we had a good thread. Take a look at this thread starting with post #62.
I believe the easiest way to get good color (say, as good as the mini lab used to deliver) is with ColorPerfect:
- Shoot Raw
- Run the Raw thru MakeTiff
- Load result into Photoshop; it will look stupidly dark
- Run the ColorPerfect filter (in ColorNeg) mode
If you are running a real scanner, then I suggest using scanner software; keep adjusting, it will do the job. I use VueScan.
ColSebastianMoran
( IRL Richard Karash )
OP, In my investigations, I worried about the complexity of the orange mask and the need for Burton's approach. FWIW, I have not found value in going that way.
Zuzu
Member
What kind of software are you using? Photoshop? Lightroom?
Jim B.
Hi Mackinaw, I'm using photoshop cs7. As for the scanner, I use epson v370. At first, I let the scanner do the scanning and the processing, but seeing the ****ty job it did with the colorshift (which my girlfriend noticed and pointed out several times) I decided to just let it scan the film as positive, invert it in photoshop and go about the levels/curves levels.
I've pondered on this subject for a couple of days and read this particular topic:
https://www.filmshooting.com/scripts/forum/viewtopic.php?f=1&t=24780&hilit=orange+mask+removal
Is it meaningful to convert it to cmy and continue with that approach?Did anyone ever try that?
I've also read about the colorperfect, but the price is a bit too much.
Highway 61
Revisited
15 years old but still working tutorial :
http://www.computer-darkroom.com/ps_tutorials/tutorial_6_1.htm
Quite the same logic as what Tim Gray explained - without the Newton rings") .
.
The two keys are : 1/always scan as TIFF 16bits per color channel with no compression whatsoever at the real maximum resolution of the scanner to benefit from the most possible headroom 2/have lots of time, care and patience to finely tune and adjust the file created by the scanner in Photoshop (CS2 or newer).
Here is what I get with only inverting the negative above image by Tim Gray and then separately adjusting the R,G,B levels, according to that good old tutorial by Ian Lyons :
A boost of the global RGB curve plus some fine tuning of each color family (to decide whether some cyan should be removed from the blues, some magenta from the reds etc) plus a proper saturation adjust would make the job complete.
http://www.computer-darkroom.com/ps_tutorials/tutorial_6_1.htm
Quite the same logic as what Tim Gray explained - without the Newton rings
.The two keys are : 1/always scan as TIFF 16bits per color channel with no compression whatsoever at the real maximum resolution of the scanner to benefit from the most possible headroom 2/have lots of time, care and patience to finely tune and adjust the file created by the scanner in Photoshop (CS2 or newer).
Here is what I get with only inverting the negative above image by Tim Gray and then separately adjusting the R,G,B levels, according to that good old tutorial by Ian Lyons :
A boost of the global RGB curve plus some fine tuning of each color family (to decide whether some cyan should be removed from the blues, some magenta from the reds etc) plus a proper saturation adjust would make the job complete.
willie_901
Mentor
I use a VueScan raw file scanned at 48 bits[1]. I make a VueScan Preview to adjust only skew and crop. I save the result as a VueScan raw DNG file[2]. This is a flat (linear) TIFF file. No other VueScan rendering options are used. In particular, WB is set to manual.
In PS I invert the rendering. Next, I set the histogram display to the log scale option. Then I adjust the R,G and B brightness sliders such that the edges for each channel meets at the approximately the same points at both edges of the histogram. Then I optimize WB rendering in LR.
Occasionally I use Nik Color Efex Pro 4 for the final WB optimization.
This method assumes WB optimization depends on collecting highly informative data (48 bit scans, minimum rendering modifications). The files are large.
I have no idea if the PS WB optimization using the histogram method would work for JPEG scans or scans saved with VueScan brightness, contrast or tone curves adjustments.
When the scene contains light from two different sources (e.g. tungsten and daylight), no single set WB parameters can work. In these cases, you have to use selective WB corrections for different regions in the image. I start with WB parameters that will minimize the difficulty of selective WB region renderings. If the majority of the image is lit by daylight, I start with those regions optimized.
[1] VueScan raw really isn't a raw file. It is a rendered flat TIFF file. There are minimal, if any, rendering modifications applied in VueScan to the saved TIFF file.
[2] VueScan raw output does not apply grain or IR corrections to the TIFF file.
ColSebastianMoran
( IRL Richard Karash )
Zuzu, given you have the Epson and VueScan, I suggest keep tinkering with VueScan. I believe this will be a more reliable way to get reasonable color automatically. Then make your final adjustments.
If you must go out of VueScan, Willie's comments match my experience: 48 bit scan, save the "VueScan raw DNG file." Note that this will look stupidly dark when you load it in Photoshop.
Once in PS, the inversion has to be non-linear to get the right tonality. You can do this with a Curve adjustment layer, but I think the best way is the $65 ColorPerfect filter.
One more suggestion: refine your technique on an image with flesh tones and saturated bright colors.
Highway 61
Revisited
That $65 software won't do anything which an human can't do while tweaking a 48bits RGB TIFF file with the good image software. Time, care and patience, plus efforts to understand how a digital image file works and how you can modify it without destroying all the data it contains, will be a better investment than just spending $65 on something you don't master.Once in PS, the inversion has to be non-linear to get the right tonality. You can do this with a Curve adjustment layer, but I think the best way is the $65 ColorPerfect filter.
If some money has to be spent, it has to be on a good calibrated screen.
The adjustments of the 48bits TIFF (or DNG) file must be done in Photoshop not Vuescan. Vuescan's algorithms will be too much destructive. Vuescan really is an excellent scanner software in that it will drive pretty every scanner available out there, and allow the operator to create a rich file containing pretty all the information captured off the negative. But from that point onwards : Photoshop.
ColSebastianMoran
( IRL Richard Karash )
That $65 software won't do anything which an human can't do while tweaking a 48bits RGB TIFF file with the good image software. ... snip ...
Agree with your first statement, but that can require a lot of human tweaking.
In my experiments, the Photoshop "Invert" operation just isn't right, it requires a lot of subsequent manual correction. A non-linear curve makes the job much easier. And, the math is confirming of this.
BTW: I have no stake in any of these products, I'm just a user.
Highway 61
Revisited
Of course. This is why the R,G,B levels and curves should be adjusted separately once the "Invert" has been done. With a 48bits TIFF file it will produce the very same results than a non-linear negative to positive inversion, and the file won't be deteriorated. Look (above) at what I got from Tim's file (not finished yet).In my experiments, the Photoshop "Invert" operation just isn't right, it requires a lot of subsequent manual correction.
Too many people still want to get excellent scans (from BW negatives, color negatives, color slides) within three or four mouseclicks, through an automated process which will allow them to scan dozens of images at once thanks to some miracle software. This is just not possible. Scanning mainly requires time and patience.
Tim Gray
Well-known
Tim, that's a pretty good conversion. Looks like it was from a camera-scan.
Yeah, in the initial stages of setting up a camera-scanning station, as you know. I grabbed the first neg I had and didn't even take it out of the sleeve (not recommended).
The above works more or less the same from scanner-scanned negatives. When I do that, I tend to have Vuescan output a linear scan (gamma 1.0) and then convert the gamma in a PS action. I wrote some of this up on my website at one point, but it's not exactly concise...
http://125px.com/articles/photography/digital/invertingraw/
http://125px.com/articles/photography/digital/colorneg/
It's slow, but if you really want to automate, you can use ImageMagick. A lot of my initial thinking was guided by negfix, an ImageMagick script. It works pretty well. Of course you can duplicate most of it in PS if you want.
charjohncarter
Mentor
There are many ways to skin a cat. Here is a new one for me. After a few attempts I was completely convinced that DSLR 'scans' are way better than flatbed for 35mm. That was discovered over 10 years ago. With this new interest in camera 'scans' I thought I'd try a new way.
RAW file from the camera
Open in my case PSE which opens first in a RAW converter.
In the converter drop the exposure to give the highlights some room.
Then drop the contrast to give the shadows some room.
It is still a negative, and open levels.
Adjust the white point and the black point on the Histogram.
Do the same with the red, green, blue.
Open in ColorPerfect using ColorNeg.
You can play here for final taste or try color correction in PSE.
This is a 100% crop.
 ColorPerfect by John Carter, on Flickr
RAW file from the camera
Open in my case PSE which opens first in a RAW converter.
In the converter drop the exposure to give the highlights some room.
Then drop the contrast to give the shadows some room.
It is still a negative, and open levels.
Adjust the white point and the black point on the Histogram.
Do the same with the red, green, blue.
Open in ColorPerfect using ColorNeg.
You can play here for final taste or try color correction in PSE.
This is a 100% crop.
ColorPerfect by John Carter, on FlickrArbitrarium
Well-known
- Invert the negative
- Apply a curves layer. Select the 'auto' button in the top right corner while holding down Alt/Option. In the dialog, select 'Enhance per channel contrast' and 'Snap neutral midtowns'. That is it. If the color isn't close, you need to go into the individual R,G,B channels and move the endpoints to make the orange mask black.
- In the same adjustment layer, or a new curves layer, select the gray eye dropper and fine tune the color balance by clicking on something neutral. You can also accomplish this by moving the midpoints of the R,G, and B curves left or right in the curve display.
- In the same or new adjustment layer, go to the composite RGB curve and make some adjustments to give you the contrast you want. This can be done with other tools as well.
This is brilliant! I've just started scanning my own negs too and am struggling a bit with the colour correcting but this method seems to work almost perfectly and with zero effort. I'll try it with a few strips tonight to confirm it works for night shots and double exposures etc.
Thanks!
Zuzu
Member
Thank you all very much for your efforts! It's a relief to know that this forum is filled useful information.
Although I was wondering if any of you ever encountered this topic and tried it? Can anyone else take a shot at it?
The text below is from this website:
https://www.filmshooting.com/scripts/forum/viewtopic.php?t=24780
" I had this in an unrelated thread, so thought I'd put it here in it's own new thread.
It's for anyone who has tried scanning colour negative themselves on their own DIY scanner, only to find it seemingly impossible to get a good colour result out of the scan. The reason it's so difficult is that the orange mask in the negative is not a flat signal. It actually contains an image (in fact two images) due to the way masks and dyes are coupled. These images need to be removed. So it requires a little more than just patiently moving colour balance sliders around all day. However it's relatively simple to implement in any NLE, once you get your head around it.
THEORY
A colour negative consist of 5 layers:
1. Blue Sensitive Layer (becomes Yellow Dye)
2. Yellow Mask (stops blue light diving deeper into the emulsion, but lets red and green light pass deeper)
3. Green Sensitive Layer (becomes Magenta Dye)
4. Magenta Mask (stops green light descending deeper into the emulsion, and lets red light pass deeper (and would also let blue light pass but there is no more blue light at this stage)
5. Red Sensitive Layer (becomes Cyan Dye)
In addition to this, each masking layer (Yellow Mask and Magenta Mask) is coupled to the layer directly below it: so the Yellow Mask is coupled to the Magenta Dye layer below it, and the Magenta Mask is coupled to the Cyan Dye layer below it. The result (during film development) is that the Yellow Mask acquires an inverse image of the Magenta Dye layer, and the Magenta Mask acquires an inverse image of the Cyan Dye layer. Both of these images need to be removed from the digital scan. But how? Well there is no Cyan Mask in the film which means the Cyan channel of the film is unpolluted. Since the Magenta Mask in the film is an inverted image of the Cyan layer, one can recreate the Magenta Mask from a copy of the Cyan layer, and then subtract that from the Magenta channel! The result being an unpolluted Magenta channel, ie. without the Magenta Mask. Repeat the same logic for the Yellow Mask and one has then removed the Yellow Mask, ending up with an unpolluted image. The rest is just fine tuning the image in the way you would otherwise fine tune an ordinary colour image.
PRACTICE
1. Digitise the negative with a blue filter such as an 80A.
The purpose of this is not colour correction. It's just to ensure the peaks in your RGB signal are closer together than they otherwise might be. It's for optimising the limited bandwidth of your capture device. A downside is that it will reduce your light source by about 2 stops, so you might want to skip this step.
2. Convert RGB capture to CMY (no K)
It's possible to work entirely in RGB space but it makes more sense (from an understanding point of view) to work in CMY space (the same space in which film works). You want to make three separate channels, each of which, on their own, are black and white. For example, in Adobe After Effects, to create a Cyan channel, you could use the Channel>Shift Channels effect on your source, setting: Take Red From: Red, Take Green From Red, Take Blue From Red. But why from Red? Well Cyan is the inverse of Red (Cyan = 1 - Red) so we start with red, however we won't do the invert here. We'll do the inversion later. In any case use the same logic to obtain a Magenta (from Green) and a Yellow (from Blue).
3. Copy Cyan channel into a new channel called Magenta Mask.
The Cyan channel is the only channel that contains a pure signal (uncontaminated by any mask) so we don't want to change this channel in any way. We want to leave it as is. What we are doing here is creating an image of what the Magenta Mask, in the film, would look like. We're effectively mimicking the way in which the Magenta Mask, in the film itself, is created.
4. Reduce levels on Magenta Mask to about 20%
This is to emulate the relative strength of the Magenta Mask with respect to the Magenta Dye layer, ie. it's about 20%.
5. Subtract Magenta Mask from the inverse of the original Magenta channel. Invert the result and call it Magenta Repaired.
Here is where we are correcting the Magenta channel. Without an image of the Magenta Mask, we wouldn't be able to correct the Magenta channel. We'd otherwise be fiddling with CC sliders all day long without getting any closer to a result. But here we have the magenta channel repaired. Magic.
6. Copy Magenta Repaired to a new channel called Yellow Mask. Reduce levels to about 20%
This is the same logic as Step 5 but instead of using the original Magenta channel to create an image of the Yellow Mask, we're using the repaired Magenta channel (this is in keeping with how the film develops. The Yellow Mask is coupled to the Magenta Dye image but not to the Magenta Mask)
7. Subtract Yellow Mask from the inverse of the Yellow Channel. Invert the result and call it Yellow Repaired.
We now have a repaired Yellow.
The following just recomposes our repaired CMY images back into a single RGB image.
8. Remove Green and Blue from the Cyan Channel, to make a new result called Red
9. Remove Red and Blue from the Magenta Repaired to make a new result called Green
10. Remove Red and Green from the Yellow Repaired to make a new result called Blue.
11. Combine Red Green and Blue with blend mode = Screen.
13. Invert the result of the above to obtain a positive image.
You now have an image in which the orange mask (yellow and magenta masks) have been removed. Feel free to dance around the room. From here on in it's just ordinary colour correction using your eyeballs and creativity.
If anyone needs any clarification, please ask.
Carl
ps. for the reverse process: digital out to print stock, the reverse process would be required - ie. ensuring your digital image has the orange mask put back in (plus some extra tweaking of the RGB channels to accommodate bias of print stocks)."
charjohncarter
Mentor
Thank you all very much for your efforts! It's a relief to know that this forum is filled useful information.
Although I was wondering if any of you ever encountered this topic and tried it? Can anyone else take a shot at it?
The text below is from this website:
https://www.filmshooting.com/scripts/forum/viewtopic.php?t=24780
" I had this in an unrelated thread, so thought I'd put it here in it's own new thread.
It's for anyone who has tried scanning colour negative themselves on their own DIY scanner, only to find it seemingly impossible to get a good colour result out of the scan. The reason it's so difficult is that the orange mask in the negative is not a flat signal. It actually contains an image (in fact two images) due to the way masks and dyes are coupled. These images need to be removed. So it requires a little more than just patiently moving colour balance sliders around all day. However it's relatively simple to implement in any NLE, once you get your head around it.
THEORY
A colour negative consist of 5 layers:
1. Blue Sensitive Layer (becomes Yellow Dye)
2. Yellow Mask (stops blue light diving deeper into the emulsion, but lets red and green light pass deeper)
3. Green Sensitive Layer (becomes Magenta Dye)
4. Magenta Mask (stops green light descending deeper into the emulsion, and lets red light pass deeper (and would also let blue light pass but there is no more blue light at this stage)
5. Red Sensitive Layer (becomes Cyan Dye)
In addition to this, each masking layer (Yellow Mask and Magenta Mask) is coupled to the layer directly below it: so the Yellow Mask is coupled to the Magenta Dye layer below it, and the Magenta Mask is coupled to the Cyan Dye layer below it. The result (during film development) is that the Yellow Mask acquires an inverse image of the Magenta Dye layer, and the Magenta Mask acquires an inverse image of the Cyan Dye layer. Both of these images need to be removed from the digital scan. But how? Well there is no Cyan Mask in the film which means the Cyan channel of the film is unpolluted. Since the Magenta Mask in the film is an inverted image of the Cyan layer, one can recreate the Magenta Mask from a copy of the Cyan layer, and then subtract that from the Magenta channel! The result being an unpolluted Magenta channel, ie. without the Magenta Mask. Repeat the same logic for the Yellow Mask and one has then removed the Yellow Mask, ending up with an unpolluted image. The rest is just fine tuning the image in the way you would otherwise fine tune an ordinary colour image.
PRACTICE
1. Digitise the negative with a blue filter such as an 80A.
The purpose of this is not colour correction. It's just to ensure the peaks in your RGB signal are closer together than they otherwise might be. It's for optimising the limited bandwidth of your capture device. A downside is that it will reduce your light source by about 2 stops, so you might want to skip this step.
2. Convert RGB capture to CMY (no K)
It's possible to work entirely in RGB space but it makes more sense (from an understanding point of view) to work in CMY space (the same space in which film works). You want to make three separate channels, each of which, on their own, are black and white. For example, in Adobe After Effects, to create a Cyan channel, you could use the Channel>Shift Channels effect on your source, setting: Take Red From: Red, Take Green From Red, Take Blue From Red. But why from Red? Well Cyan is the inverse of Red (Cyan = 1 - Red) so we start with red, however we won't do the invert here. We'll do the inversion later. In any case use the same logic to obtain a Magenta (from Green) and a Yellow (from Blue).
3. Copy Cyan channel into a new channel called Magenta Mask.
The Cyan channel is the only channel that contains a pure signal (uncontaminated by any mask) so we don't want to change this channel in any way. We want to leave it as is. What we are doing here is creating an image of what the Magenta Mask, in the film, would look like. We're effectively mimicking the way in which the Magenta Mask, in the film itself, is created.
4. Reduce levels on Magenta Mask to about 20%
This is to emulate the relative strength of the Magenta Mask with respect to the Magenta Dye layer, ie. it's about 20%.
5. Subtract Magenta Mask from the inverse of the original Magenta channel. Invert the result and call it Magenta Repaired.
Here is where we are correcting the Magenta channel. Without an image of the Magenta Mask, we wouldn't be able to correct the Magenta channel. We'd otherwise be fiddling with CC sliders all day long without getting any closer to a result. But here we have the magenta channel repaired. Magic.
6. Copy Magenta Repaired to a new channel called Yellow Mask. Reduce levels to about 20%
This is the same logic as Step 5 but instead of using the original Magenta channel to create an image of the Yellow Mask, we're using the repaired Magenta channel (this is in keeping with how the film develops. The Yellow Mask is coupled to the Magenta Dye image but not to the Magenta Mask)
7. Subtract Yellow Mask from the inverse of the Yellow Channel. Invert the result and call it Yellow Repaired.
We now have a repaired Yellow.
The following just recomposes our repaired CMY images back into a single RGB image.
8. Remove Green and Blue from the Cyan Channel, to make a new result called Red
9. Remove Red and Blue from the Magenta Repaired to make a new result called Green
10. Remove Red and Green from the Yellow Repaired to make a new result called Blue.
11. Combine Red Green and Blue with blend mode = Screen.
13. Invert the result of the above to obtain a positive image.
You now have an image in which the orange mask (yellow and magenta masks) have been removed. Feel free to dance around the room. From here on in it's just ordinary colour correction using your eyeballs and creativity.
If anyone needs any clarification, please ask.
Carl
ps. for the reverse process: digital out to print stock, the reverse process would be required - ie. ensuring your digital image has the orange mask put back in (plus some extra tweaking of the RGB channels to accommodate bias of print stocks)."
This seems simple enough.
Zuzu
Member
This seems simple enough.
Could you help me out with step 8 till 13? I don't understand it fully.
How should I apply this in PS?Thank you all very much for your efforts! It's a relief to know that this forum is filled useful information.
Although I was wondering if any of you ever encountered this topic and tried it? Can anyone else take a shot at it?
The text below is from this website:
https://www.filmshooting.com/scripts/forum/viewtopic.php?t=24780
The following just recomposes our repaired CMY images back into a single RGB image.
8. Remove Green and Blue from the Cyan Channel, to make a new result called Red
9. Remove Red and Blue from the Magenta Repaired to make a new result called Green
10. Remove Red and Green from the Yellow Repaired to make a new result called Blue.
11. Combine Red Green and Blue with blend mode = Screen.
13. Invert the result of the above to obtain a positive image.
"
charjohncarter
Mentor
Sorry, I was being facetious, I didn't understand a bit of it.
Share:
-
This site uses cookies to help personalise content, tailor your experience and to keep you logged in if you register.
By continuing to use this site, you are consenting to our use of cookies.