
shawn
Mentor
Starting a new version of a Sony RX0 multi-camera setup. This is my older version with USB power bank powered and the cameras shutters synced through the control ports.
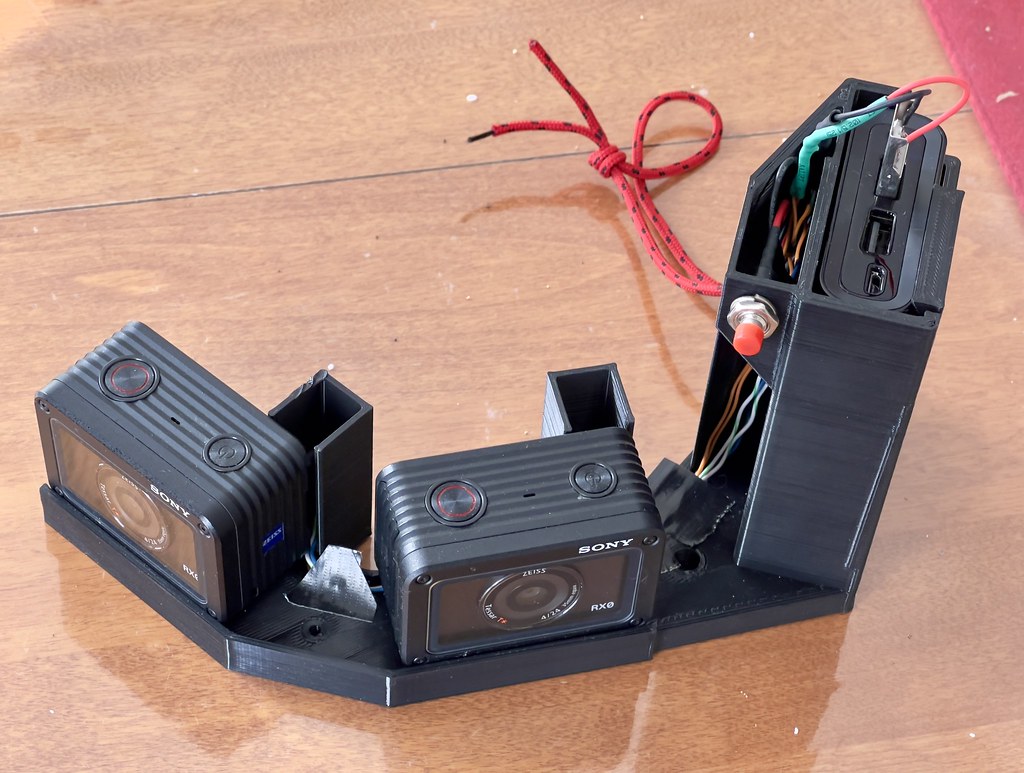
Keeping USB power bank, integrating the wiring more cleanly, a space for a breadboard for diode isolation between the synced controls of the cameras th shutter release, AF and power on/off.
Did some testing between bodies to work toward a good blend area between them.


On those there are 30 degrees between bodies and they are blending together easily.
Keeping USB power bank, integrating the wiring more cleanly, a space for a breadboard for diode isolation between the synced controls of the cameras th shutter release, AF and power on/off.
Did some testing between bodies to work toward a good blend area between them.
On those there are 30 degrees between bodies and they are blending together easily.
shawn
Mentor
(Cont due to 3 picture limit)
Realized it would be much better to make this camera have a base with the battery and all the control wiring and then have interchangeable mounting plates to go on top. That would let me change the angles between the cameras easily, or to try something like portrait - landscape - portrait orientation, or make a 3d/stereo top....etc...etc.
This is where I am so far with the base,,,,


and this will be the 3 camera mounting plate.

Will update as I keep working on this project.....
Realized it would be much better to make this camera have a base with the battery and all the control wiring and then have interchangeable mounting plates to go on top. That would let me change the angles between the cameras easily, or to try something like portrait - landscape - portrait orientation, or make a 3d/stereo top....etc...etc.
This is where I am so far with the base,,,,
and this will be the 3 camera mounting plate.
Will update as I keep working on this project.....
Archiver
Mentor
This is so, so cool. Awesome to see someone use the RX0 the way it was intended! I just use mine as a pocket camera, but you clearly have other ideas.
shawn
Mentor
Finished prints....


Still have to wire everything up. Might move the on/off switch from the bottom front position to be more toward the rear. Want to see if I have problems accidentally hitting it with my pinkie or not. Also realized I should have made recesses in the top plate to put in a pair of bubble levels. Next print will have them.
Still have to wire everything up. Might move the on/off switch from the bottom front position to be more toward the rear. Want to see if I have problems accidentally hitting it with my pinkie or not. Also realized I should have made recesses in the top plate to put in a pair of bubble levels. Next print will have them.
shawn
Mentor
Got the camera base wired. For the body on/off and shutter release I used diodes to isolate isolated each body from the others, otherwise it gets weird if one is off as the signal lines go low. Just used a small breadboard as I didn't feel like layout out a PCB. Pins on the plugs are tiny so I used 28 gauge and was very glad for my Metcal.
Too dark to take any shots now but everything is working. Bodies are all charging from the power bank, turning on/off and firing together. I also designed a portrait, landscape, portrait top plate but think I am going to make another all portrait layout with a larger angle between the cameras as I think I can go wider than I am now.
Too dark to take any shots now but everything is working. Bodies are all charging from the power bank, turning on/off and firing together. I also designed a portrait, landscape, portrait top plate but think I am going to make another all portrait layout with a larger angle between the cameras as I think I can go wider than I am now.
Attachments


Myrrys.eu
Established
This is amazing project. I love panoramas and have been wondering digital options other then cropping / panning shots. Something akin to horseman 6x17 in digital or there abouts 😅
shawn
Mentor
Thanks. The 2 camera landscape setup is a bit closer to 6x17 aspect ratio. The 3 camera rig is closer to 6x12 but of course can be cropped to a tighter ratio. Very different look compared to a 6x12 or 6x17 camera though. This is considerably wider without as much perspective distortion. I have a 6x17 with a 65mm and a 6x12 with 47mm and this setup is considerably wider than either of those. It is closer to a swing lens camera look.
One of the gotchas with multi-camera setups like this is if they aren't shooting level (front to back) you loose image height (uneven top to bottom) in the blend due to the outer cameras also being skewed relative to the front camera. The 3 camera portrait top plate is to work around that as I get much more image height in the capture so I may not need to tilt and if I do I still have excess height for the blend.
I want to play around with Landscape/Portrait/Landscape and Portrait/Landscape/Portrait plates too to see how that impacts blending. That is part of why I designed this to be modular with replaceable camera mounts. I'll also use that to add an ARCA tripod plate onto the bottom when desired.
Meanwhile I designed and printed a new 3 camera portrait layout last night. This one has 40 degree shifts between cameras and I added the bubble levels to it and put the filler panels between cameras back into the design since the remote on/off switch is working fine so I don't need to get at the cameras' on/off buttons.


Indoor tests have slight blend errors on some straight lines but I want to see what it does outdoors at more normal distances. Trying to find the right balance of getting as wide as I can without blending problems.
One of the gotchas with multi-camera setups like this is if they aren't shooting level (front to back) you loose image height (uneven top to bottom) in the blend due to the outer cameras also being skewed relative to the front camera. The 3 camera portrait top plate is to work around that as I get much more image height in the capture so I may not need to tilt and if I do I still have excess height for the blend.
I want to play around with Landscape/Portrait/Landscape and Portrait/Landscape/Portrait plates too to see how that impacts blending. That is part of why I designed this to be modular with replaceable camera mounts. I'll also use that to add an ARCA tripod plate onto the bottom when desired.
Meanwhile I designed and printed a new 3 camera portrait layout last night. This one has 40 degree shifts between cameras and I added the bubble levels to it and put the filler panels between cameras back into the design since the remote on/off switch is working fine so I don't need to get at the cameras' on/off buttons.
Indoor tests have slight blend errors on some straight lines but I want to see what it does outdoors at more normal distances. Trying to find the right balance of getting as wide as I can without blending problems.
shawn
Mentor
Couple from a test run today..


shawn
Mentor
Was also very curious how this compares to a Voigtlander 12mm shot full frame in terms of perspective distortion and width.
This is from the Sony blend:

and this is from the 12mm cropped to the roughly the same image height (at the center) on the S1R. These weren't on a tripod so there might be slight differences in camera position and tilt but I was standing in the same place. The Sony blend is considerably wider.

I did not try to match color between them. The S1R wins on color/DR but the difference in perspective is very interesting, to me anyway. The tress on the edges of the 12mm have perspective distortion and look much fatter than in the Sony blend. The image height captured on the sides is wildly different as well. I used cylindrical projection for the Sony blend.
This is uncropped from the S1R with the 12mm.

This is from the Sony blend:
and this is from the 12mm cropped to the roughly the same image height (at the center) on the S1R. These weren't on a tripod so there might be slight differences in camera position and tilt but I was standing in the same place. The Sony blend is considerably wider.
I did not try to match color between them. The S1R wins on color/DR but the difference in perspective is very interesting, to me anyway. The tress on the edges of the 12mm have perspective distortion and look much fatter than in the Sony blend. The image height captured on the sides is wildly different as well. I used cylindrical projection for the Sony blend.
This is uncropped from the S1R with the 12mm.
shawn
Mentor
Another comparison from Sony to 12mm


Again the S1R kills the Sonys on color/DR but the multi-cam perspective is considerably better IMO.
Again the S1R kills the Sonys on color/DR but the multi-cam perspective is considerably better IMO.
Freakscene
Obscure member
Hi @shawn what 12mm is it? Those are some crazy sun stars.Another comparison from Sony to 12mm
Again the S1R kills the Sonys on color/DR but the multi-cam perspective is considerably better IMO.
I really like the system you have built too.
Marty
shawn
Mentor
Voigtlander 12mm Ultra Wide Heliar II in M Mount. Think I was at f8.
shawn
Mentor
What I was hoping for with this setup was to get basically a digital version of a Panon Widelux/HorizonT camera. After some more test shots this morning I'm pretty sure I have that. The FOV is basically what you see ahead of you. On a couple of shots I have minor blend errors so I might see about redesigning the mount plate to get the cameras a little closer to each other to see if that fixes it. If not, I will reduce the angle between them slightly.


shawn
Mentor
Some more....


shawn
Mentor
So based on shooting today I did end up designing a new mount plate. This one has the rear of the cameras about 6mm closer to each other but kept the 40 degree angle. Will see if that gets rid of the small blend errors I was getting occasionally.
I also corrected two things I found when shooting today.
First, I added another level mounted vertically and recessed into the plate. That will be used when shooting vertically so I can be 'horizontal.'
Second, the RX0 screens don't have as bright a viewing area in portrait orientation, they were hard to see in direct sun. I didn't want a rigid mounted sunshade as it would block access to the camera controls and make it harder to get the memory card out. So I added magnetic mounting points to add a removable LCD sunshade. Still designing the shade itself but it will just magnetically pop on/off when needed.
Out with the old, in with the new.

]

I also corrected two things I found when shooting today.
First, I added another level mounted vertically and recessed into the plate. That will be used when shooting vertically so I can be 'horizontal.'
Second, the RX0 screens don't have as bright a viewing area in portrait orientation, they were hard to see in direct sun. I didn't want a rigid mounted sunshade as it would block access to the camera controls and make it harder to get the memory card out. So I added magnetic mounting points to add a removable LCD sunshade. Still designing the shade itself but it will just magnetically pop on/off when needed.
Out with the old, in with the new.
]
shawn
Mentor
When I frame I do it at eye level but typically shoot closer to waist level to be better able to level out the camera. As such I designed the sunscreen for max coverage.

It just pops into and out of place easily if I want to adjust something on the cameras or get at the memory cards.

And a trimmed version....

Upcoming adjustments....Waiting on a 90 degree USB cable to clean up that connection. Think I am going to relocated the power button and make the red button be the same as a half press activate (to wake up the cameras) with the green being the combined activate/fire shutter. Will need to add some more diodes to the breadboard for this. I ordered a 2 stage switch to better follow the functionality of the original trigger but I haven't received them yet. When I get those I'll redo the camera base and tweak the strap lug positions a little more too.
It just pops into and out of place easily if I want to adjust something on the cameras or get at the memory cards.
And a trimmed version....
Upcoming adjustments....Waiting on a 90 degree USB cable to clean up that connection. Think I am going to relocated the power button and make the red button be the same as a half press activate (to wake up the cameras) with the green being the combined activate/fire shutter. Will need to add some more diodes to the breadboard for this. I ordered a 2 stage switch to better follow the functionality of the original trigger but I haven't received them yet. When I get those I'll redo the camera base and tweak the strap lug positions a little more too.
shawn
Mentor
I did make the green button the same as a half press on the shutter release and the red is still a combined shutter release. You don't have to press both to shoot as the red has both the half and full press still wired to it. If the cameras have been on for awhile the don't always fire exactly at the same time when you press the red. The green button wakes them up and gets them ready to fire at the same instant. Yellow button is now the power button. I like its recessed position here as I can still turn it on/off one handed but it is less likely to be accidentally pressed by me or in a camera bag.

Camera fits well in a Think Tank Mirrorless Mover 25.

I have a spare power bank in there too if I need even more shooting time.
Camera fits well in a Think Tank Mirrorless Mover 25.
I have a spare power bank in there too if I need even more shooting time.
joe bosak
Well-known
Brilliant job, great to see this project - and that it fits into a camera bag too, very nice!What I was hoping for with this setup was to get basically a digital version of a Panon Widelux/HorizonT camera. After some more test shots this morning I'm pretty sure I have that. The FOV is basically what you see ahead of you.
shawn
Mentor
Thanks, I have been having way to much fun shooting and designing/building this.
Shot some fencing with it last night. This is sort of a torture test due to the fast motion, straight lines and close in shooting. Overall it did fairly well but the blends were a little more variable then I would like.
Some were fine in the 65x24 I cropped the photos to

Some were subtle such as this one:

And some where a bit more dramatic (and also hilarious since Sabre is a slashing weapong....)

So due to the variability I designed and am currently printing a new top mount with 35 degrees between cameras. Hypothetically this should give me about 124 degrees of horizontal view. 54 degrees for the center camera and then 35 additional degrees each for the left and right cameras.
Shot some fencing with it last night. This is sort of a torture test due to the fast motion, straight lines and close in shooting. Overall it did fairly well but the blends were a little more variable then I would like.
Some were fine in the 65x24 I cropped the photos to
Some were subtle such as this one:
And some where a bit more dramatic (and also hilarious since Sabre is a slashing weapong....)
So due to the variability I designed and am currently printing a new top mount with 35 degrees between cameras. Hypothetically this should give me about 124 degrees of horizontal view. 54 degrees for the center camera and then 35 additional degrees each for the left and right cameras.
Last edited:
shawn
Mentor
I shot 110ish pano images (330+ files). The 3 cameras clocks are synced to a second or two between them. Using Lightrooms Auto Stack by capture time (set to 3 seconds) it stacked most of the pano shots automatically. Once they are in stacks you can then batch merge the stacks easily so very little time on my part. The only time this didn't work was if I shot successive panoramas too quickly, the stacks would have extra images in them and the blends sometimes turned out interesting.

Share:
-
This site uses cookies to help personalise content, tailor your experience and to keep you logged in if you register.
By continuing to use this site, you are consenting to our use of cookies.