
DrTebi
Slide Lover
Can't wait to prove you wrongThe logic behind that question is that if I can see the grain structure clearly, there's no more detail to be had in the image than that.

I appreciate your efforts, and understand the concept you are presenting. But in order to really see whether there is more... you should go in closer. And, use a 35mm film, preferably something recent that is very fine grained, like Provia or Ektar.
From my own test shots of various films, it is just barely possible for a 36MP sensor to show the film grain of some films.
Also, consider that film grain is not consistent, unlike pixels.
Check out this 100% crop from an image taken on Provia 100F:

That picture was taken with the Pentax K-1 at 1:1. Only white balance and exposure were adjusted.
You can clearly see grain structure in the tower (greenish part), but look at the cables, or the lettering... when I zoom in, I see pixel structure... but no grain structure.
Yeah I know, sounds like I am desperately trying to make the case for "film is bazillion-million pixels in resolution". Well no... I just wanted to point out that my experience is a bit different than yours... and that your scan from an old BW negative was not quite enough to convince me that 24MP is enough for 35mm film.............
Kamph
Established
I agree with Dr. Tebi. Seeing the grain doesn't mean one can't extract more detail. In fact, scanning at a too low resolution will produce bigger grain than at higher resolutions - bigger grain that will obstruct fine detail. Look up on the concept of grain aliasing if you want to know more.
You could also think about it this way - most enlarger lenses in the dark room will allow you to focus on the grain, yet people are spending a lot of money on APO lenses to get that extra detail.
You could also think about it this way - most enlarger lenses in the dark room will allow you to focus on the grain, yet people are spending a lot of money on APO lenses to get that extra detail.
jzagaja
Well-known

Godfrey
somewhat colored
Can't wait to prove you wrong
I appreciate your efforts, and understand the concept you are presenting. But in order to really see whether there is more... you should go in closer. And, use a 35mm film, preferably something recent that is very fine grained, like Provia or Ektar.
From my own test shots of various films, it is just barely possible for a 36MP sensor to show the film grain of some films.
Also, consider that film grain is not consistent, unlike pixels.
Check out this 100% crop from an image taken on Provia 100F:
That picture was taken with the Pentax K-1 at 1:1. Only white balance and exposure were adjusted.
You can clearly see grain structure in the tower (greenish part), but look at the cables, or the lettering... when I zoom in, I see pixel structure... but no grain structure.
Yeah I know, sounds like I am desperately trying to make the case for "film is bazillion-million pixels in resolution". Well no... I just wanted to point out that my experience is a bit different than yours... and that your scan from an old BW negative was not quite enough to convince me that 24MP is enough for 35mm film.............
The structure of the cable lines is the same as it is in the larger masses. There's no further detail within the cable lines. With color films using C22 or E4 process, you're seeing not so much grain structure (since the silver is leached out when dyes are injected) but dye blobs, which might be a finer grain. That's all.
A film image is comprised of the stochastic clumping of the silver grains or dye blobs suspended in the gelatin, based on the pattern of light which struck the film prior to processing. Once you can see the dye blobs clearly, there is no further detail, by definition; just stochastically random differences in density which are the 'grain structure'. You cannot have "sub-grain detail" in the image, although you might have levels of the grain that are invisible at lower magnification. None of the processes we're discussing here is capable of resolving the individual silver or dye particles at the molecular level. Nor would such be content significant image detail at any useful magnification of the image for viewing or printing.
So the question is "When does the level of detail in the image become insignificant to the content of the image?" Looking at the test pattern images, the only purpose for those images is to see when the light and dark bars are differentiable, so the higher magnifications of the grain clumps there have a purpose. Not so for any image of expressive content that I'm ever going to make...
I am not interested in analysis of the patterns of silver/dye clump grain. I'm interested in image content.
Aside from that, what joy is there in "proving me wrong"? If you have images of such significant detail that you can get more out of, and that detail is of importance to the intent of the image, then I'm happy you have found a way to reveal it.
There are no images of mine where such detail is of any significance to my intent for the images, of that I'm quite certain. I see no point to such high resolution film captures at all, and I've almost never used films with the acutance required to return such resolution. So what does it matter?
Godfrey
somewhat colored
I agree with Dr. Tebi. Seeing the grain doesn't mean one can't extract more detail. In fact, scanning at a too low resolution will produce bigger grain than at higher resolutions - bigger grain that will obstruct fine detail. Look up on the concept of grain aliasing if you want to know more.
You could also think about it this way - most enlarger lenses in the dark room will allow you to focus on the grain, yet people are spending a lot of money on APO lenses to get that extra detail.
I did the calculations of when grain aliasing, and other kinds of aliasing behavior that occurs in digital image capture, obscured image content at NASA/JPL in the 1980s. But thank you for your suggestion.
Many people spend money on APO lenses without understanding what APO stands for and why it is significant to an imaging system.
DrTebi
Slide Lover
But the question is, whether 24MP would have resolved those cable lines the same way... that crop is from a 36MP sensor.The structure of the cable lines is the same as it is in the larger masses. There's no further detail within the cable lines. With color films using C22 or E4 process, you're seeing not so much grain structure (since the silver is leached out when dyes are injected) but dye blobs, which might be a finer grain. That's all.
I completely understand. And that is what it should be about. But this discussion was not about image content from the beginning. I am interested in the theoretical limits of how much detail exists in film, so at this moment, it's just a about analysisA film image is comprised of the stochastic clumping of the silver grains or dye blobs suspended in the gelatin, based on the pattern of light which struck the film prior to processing. Once you can see the dye blobs clearly, there is no further detail, by definition; just stochastically random differences in density which are the 'grain structure'. You cannot have "sub-grain detail" in the image, although you might have levels of the grain that are invisible at lower magnification. None of the processes we're discussing here is capable of resolving the individual silver or dye particles at the molecular level. Nor would such be content significant image detail at any useful magnification of the image for viewing or printing.
So the question is "When does the level of detail in the image become insignificant to the content of the image?" Looking at the test pattern images, the only purpose for those images is to see when the light and dark bars are differentiable, so the higher magnifications of the grain clumps there have a purpose. Not so for any image of expressive content that I'm ever going to make...
I am not interested in analysis of the patterns of silver/dye clump grain. I'm interested in image content.
I was afraid you would take that comment too serious. Please don't... it was meant to be humorous, I promise! Sorry if you took it the wrong way. Well, at least I got your attentionAside from that, what joy is there in "proving me wrong"? If you have images of such significant detail that you can get more out of, and that detail is of importance to the intent of the image, then I'm happy you have found a way to reveal it.
As I was saying, I am just interested in how much detail exists, and how far one should take it—24MP, 36MP, 50MP? Stitching 4 or 6 shots of 35mm?
After all, we are trying to "Construct the definite DSLR scanning setup"... So I think it would be very helpful for others to have various people post their results; then one can determine for oneself what resolution is enough etc.
And that is, again, another point.There are no images of mine where such detail is of any significance to my intent for the images, of that I'm quite certain. I see no point to such high resolution film captures at all, and I've almost never used films with the acutance required to return such resolution. So what does it matter?
In my opinion we should first examine the theoretical limits, and then everyone can judge for themselves which route to go.
It will always be up to each individual to figure out what they need for their purposes.
I, for one, noticed a small improvement by going even closer that 1:1 on a 35mm slide. But that doesn't mean for me, that I will start stitching 4:1 35mm shots of each and every shot I ever made... but if I do want one huge print of a particularly nice shot, I just may go through the effort and stitch... so that I can have as much detail as possible in that poster...
jzagaja
Well-known
Do you use automatic stitch, if so which?
DrTebi
Slide Lover
If I do any stitching, I use Microsoft Image Composite Editor. It works really well, and doesn't cost a thingDo you use automatic stitch, if so which?
It does everything automatically. I have had great results with it.
Godfrey
somewhat colored
But the question is, whether 24MP would have resolved those cable lines the same way... that crop is from a 36MP sensor.
Only way to know that is to make direct comparisons with the same lens, same subject, same conditions, and a pair of cameras one with a 36 MP sensor and the other with a 24 MP sensor. I can do the same lens, same subject, same conditions, etc, but I don't have anything with a 36 MP sensor. I could do a similar test in the other direction using my Olympus E-1 and E-M1 (5 and 16 Mpixel sensors) fitted to the same lens and negative... That would give an idea of the relative detail/grain capture imaging capabilities between 5, 16, and 24 MPixel sensors. The gains are not linear because the megapixel number is an area measure. By and large, given equal sensors, you expect gains in resolution on a square-root-of-2 scale as megpixels increase.
BTW: you made some negative comment about "old negatives" and not being a 35mm format. The film was APX25 developed in HC-110. I still have a dozen rolls or so of this film, fresh frozen and stored with a 2007 expiration date. I know it's still as-new in terms of its grain and response curve ... It's one of the finest grained, highest acutance production emulsions ever. The format doesn't matter, the film is the same regardless of format, and my test showed it imaged at capture magnifications for Minox, 35mm FF, and 6x6 negative sizes. That's as complete as I will ever need in order to understand the grain resolution and image detailing I could work with.
I completely understand. And that is what it should be about. But this discussion was not about image content from the beginning. I am interested in the theoretical limits of how much detail exists in film, so at this moment, it's just a about analysis
...
As I was saying, I am just interested in how much detail exists, and how far one should take it—24MP, 36MP, 50MP? Stitching 4 or 6 shots of 35mm?
After all, we are trying to "Construct the definite DSLR scanning setup"... So I think it would be very helpful for others to have various people post their results; then one can determine for oneself what resolution is enough etc.
...
In my opinion we should first examine the theoretical limits, and then everyone can judge for themselves which route to go.
How much detail might exist in a film image is a fine study ... but I'd start with the manufacturers' data sheets for the film to discover what their labs suggested the film was capable of in terms of resolution and contrast coefficient. That way at least you have a baseline against which to measure, using a resolution test chart, what you can achieve rather than just looking at some random photograph and saying you think there's more detail or not at some arbitrary sampling resolution.
That's what I think of "defining the theoretical limits" and then "testing the theoretical limits by applied tests and observation."
It will always be up to each individual to figure out what they need for their purposes.
I tend to do this kind of testing very rarely nowadays, given that I've been digitizing images from film domain for so long and for so many diverse needs/requirements. I know what works for my purposes and produces results that satisfies my needs from long experience...
I have reached that point with my current setup, which pleases me enormously.
G
Godfrey
somewhat colored
So, speaking of actual images, here's a trio of Minox 8x11 photographs I made in 1997 using a Minox B and APX25 film. They're scanned at ~1.75:1 resolution with the Leica CL using the Focusing Bellows-R and Macro-Elmarit-R 60mm lens. No editing other than the usual inversion and a bit of spotting... The originals digital images are 24 Mpixel in size, but these downscaled JPEGs do the right job for photos from these teensy little negatives.
The folks are two of my motobuddies, still good friends today after all these years. Daffy is long gone...

Jack - Mount Hamilton 1997
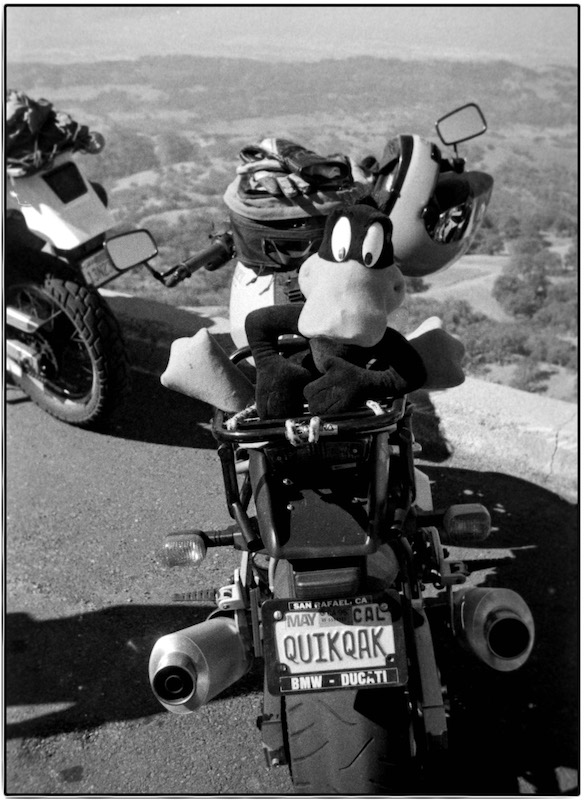
Jack's Bike "Daffy Ducati" - Mount Hamilton 1997

Joanne - Mount Hamilton 1997
There's a tiny bit more resolution in the full 24Mpixel image files, but nothing that is actually significant to the photographs.
enjoy!
G
The folks are two of my motobuddies, still good friends today after all these years. Daffy is long gone...
Jack - Mount Hamilton 1997
Jack's Bike "Daffy Ducati" - Mount Hamilton 1997
Joanne - Mount Hamilton 1997
There's a tiny bit more resolution in the full 24Mpixel image files, but nothing that is actually significant to the photographs.
enjoy!
G
:: Mark
Well-known
FWIW, I ran a set of scanning tests with my Olympus based film scanning rig and a frame of Delta 100 that had been processed in DDX 1+4. The aim was to compare the results from single-shot (20MP), HiRes (50ish MP) and in-camera focus-stacking.
The bottom line is that at least in the image central areas, the HiRes modes on the Olympus really do resolve more perceived detail and texture than the single-shot modes. There is likely not much more than 12MP of digital equivalent information in the frame, but to extract that needs a much higher resolution digital capture - perhaps because the higher resolution resolves the grain more effectively to give the impression of more detail. In my setup there are two main sources of degradation in the image: film flatness (particularly where the film contacts the holder) and some lens softness at the extreme edge (when pixel peeping ~50MP scans at 400%...).
I tried to use the Olympus focus-stacking mode to address the film flatness issue, but the in-camera processing reduces the image quality so much that the result is much worse than just living with some slight edge blur.
I wrote up a blog post on this, comparing the different shooting modes and showing the trade-off between diffraction and DOF (film flatness tolerance) in HiRes mode.
FWIW, the conclusion was that I should stick with the Olympus HiRes scans, and that for B&W there is no real downside to sticking with the out-of-camera 50MP JPEGs rather than the much larger 80MP RAW files.
:: Mark
Well-known
single-shot (20MP), HiRes (50ish MP)
Also, keep in mind that these are u4/3 shots that have to be cropped for 35mm film - the actual MP counts for the scanned film area are ~15MP and ~40ish MP respectively.
DrTebi
Slide Lover
I have just read your blog post.Also, keep in mind that these are u4/3 shots that have to be cropped for 35mm film - the actual MP counts for the scanned film area are ~15MP and ~40ish MP respectively.
What I suggest is to move your negative so that the bird is in the center of the frame; that way you can verify that that part of the image is in fact sharp. I just have the suspicion that the original shot was on infinity, and maybe the bird was a bit too close for infinity to be perfectly sharp.
Regarding film flatness: It's amazing what a 3 inch thick book can do. Try placing the film into a protective sleeve and leaving it in the center of a book for a few hours. Really helped when I scanned some 35mm slides.
Then there are always extension tubes... in my opinion, it's the only way to truly find out how much detail there is in the negative. Going down to a microscopic level... until you can say "there just ain't more detail..."
If you do find that you can capture more detail, then it's time to do some stitching
I have just done a single-shot of a medium format slide, and then another with a 20mm extension tube. There was definitely more detail in the latter.
DrTebi
Slide Lover
Here two crops side-by-side of a medium format slide. One shot without extension tube, fitting the slide into the frame, the other with a 20mm extension tube (which yields 1.4:1) as close as possible:
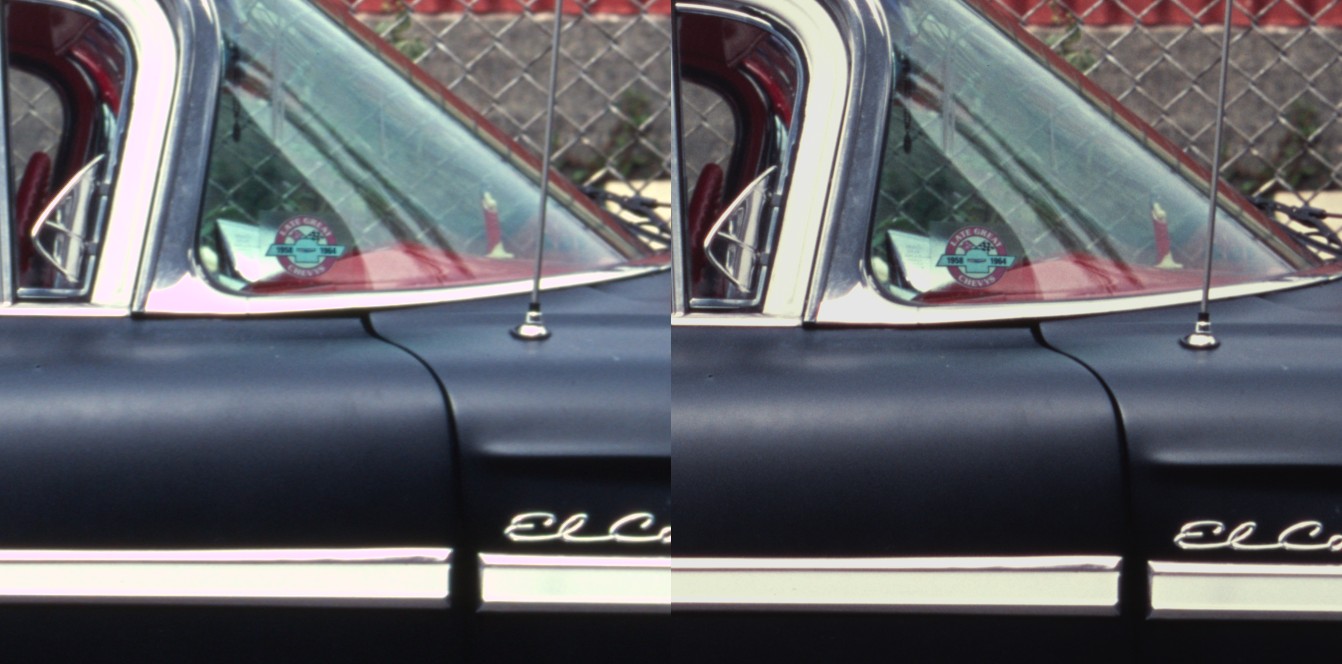
OK, looking at two crops side by side, it's not a hell lot of a difference. Yet, it is clearly noticeable. I also find the extension-tube image much cleaner, especially the chrome lettering, the mirror, or the fence for example.
OK, looking at two crops side by side, it's not a hell lot of a difference. Yet, it is clearly noticeable. I also find the extension-tube image much cleaner, especially the chrome lettering, the mirror, or the fence for example.
DrTebi
Slide Lover
Talking a bit to myself here... oh well.
Here another interesting experiment, this time I used extension bellows to get as close as possible to that window sticker in the image.

On the right side, for comparison, the full-framed shot of the medium format slide, which I up-scaled to fit the bellows shot, which is at 100%.
Now one can finally see some grain in that Velvia film...
Here the full image:
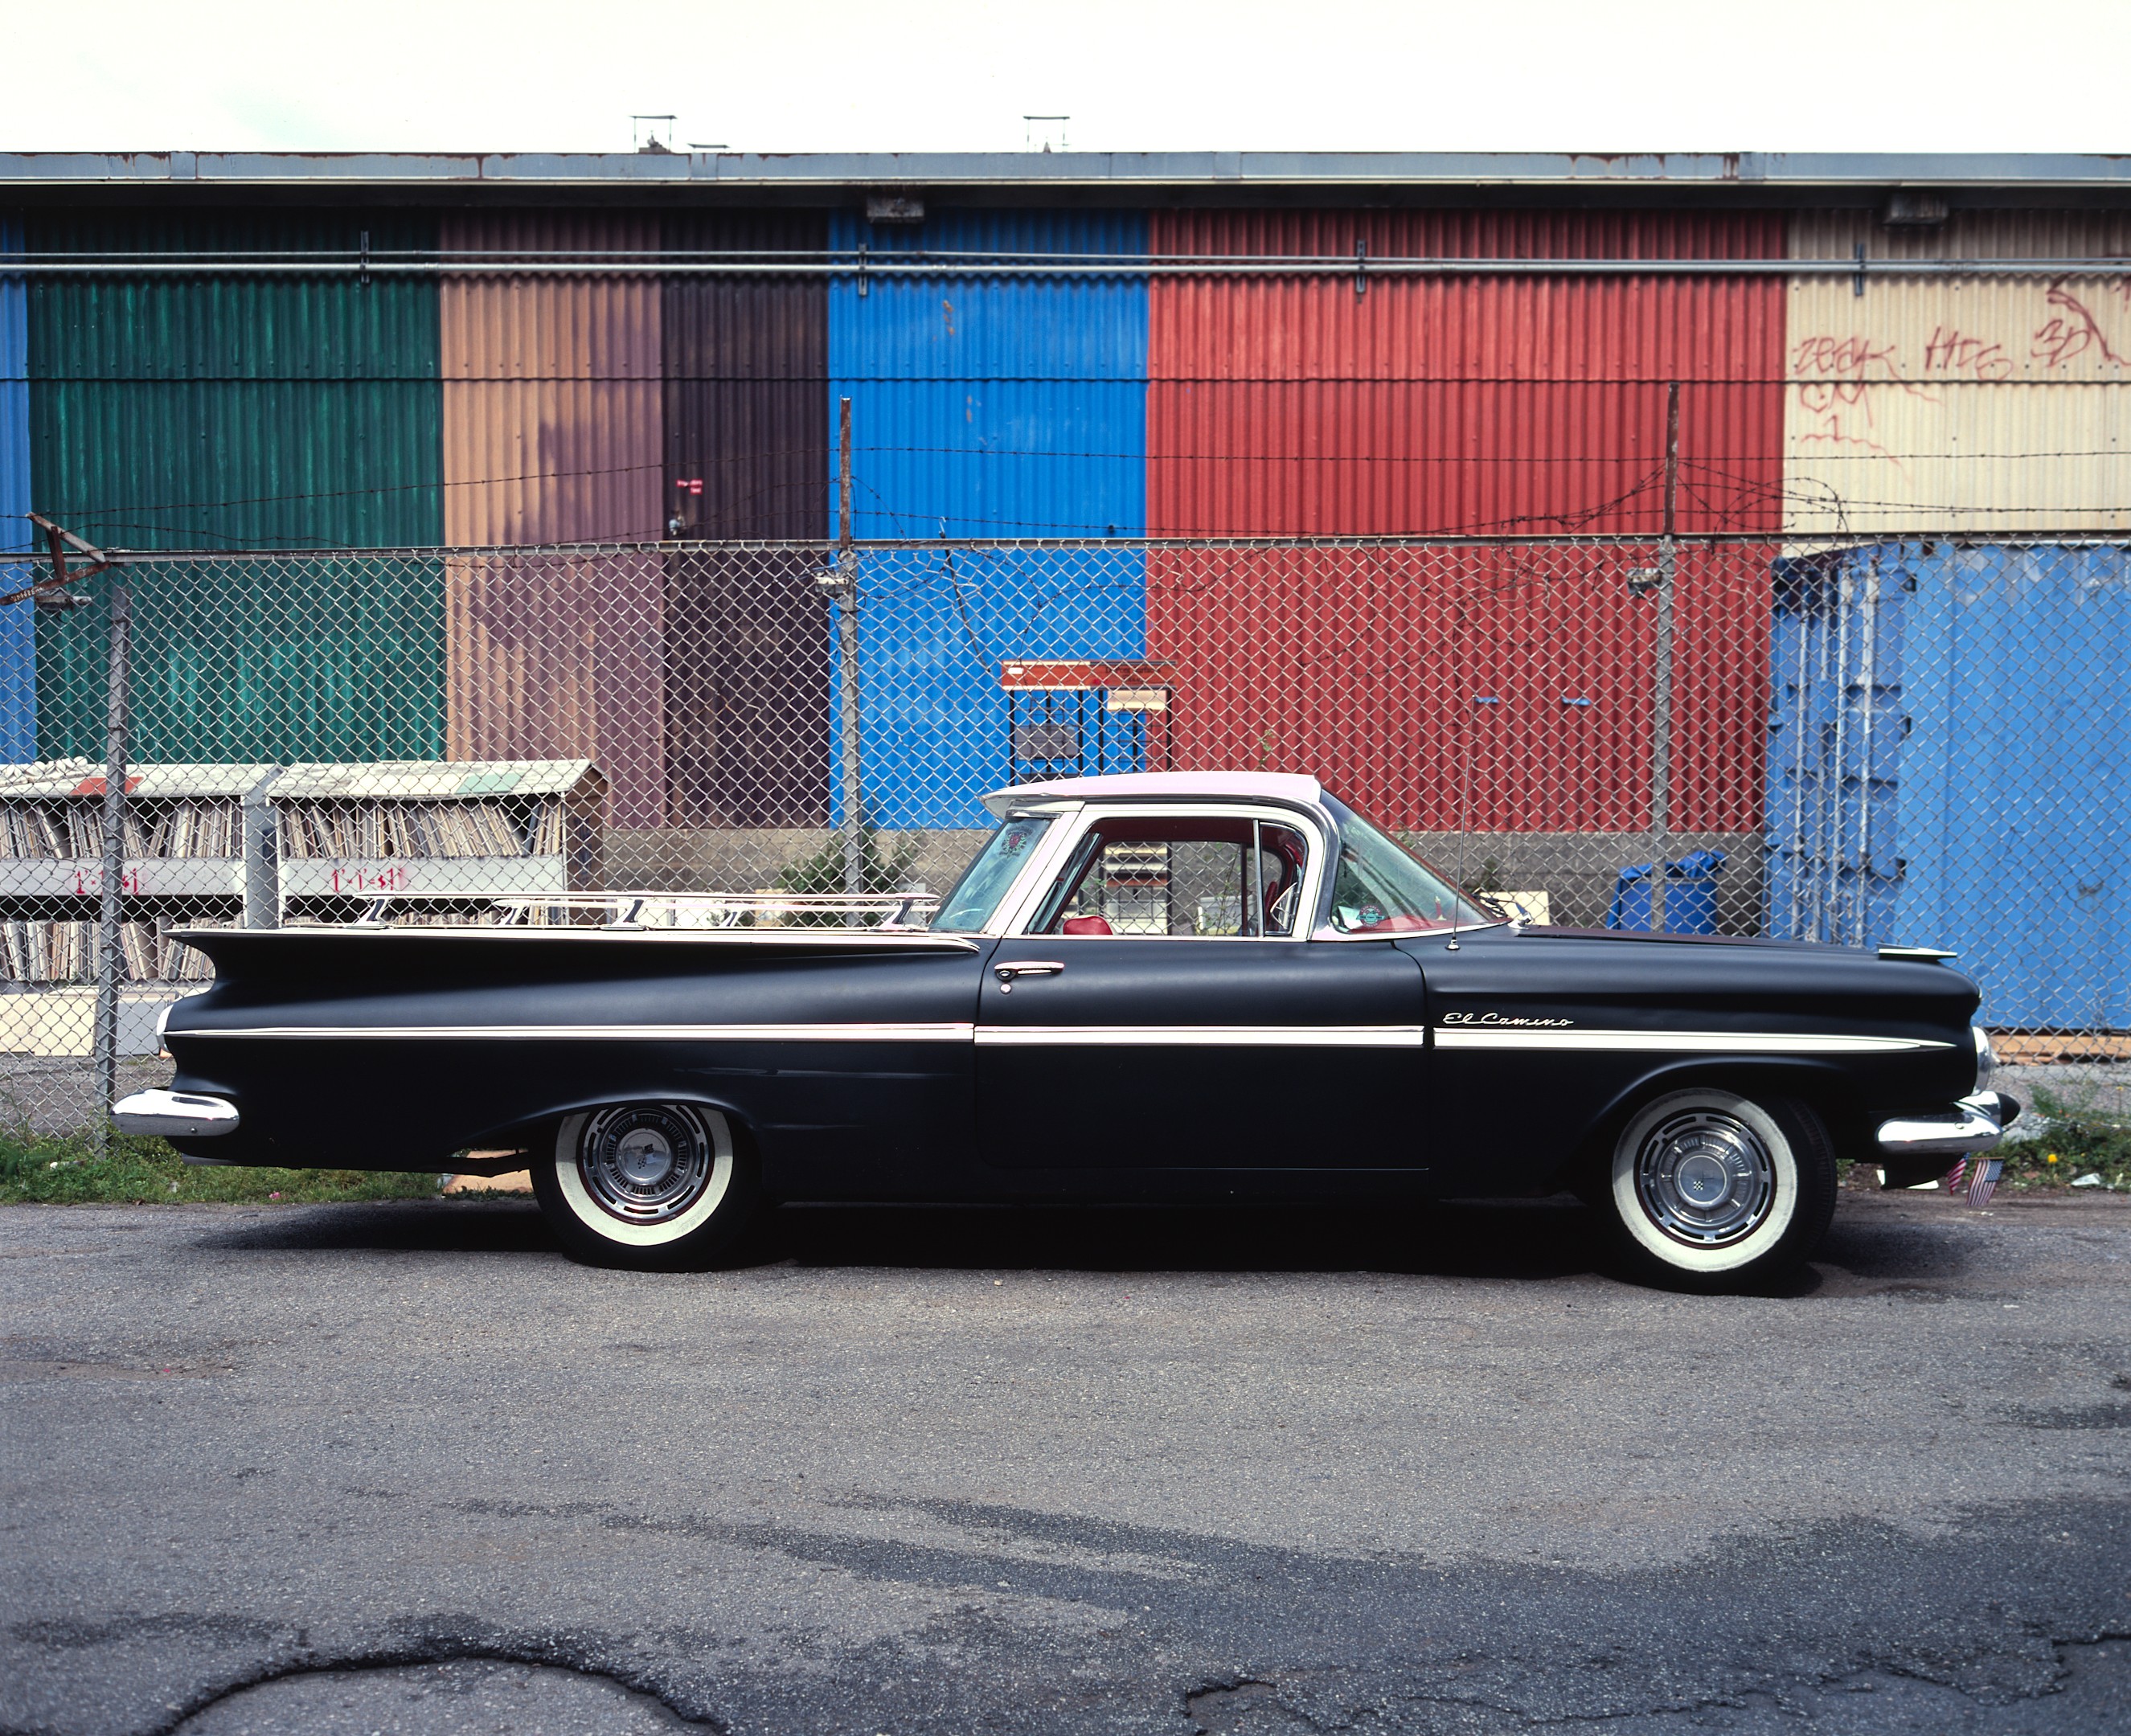
You may draw your own conclusions... I think it's pretty clear that if you want as much details as possible from a medium format slide, a single shot with a 36MP FF sensor is not enough... you will need to do some stitching.
Pixel-Peeper fun, isn't it?
Here another interesting experiment, this time I used extension bellows to get as close as possible to that window sticker in the image.
On the right side, for comparison, the full-framed shot of the medium format slide, which I up-scaled to fit the bellows shot, which is at 100%.
Now one can finally see some grain in that Velvia film...
Here the full image:
You may draw your own conclusions... I think it's pretty clear that if you want as much details as possible from a medium format slide, a single shot with a 36MP FF sensor is not enough... you will need to do some stitching.
Pixel-Peeper fun, isn't it?
Jockos
Well-known
DrTebi, those are some great results for sure!
I've acquired the parts to make a "Tebi-holder", and replaced my sony A7 with a A7r. Will hopefully have time to assemble everything during my holidays in August.
Mine's going to be a bit larger tho; holding a full strip of 35mm in length, and a 5x7 in width!
I think it'll be perfect for the large format sheets, the ability to put tension on the film should be enough to counteract any bulging.
DrTebi
Slide Lover
That sounds great, I feel honored that you will try out my idea of a flat film holderDrTebi, those are some great results for sure!
I've acquired the parts to make a "Tebi-holder", and replaced my sony A7 with a A7r. Will hopefully have time to assemble everything during my holidays in August.
Mine's going to be a bit larger tho; holding a full strip of 35mm in length, and a 5x7 in width!
I think it'll be perfect for the large format sheets, the ability to put tension on the film should be enough to counteract any bulging.
There are a couple of things that I would try to improve if I make a new one (actually, I do want to make another one, since I would really like to clamp a a strip of six negatives):
- Somehow "color" the edges near the negatives flat black—I have noticed in some occasions a bit of a reflection from the edges (top edges near the negative). Using black matte anodized aluminum would of course be the best, but otherwise a good careful paint job might work.
- Incorporate some expansion springs that put the tension on, instead of me having to pull... this would make mounting a little easier, and would also always use the same tension.
- Don't incorporate the diffuser in the film mount, instead fixate the diffuser to the light box. A minor thing, but it would make it easier to clean the diffuser, or exchange it if desired.
Other than that... drilling precise holes is the most tricky part. A drill press and a good vise are your best friends.
To align the holes in the top and bottom pieces, I drilled through both pieces at once (while clamped down), this makes it easier than measuring. That's also why my pieces have small holes inside the "blind" holes for the compression springs.
But hey... I don't know what tools you have... maybe you have a big Bridgeport standing around and know much more than me!
Good luck, and please post your results here
:: Mark
Well-known
I have just read your blog post.
What I suggest is to move your negative so that the bird is in the center of the frame; that way you can verify that that part of the image is in fact sharp. I just have the suspicion that the original shot was on infinity, and maybe the bird was a bit too close for infinity to be perfectly sharp.
I actually took many more pictures that I showed on the blog (it gets very boring), including some at 2x magnification and with the focus point moved to the edge.
The biggest problem appears to be the film holder. It seems that where the film touches the plastic it ends up slightly distorted - and it was far worse at the corner that I photographed. In part this is because I suspect that this is the only part of the frame where the film was displaced slightly forward of the focal plane (most of the DOF with the E-M1 and 60mm seems to be behind the focal point, as you might expect).
I am really not sure how I can improve the film holders. The PlusTek holders are nice because they have thin plastic strips that cross the frame boundaries to aid flatness. But the plastic itself is too flexible and imprecise - it really needs something more rigid material, such as metal.
That said, at anything up to an A3 print size worrying about the last drop of corner sharpness is probably unnecessarily. There are usually other minor defects from the developing and the film emulsion itself, and I would bet that wet printing the same negative would not yield anything better. It is all part of the character from using film...
Jockos
Well-known
Great suggestions. I don't know if I'll be working with a drill press, or if I can borrow the CNC router, but I drew everything up in CAD just in case. Won't be anodizing though, it'll be a coat of matte black paint and I might angle the edges like you did.
Still not sure about what to use as a light source, but I bet something will come up in time!
Sadly importing cheap LED panels from China has been blocked by Swedish customs. Everything is now much more expensive..
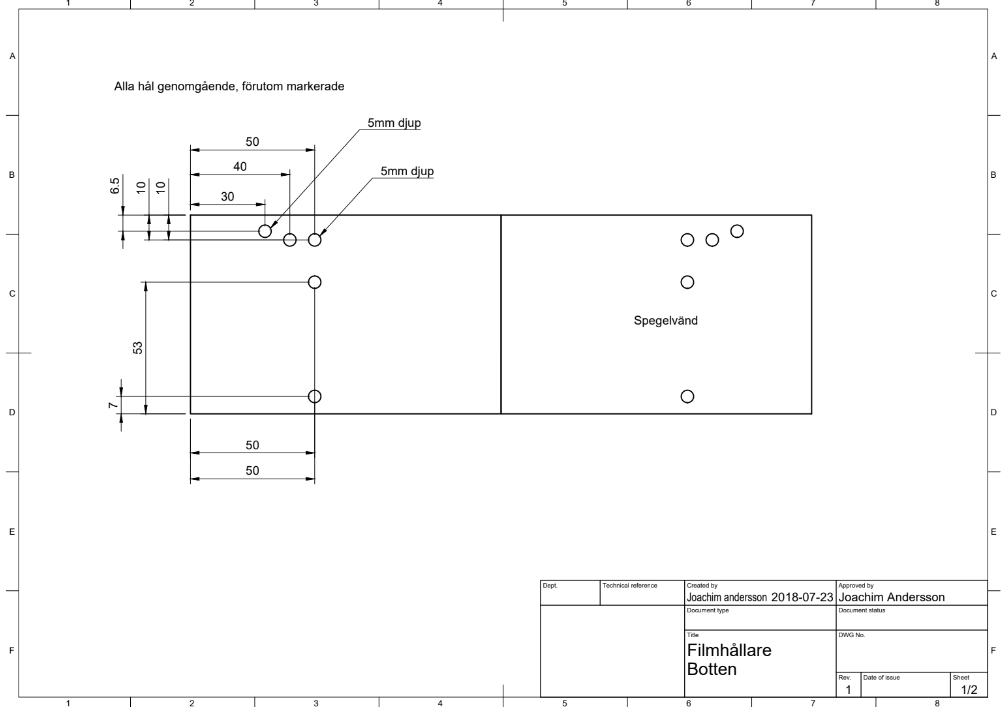
^ I'll cut out between the bottom two holes, hopefully with a CNC router.
Still not sure about what to use as a light source, but I bet something will come up in time!
Sadly importing cheap LED panels from China has been blocked by Swedish customs. Everything is now much more expensive..
^ I'll cut out between the bottom two holes, hopefully with a CNC router.
DrTebi
Slide Lover
@Jockos: Have you already started to build the film holder?
There is one thing that I just remembered, which I wanted to do different on mine.
On the top plates, the ones that mount the film, I wanted to add an edge, or recess, so that one could easily fit masks into it. It would have to be some 5mm wide or so, since the distance between the two holders is not always the same. Then just make masks that are slightly larger than the smallest width you would cover (e.g., for 120 film ca. 64mm wide).
I find it, from some tests I have done, not so important to have masks for 35mm film, since you sensor covers exactly the negative.
But when you take a single shot of a 6x7 for example, your sensor will cover some areas where no film is. This will throw off your exposure. Here a mask will make sure that the exposure reading is limited to the negative/positive itself, not the light that comes through the sides...
I hope that all makes sense...
If I had a mill, I would have put an edge into my pieces already... I don't really feel to comfortable trying it on my drill press...
Share:
-
This site uses cookies to help personalise content, tailor your experience and to keep you logged in if you register.
By continuing to use this site, you are consenting to our use of cookies.