
shawn
Mentor
Make sure the sprocket is engaging with the film holes and then after you put the leader into the take up spool twist it (not wind) to take out any slack between it and the sprocket gear. Most of the advance is really from the sprocket gear so make sure it is engaging properly. Then shoot a shot and do a full advance before you put the back on.
Arash
Established
What seems to be happening is as the film is being advanced, the sprocket spool turns well to feed the film forward but the take up spool where the film is wound is not moving at the same rate.
This causes the film to become unwound and bulge out from the take up spool. It then gets caught up with the sprocket spool again causing a jamb.
I have to open the top again and see where is the misalignment.
Any pointers would be appreciated.
Getting there…
Thanks
This causes the film to become unwound and bulge out from the take up spool. It then gets caught up with the sprocket spool again causing a jamb.
I have to open the top again and see where is the misalignment.
Any pointers would be appreciated.
Getting there…
Thanks
shawn
Mentor
Not sure on that one. In some cameras the take up spools rotation changes (less rotation) as you get further into the roll to account for the diameter of that getting larger as more film is wound on. I don't think the HorizonT does this though but I might be wrong. I *think* it gets around this by being designed to slip a little. In other words when you get further into the roll the take up spool would be trying to pull more film than the sprockets allow so the take up spool slips a little to keep winding consistent.
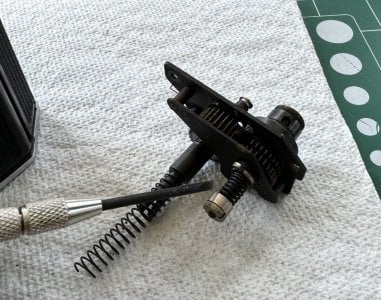
What might be happening to you is the take up spool is slipping too early. There is a tension adjustment for the take up spool on the bottom of the winding mechanism that you take out from the top. I think that is what the spring loaded part is all about. Can't recall which way you adjust that for more tension though.
What might be happening to you is the take up spool is slipping too early. There is a tension adjustment for the take up spool on the bottom of the winding mechanism that you take out from the top. I think that is what the spring loaded part is all about. Can't recall which way you adjust that for more tension though.
santino
FSU gear head
Shawn, you’re a very wise man 👍
Arash
Established
Thank you for that insight.
I paid no attention to the frame counter setting as I loaded and reloaded the test roll.
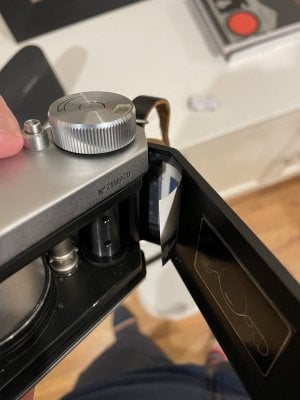
I adjusted the tension on the rotation contact spring (first image, pointing with the screwdriver) of the take up spool and it seems to have helped. Not sure how much tension is too much, I adjusted it by a couple of full rotations (shown in second picture)
I really don’t relish taking this wretched thing apart again.
That, and some experience in handling the film loading and advancing seems to have helped. I’m a few exposures into an actual test roll.
Uh-oh, I probably just jinxed it…
After all this, I finally get to see if the light seals and exposure settings are good.
I can definitely see the a person change properly with the clicks, but I have no ideas as to the shutter speed - that setting wheel seems a bit sloppy.
The turret seems to run at the same rate no matter what the shutter speed is set to. I gather this is normal and the “shutter speed” is actually managed by a slit size on the turret?
Anyway, thanks for all the help.
I hope this may prove useful to someone else at some point as well.
Arash
I paid no attention to the frame counter setting as I loaded and reloaded the test roll.
I adjusted the tension on the rotation contact spring (first image, pointing with the screwdriver) of the take up spool and it seems to have helped. Not sure how much tension is too much, I adjusted it by a couple of full rotations (shown in second picture)
I really don’t relish taking this wretched thing apart again.
That, and some experience in handling the film loading and advancing seems to have helped. I’m a few exposures into an actual test roll.
Uh-oh, I probably just jinxed it…
After all this, I finally get to see if the light seals and exposure settings are good.
I can definitely see the a person change properly with the clicks, but I have no ideas as to the shutter speed - that setting wheel seems a bit sloppy.
The turret seems to run at the same rate no matter what the shutter speed is set to. I gather this is normal and the “shutter speed” is actually managed by a slit size on the turret?
Anyway, thanks for all the help.
I hope this may prove useful to someone else at some point as well.
Arash
Attachments

shawn
Mentor
As far as enough tension you want enough so that you aren't unloading but not too much that you end up tearing the film near the end of the roll from the take up roller pulling too much/too hard and the film tearing at the sprockets. .
The turret is single speed, shutter speed is controlled by slit width. You can hold the turret with your thumb when you fire it to see it mid rotation and look at the shutter slit if you want. This is one of the reasons I prefer the HorizonT to the Widelux. The Widelux uses a constant shutter width and changes shutter speed by changing turret rotation speed. It has three speed choices of 1/15, 1/125, 1/250. The gap between 1/15 and 1/125 is kind of large. Also if 1 speed isn't used in awhile it can be a little more likely to band. The gear doesn't always engage for the 1/15 so it can jam and you loose a shot. The 1/15 speed takes awhile for the turret to make its full rotation so it is harder to handhold that one. On the HorizonT at 1/30 the rotation speed is the same as shoot at 1/500. (The unmarked position on the dial)
The turret is single speed, shutter speed is controlled by slit width. You can hold the turret with your thumb when you fire it to see it mid rotation and look at the shutter slit if you want. This is one of the reasons I prefer the HorizonT to the Widelux. The Widelux uses a constant shutter width and changes shutter speed by changing turret rotation speed. It has three speed choices of 1/15, 1/125, 1/250. The gap between 1/15 and 1/125 is kind of large. Also if 1 speed isn't used in awhile it can be a little more likely to band. The gear doesn't always engage for the 1/15 so it can jam and you loose a shot. The 1/15 speed takes awhile for the turret to make its full rotation so it is harder to handhold that one. On the HorizonT at 1/30 the rotation speed is the same as shoot at 1/500. (The unmarked position on the dial)
Arash
Established
Thank you for that.
I had read the unmarked position to be 1/250th. Hood to know it’s 1/500
I’m a dozen exposures through, and so far so good as far as the film advance/shutter release is concerned.
I had read the unmarked position to be 1/250th. Hood to know it’s 1/500
I’m a dozen exposures through, and so far so good as far as the film advance/shutter release is concerned.
shawn
Mentor
Just also keep an eye on the rewind dial to make sure it is turning while you are advancing. That is the one thing that is annoying about the HorizonT in that the viewfinder blocks this so it is easier to miss a feed problem.
RyanKent
Newbie
Had the same exact problem with mine. I tightened the tension spring multiple times and I thought I had fixed it multiple times. After ruining at least 3 rolls of film I resorted to an elegant solution… taping a cut up playing card as guide to prevent take up spool slack from catching the sprocket teeth. Worked like a dream! Just finished my first complete roll in that camera. Now time to tackle the light leaks.What seems to be happening is as the film is being advanced, the sprocket spool turns well to feed the film forward but the take up spool where the film is wound is not moving at the same rate.
This causes the film to become unwound and bulge out from the take up spool. It then gets caught up with the sprocket spool again causing a jamb.
I have to open the top again and see where is the misalignment.
Any pointers would be appreciated.
Getting there…
Thanks
Attachments
Arash
Established
Thank you all for the input.
I am happy to say two rolls of film have been run through with no snags.
If it misbehaves again, I’ll add in the card baffle.
Hopefully there are actual useful pictures.
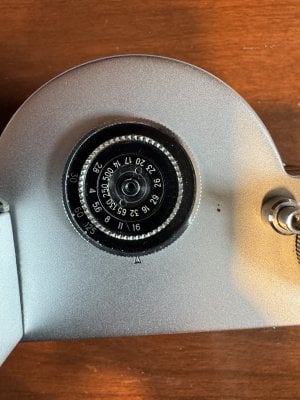
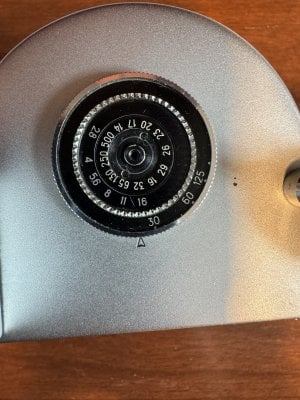
I noticed that even though the shutter speed dial clicks in smartly at the marked 30, 60, 125 and the unlabeled settings, the dial does travel a bit past those marks. There’s specially a lot to slop past the unmarked (500) spot.
Is this normal, or did I screw up in reassembly?
Maybe the attached pictures will show the amount of travel past the markers. There is no “click” at these extremities by the way.
What do you think?
I am happy to say two rolls of film have been run through with no snags.
If it misbehaves again, I’ll add in the card baffle.
Hopefully there are actual useful pictures.
I noticed that even though the shutter speed dial clicks in smartly at the marked 30, 60, 125 and the unlabeled settings, the dial does travel a bit past those marks. There’s specially a lot to slop past the unmarked (500) spot.
Is this normal, or did I screw up in reassembly?
Maybe the attached pictures will show the amount of travel past the markers. There is no “click” at these extremities by the way.
What do you think?
Attachments
santino
FSU gear head
I‘m no expert but the travel between the marks looks extreme (even by soviet standards). If it works, just leave it that way, it wouldn’t bother me.
shawn
Mentor
Glad to hear you had two rolls feed properly. Biggest question now is if it has any light leaks which the film will show you pretty easily once it is processed.
If the click positions line up with the shutter speed indicators everything is fine. If they don't line up you misaligned the shutter dial gear a little. You can correct that by removing the top and tweaking the position of the shutter dial when you reassemble. Took me a couple of tries to get mine lined up properly for both shutter and aperture settings.
If the click positions line up with the shutter speed indicators everything is fine. If they don't line up you misaligned the shutter dial gear a little. You can correct that by removing the top and tweaking the position of the shutter dial when you reassemble. Took me a couple of tries to get mine lined up properly for both shutter and aperture settings.
Arash
Established
Thanks Shawn
I can easily verify that the aperture wheel works properly- the diaphragm is easy to see change as I toggle from f16 to 2.8
The gear wheels did come off a few times inadvertently. I tried my best to line them up with the mark. Like I said, they seem to “click” into position ok. I just don’t know if they’re supposed to travel beyond the “click” at the extremities.
I suppose the proof will be once the film is developed and I’ll know in a couple of weeks.
I must say, this camera is a whole new level of fun!
Thanks
shawn
Mentor
Yes, it is a very fun camera and challenges you to rethink how you might take a shot. Also very fun to see how the images come out as it has such a different look compared to a typical wide angle camera.
Arash
Established
Time for an update
good news, two rolls of film went through the camera with no issues
Not so good news, light leaks.
Ugh. I had really hoped to not have to mess with this camera again since I was really pushing my abilities with the previous repairs.
Are these leaks from the light baffles on either side of the turret?
Attachments


Arash
Established

shawn
Mentor
Yes, those are light leaks around the turret. This is from my early basket case HorizonT.Time for an update
good news, two rolls of film went through the camera with no issues
Not so good news, light leaks.
Ugh. I had really hoped to not have to mess with this camera again since I was really pushing my abilities with the previous repairs.
Are these leaks from the light baffles on either side of the turret?

Don't bother trying to replace them from the bottom. Bite the bullet and just pull the turret out. It isn't as scary as it seems and makes it dramatically easier to get new seals in there. The little bit tricky part is having the seals tight enough to block the light but loose enough to not impede the rotation.
Ignore the banding for now. If the old seals are gunked up that could be impacting the rotation of the turret.
Arash
Established
thank you for that.
I was tempted to follow the “easy” replace from the bottom technique.
I hadn’t thought of the degraded seals causing rotation banding - hope that’s it!
What material did you use for the replacement seals?
I was tempted to follow the “easy” replace from the bottom technique.
I hadn’t thought of the degraded seals causing rotation banding - hope that’s it!
What material did you use for the replacement seals?
shawn
Mentor
Detailed in post 8 but a combination of adhesive neoprene and adhesive felt flocking material. If I were going to do it again I might try using an adhesive open cell foam with the flocking material. The foam would likely give a little more than the neoprene and would likely be less critical for thickness in sealing the turret and letting it spin.
Set aside some time for this to get it right as you need to seal the light while also rotating easily and not having the felt move around and potentially jamming between the turret and the body. Before you take it apart shine a light in the front at the sides of the turret and you can probably see if from the back. If the seals are good that won't happen anymore while still spinning freely through multiple wind/fire cycles.
Set aside some time for this to get it right as you need to seal the light while also rotating easily and not having the felt move around and potentially jamming between the turret and the body. Before you take it apart shine a light in the front at the sides of the turret and you can probably see if from the back. If the seals are good that won't happen anymore while still spinning freely through multiple wind/fire cycles.
Share:
-
This site uses cookies to help personalise content, tailor your experience and to keep you logged in if you register.
By continuing to use this site, you are consenting to our use of cookies.