
douwe
Jazz and Silver
Hi all,
I made a laser alignment tool for my enlarger. Since I really couldn't find much information on this anywhere I decided to share here.
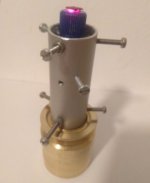
Below you find a short description on how I built it. In its most basic form, the aligner is a disc with three adjustable feet and a cross laser in the middle pointing straight up. See the pictures below.
Once calibrated the laser points exactly 90 degrees upward when you put it on the baseboard of the enlarger. A reflection of the laser beam reflecting from either the glass in the negative carrier or a mirror attached to the lens should return exactly to the source, the laser diode. If so, you have parallel planes. If not, you adjust any of the two planes until the laser beam does return straight down.
I made the apparatus from a 3d-print I designed, a cheap 3-5V cross laser diode, and some M5 heat-set threaded inserts with hex screws inserted from the bottom:


I made a laser alignment tool for my enlarger. Since I really couldn't find much information on this anywhere I decided to share here.
Below you find a short description on how I built it. In its most basic form, the aligner is a disc with three adjustable feet and a cross laser in the middle pointing straight up. See the pictures below.
Once calibrated the laser points exactly 90 degrees upward when you put it on the baseboard of the enlarger. A reflection of the laser beam reflecting from either the glass in the negative carrier or a mirror attached to the lens should return exactly to the source, the laser diode. If so, you have parallel planes. If not, you adjust any of the two planes until the laser beam does return straight down.
I made the apparatus from a 3d-print I designed, a cheap 3-5V cross laser diode, and some M5 heat-set threaded inserts with hex screws inserted from the bottom:
douwe
Jazz and Silver
Calibration of the tool
Calibration of the tool
To calibrate the tool, you have to ensure that the laser is oriented straight at a 90-degree angle relative to the plane formed by the three adjustable feet, i.e., the hex screws
How to do this? There is a trick. The base of the tool is round so that you can rotate it whilst keeping it in place. If the laser isn't straight relative to the base, the laser will draw a circle on the ceiling. By adjusting the feet you can reduce this circle to a smaller circle and eventually as close to a point as possible.
The key here is that the floor and the ceiling do not need to be parallel (I rotated the tool against two books on the floor). There is no need to rely on a perfectly parallel reference!
To improve accuracy I put a small mirror against the ceiling once I had done a rough adjustment. This just made the path longer and put the circle next to the tool. Much easier and more accurate.
Fred R.
Established
Very interesting and out of my skill set. Any plans too sell them?
Btw, your website is very funky on my computer, full of overlaid "image no longer available" figures . Photos are okay, but text is unreadable, and I would like to.
Fred
Btw, your website is very funky on my computer, full of overlaid "image no longer available" figures . Photos are okay, but text is unreadable, and I would like to.
Fred
douwe
Jazz and Silver
Hi Fred, I wasn't really thinking about selling it, but if you'd like to have one I could make the 3d printed parts for a small fee plus postage? I just wanted to share my insights, since I couldn't find any clear information on aligners
retinax
Well-known
BWF
Established
Great solution. I’d be interested in making one.
maddoc
... likes film again.
Very interesting. This could also be used to align a camera parallel to negative holders for film scanning?
Gents, please conduct business off-line, by PM.Hi Fred, I wasn't really thinking about selling it, but if you'd like to have one I could make the 3d printed parts for a small fee plus postage? I just wanted to share my insights, since I couldn't find any clear information on aligners
Thanks, Doug
douwe
Jazz and Silver
Sweet! I recently made one, too. Much less elegant than yours, but same principle: round base. It works.
Solid concept! I'm sure it does the job well! Was it hard to adjust the set screws? I went for a large base with the feet far apart to make the 'adjustment resolution' a bit higher as it were.
douwe
Jazz and Silver
Very interesting. This could also be used to align a camera parallel to negative holders for film scanning?
In principle yes. I scan my own negatives with a copy stand, a macro lens and a led light table. Even for 6x7 negatives the working distance is limited, however, so getting the aligner on the baseboard and a mirror on the front of the lens would not give you much room to use the tool, and the path the laser would travel would be quite short.
It would be more ideal to build something custom for that. I'll think about designing something more fit for purpose: I have the same problem!
retinax
Well-known
Solid concept! I'm sure it does the job well! Was it hard to adjust the set screws? I went for a large base with the feet far apart to make the 'adjustment resolution' a bit higher as it were.
Worked just fine, but was fiddly. To be honest I'm not entirely sure how much accuracy is necessary or achievable, haven't made large prints yet since aligning the enlarger. But my enlarger isn't so easy to adjust precisely. So my adjustment tool doesn't need to be accurate to the archsecond.
douwe
Jazz and Silver
Worked just fine, but was fiddly. To be honest I'm not entirely sure how much accuracy is necessary or achievable, haven't made large prints yet since aligning the enlarger. But my enlarger isn't so easy to adjust precisely. So my adjustment tool doesn't need to be accurate to the archsecond.
Totally agree on the 'modest' need for accuracy. I think the aligner is accurate to about 0.1 degree or 360 arcseconds
") . In practical terms that would roughly be 0.4mm at the edge of a 10x16" print. Depth of field should be enough to render such deviations irrelevant, right?
. In practical terms that would roughly be 0.4mm at the edge of a 10x16" print. Depth of field should be enough to render such deviations irrelevant, right?titrisol
Bottom Feeder
This is awesome!!! Could you share the STL file?
titrisol
Bottom Feeder
I finally had time to test and play with this.
GREAT TOOL!
Took me about 1h to 3dprint, and I used a 3xLR44 bateery holder I had from a toy.
Calibrated it in a bookshelf which is paralell and voila
My enlarger was a little tilted to the "front" but not anymore.
GREAT TOOL!
Took me about 1h to 3dprint, and I used a 3xLR44 bateery holder I had from a toy.
Calibrated it in a bookshelf which is paralell and voila
My enlarger was a little tilted to the "front" but not anymore.
Share:
-
This site uses cookies to help personalise content, tailor your experience and to keep you logged in if you register.
By continuing to use this site, you are consenting to our use of cookies.