DrTebi
Slide Lover
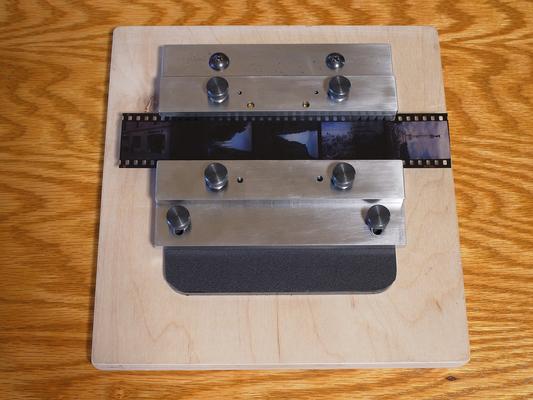
In response to @danitoma, here a few detailed images of my film holder. Note that all images are linked to a full-size image, so click any image if you need to see more detail.
It was initially made for 6×7 slides. For 35mm film, it could be wider, e.g. wide enough to mount six negatives.
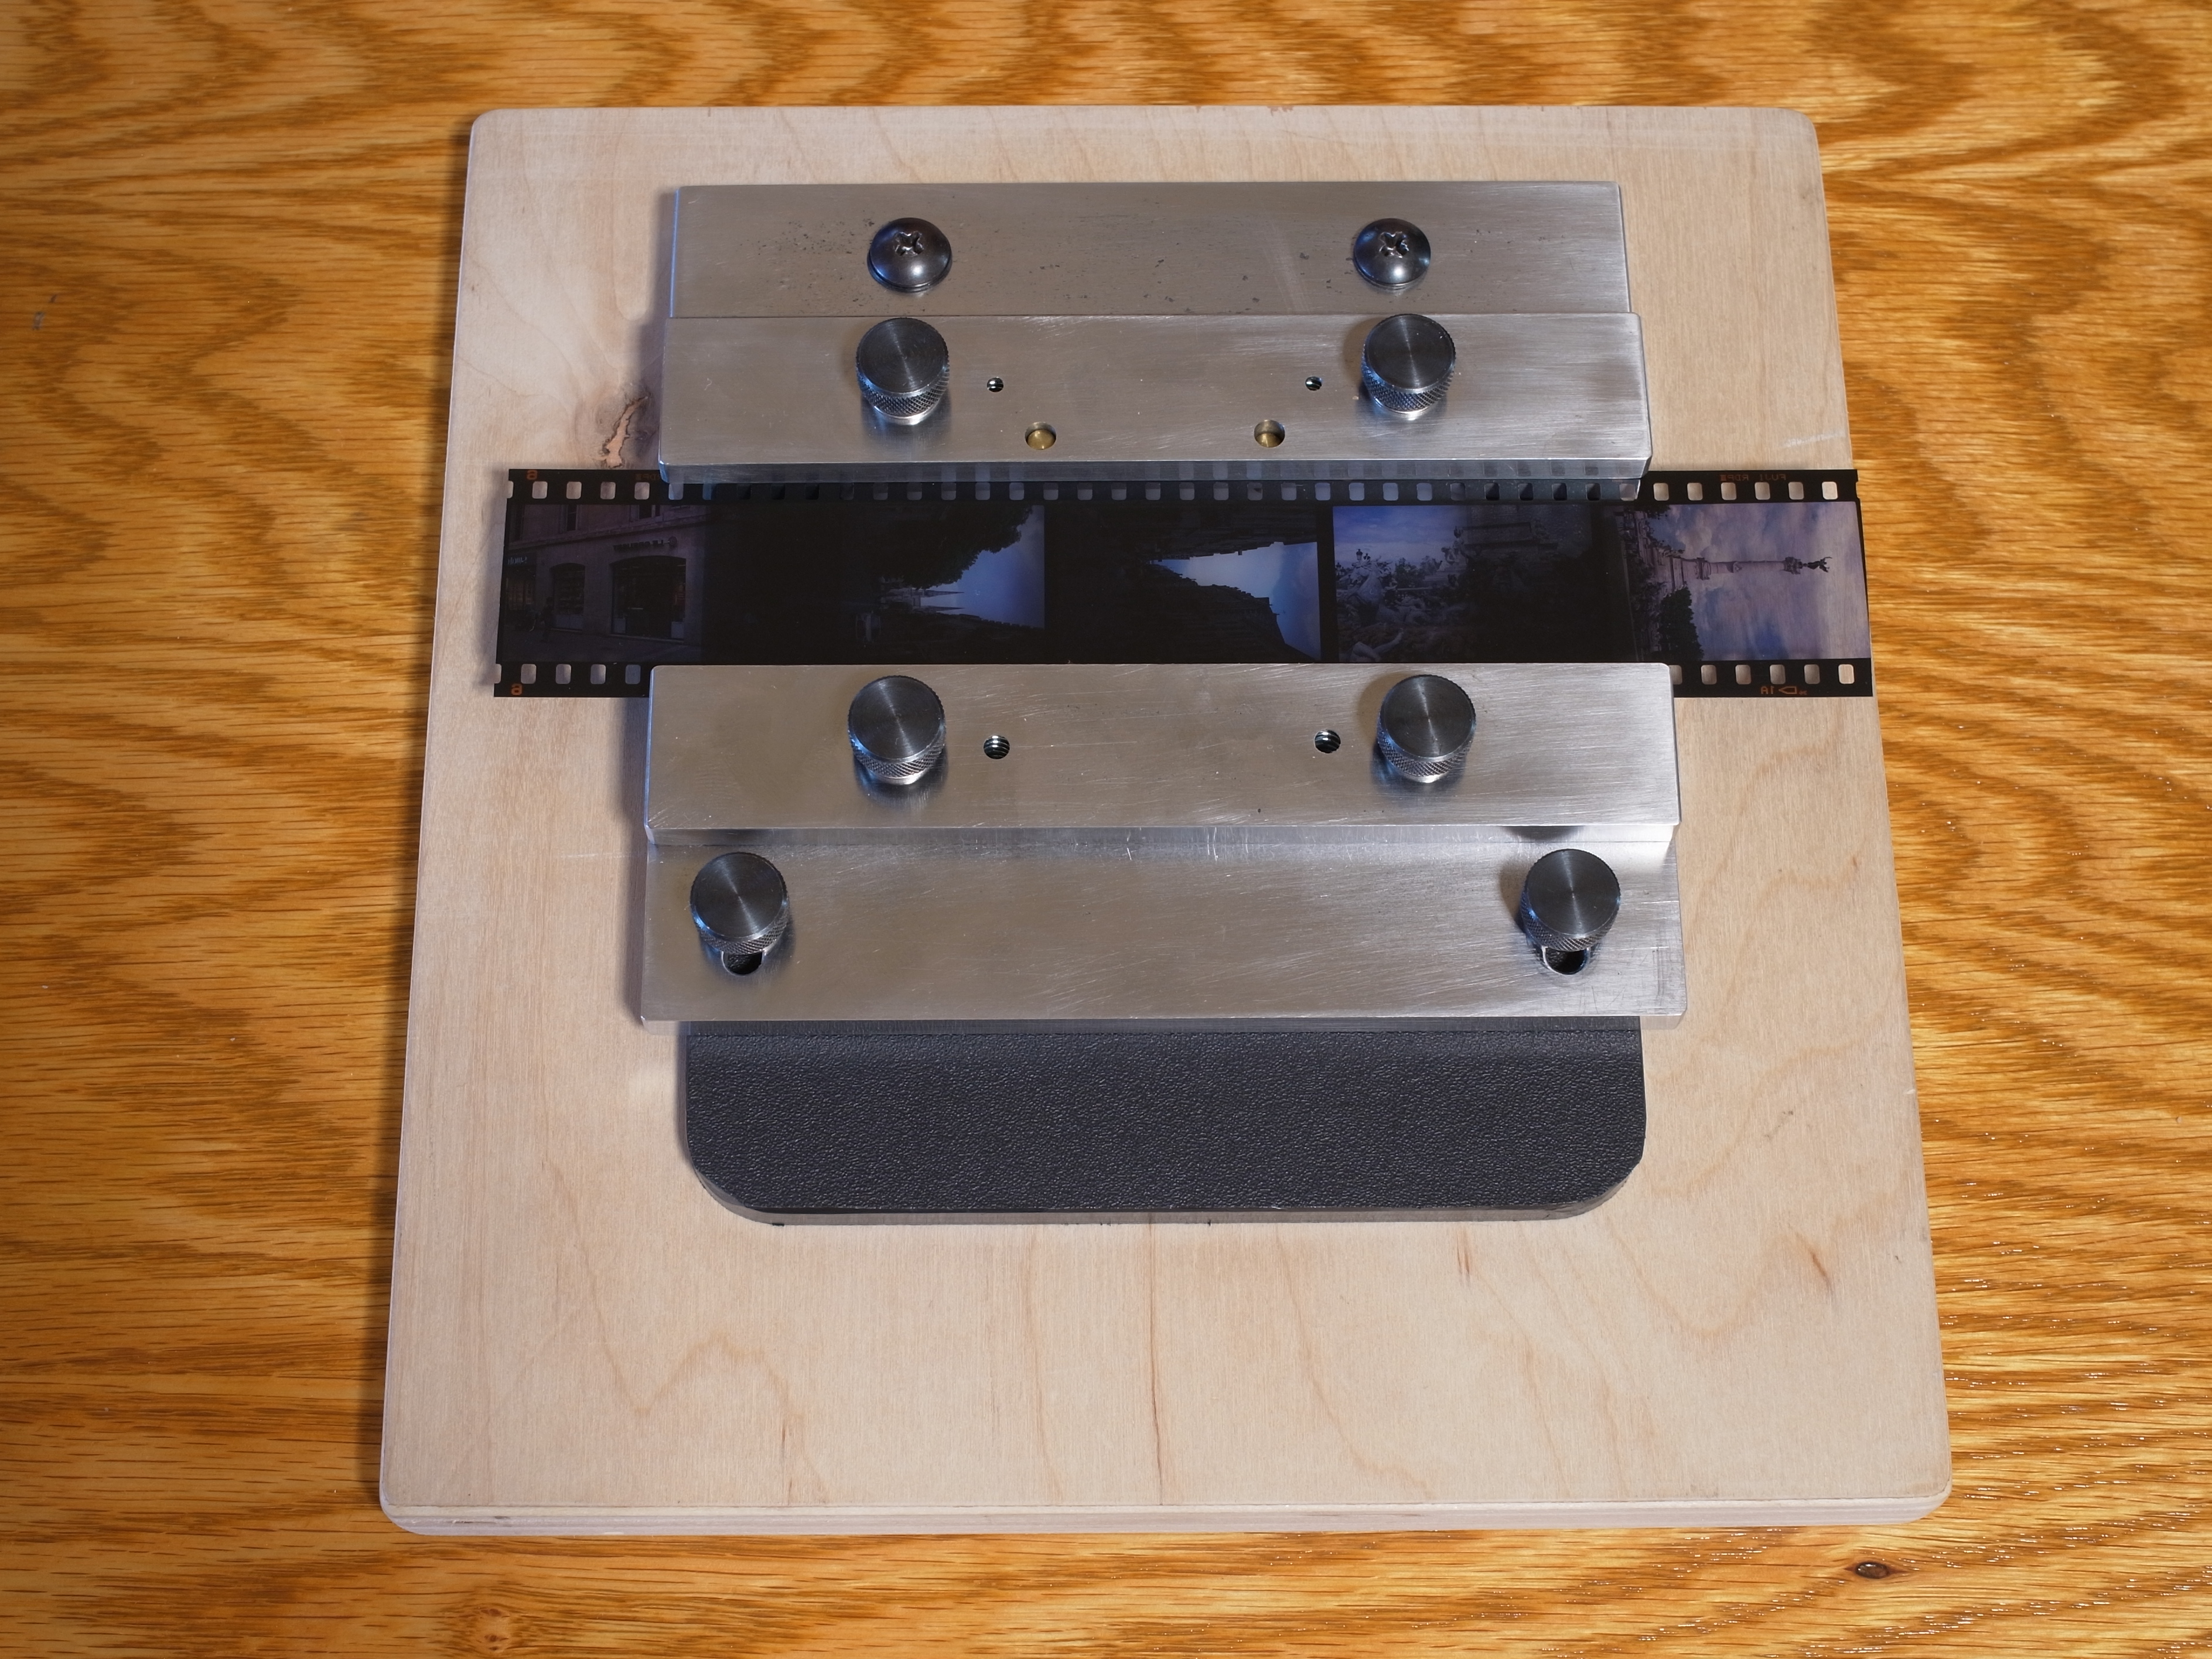
First a shot of the whole apparatus:
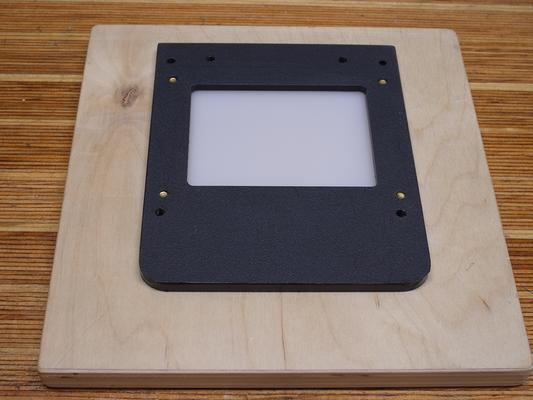
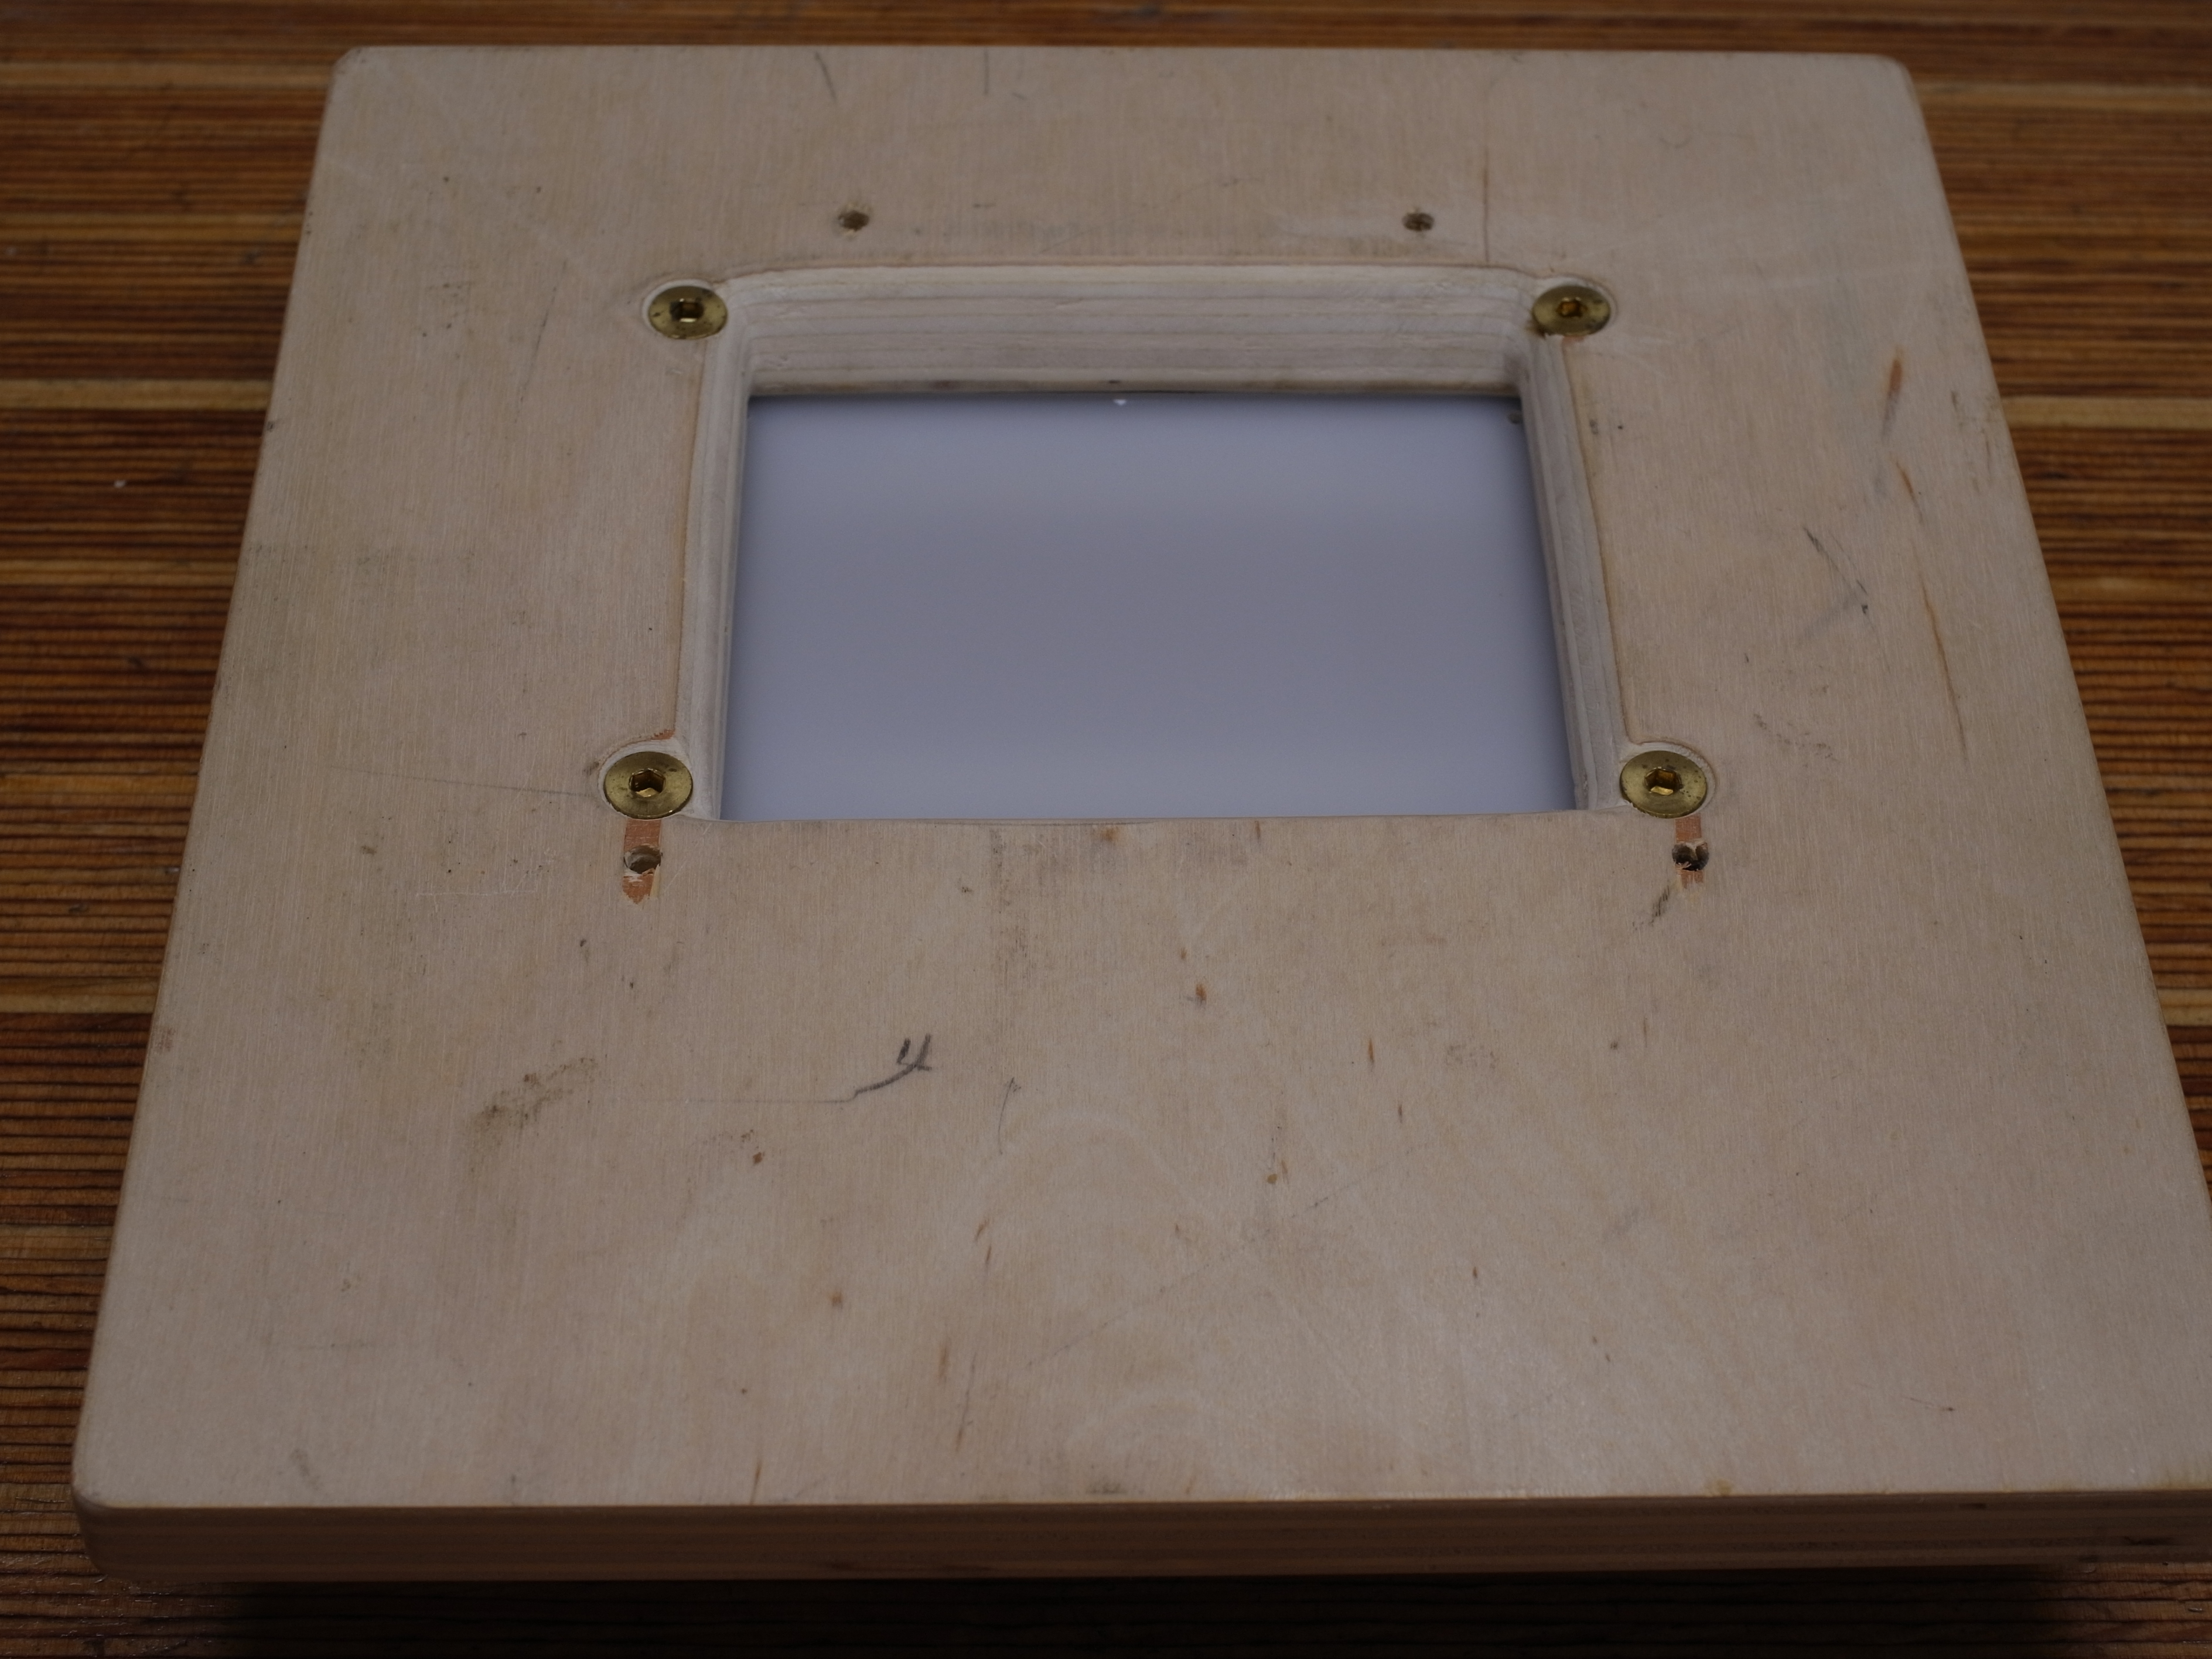
The base is just a piece of plywood, with a window cut-out, which is also beveled. Plywood is not necessarily ideal, since it is prone to shed off some dust. A few layers of shellac could solve this though. This is the bottom of said piece:

On top of that is a piece of hard plastic, about 1/4" thick. The plastic has a cut-out for a diffusion piece (also plastic). It is mounted into a recess on the bottom of the black piece. The plywood and plastic piece are screwed together. It is quite easy to drill and tap plastic, and holds well.
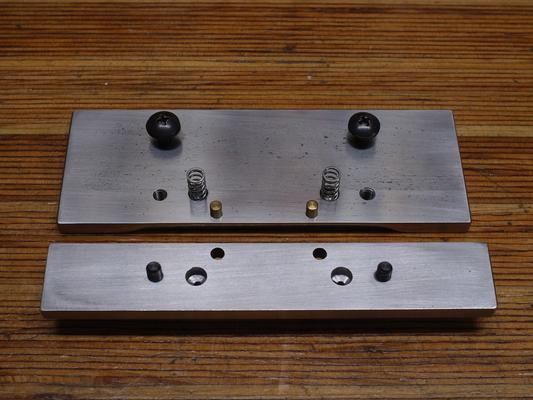
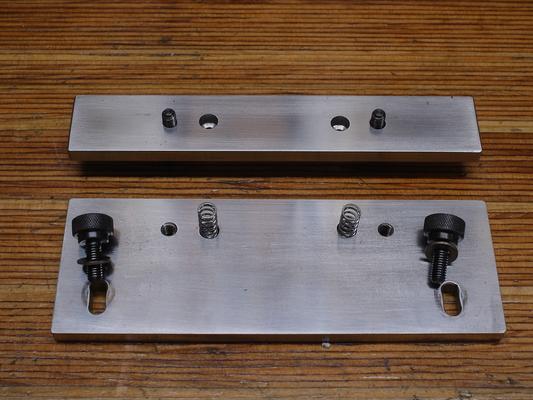
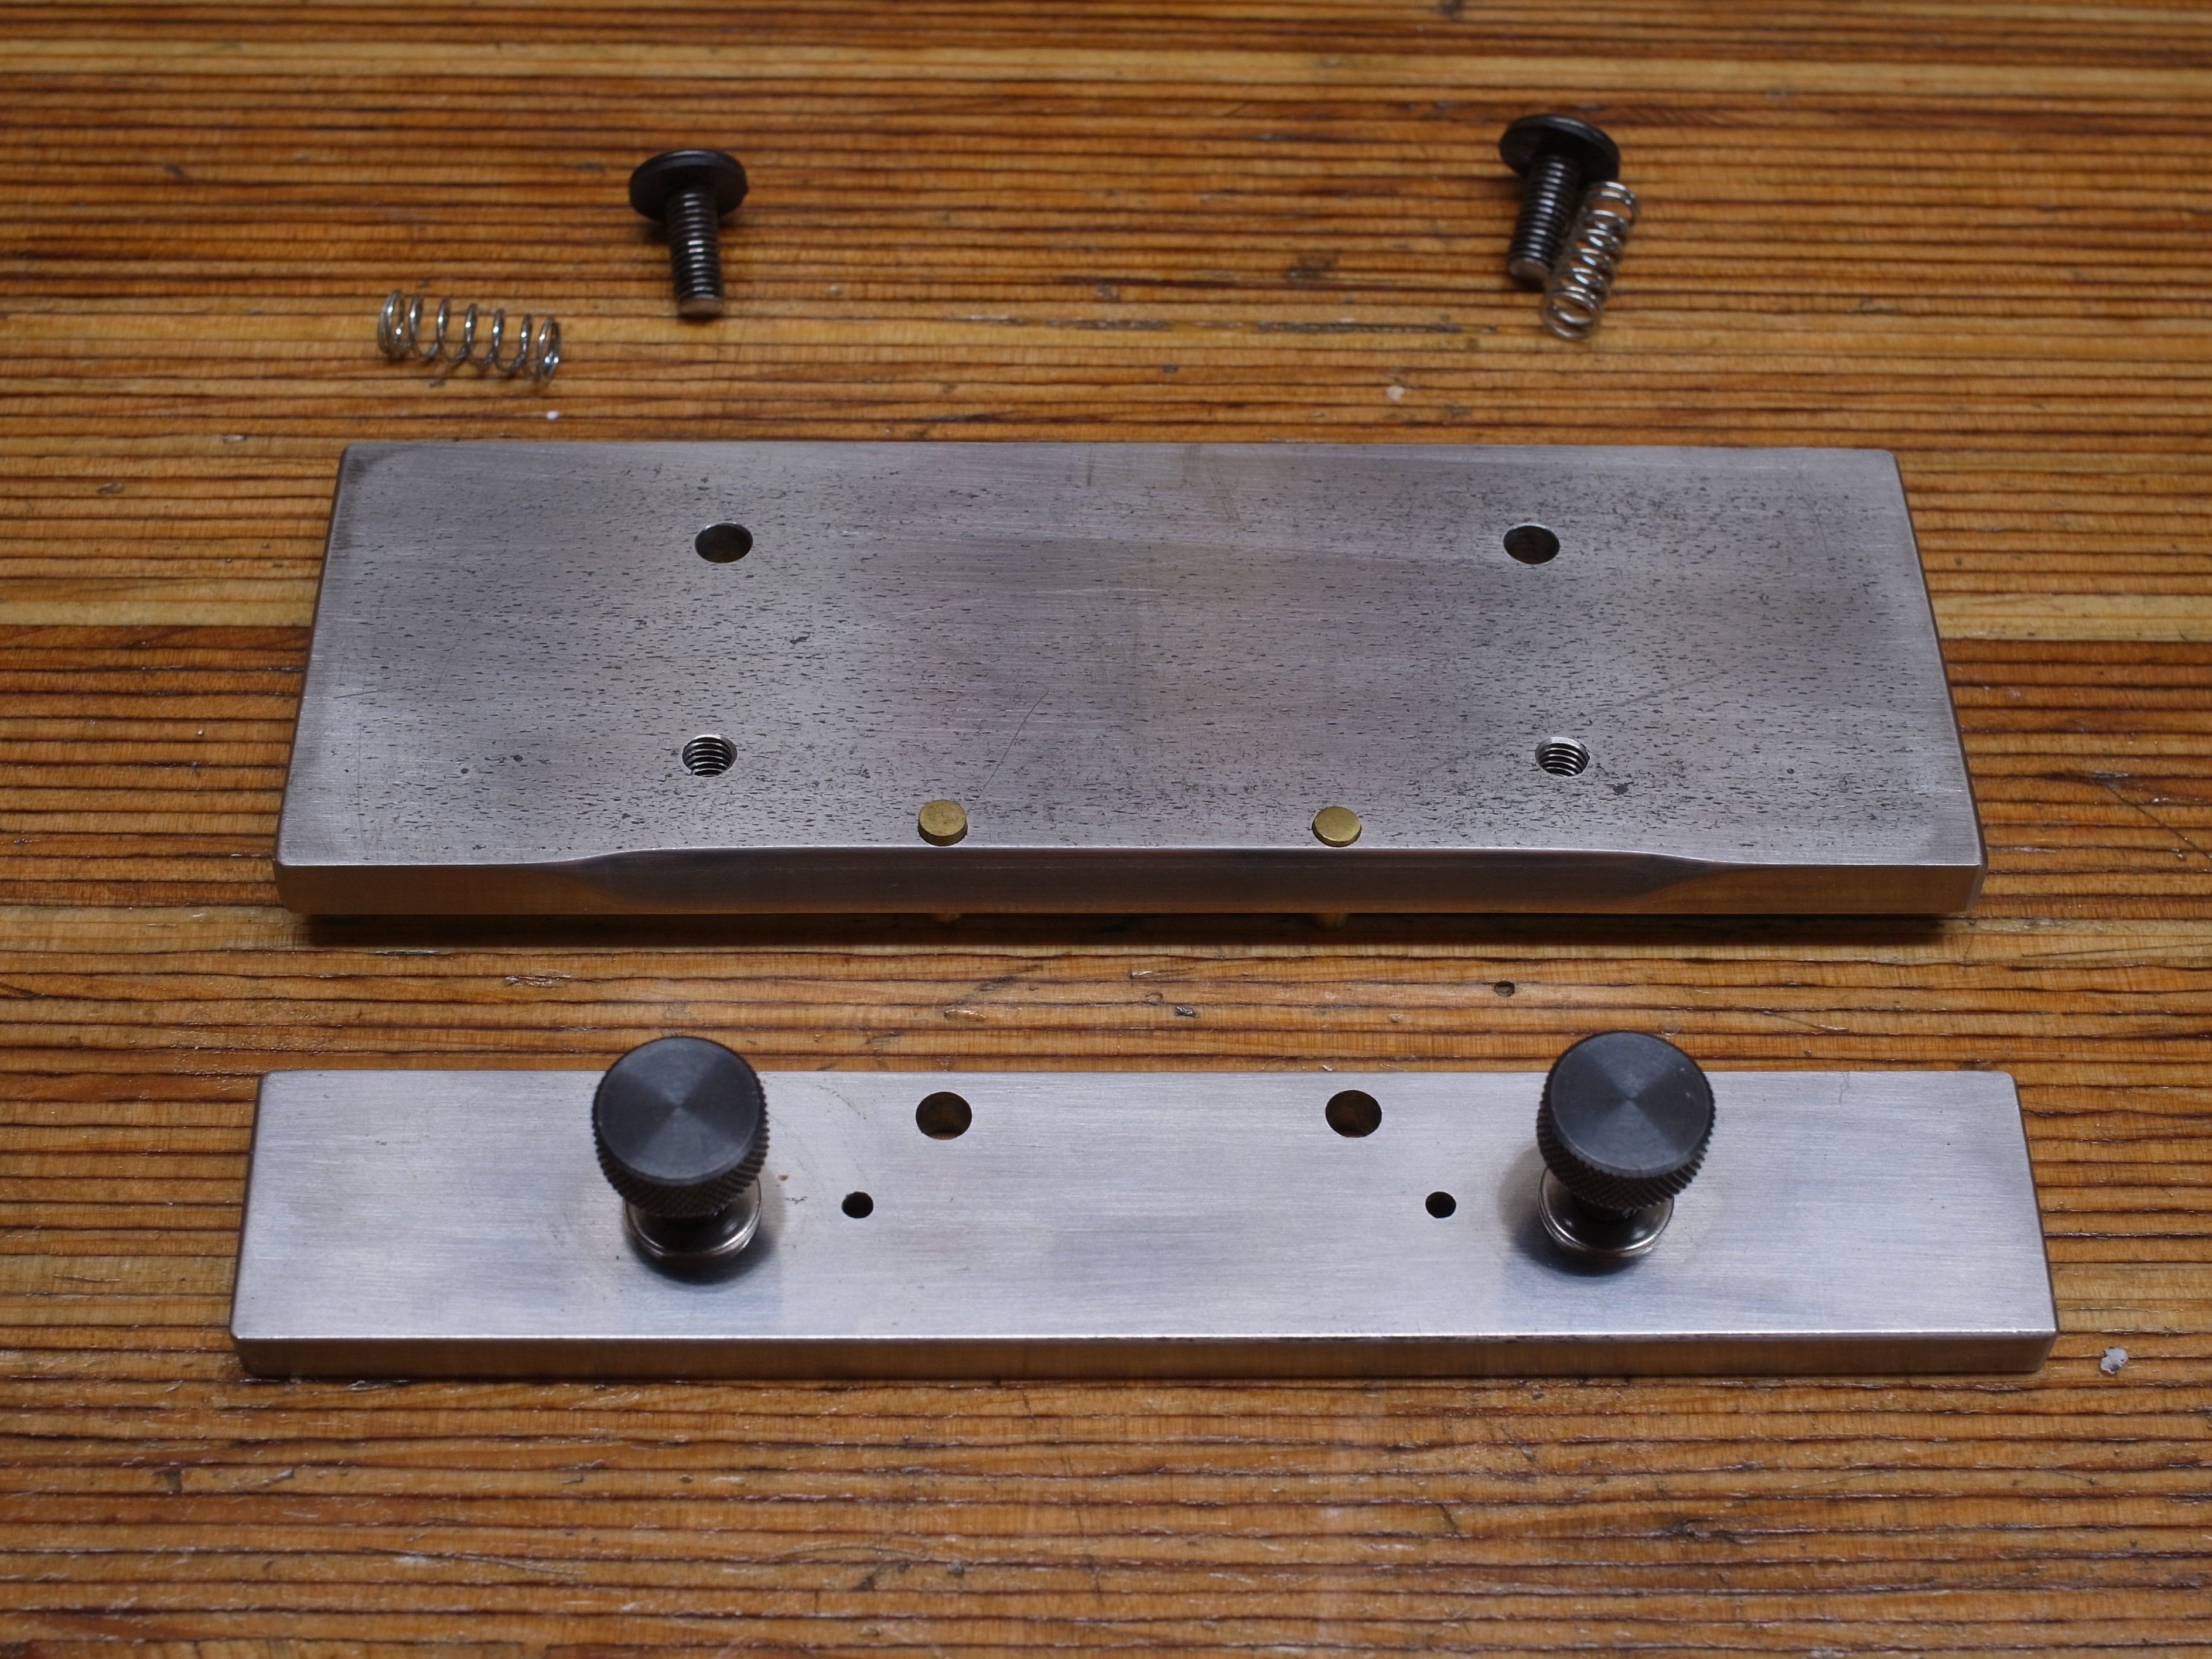
Now come the more interesting parts, the steel pieces that actually hold the film strip. These are 1/4" thick steel pieces, about 3/4" and 1 1/2" wide. A bit over 5" long. The bottom piece as two holes in the back; the black Phillips screws pass through into threaded holes in the black plastic piece. This holds the bottom piece to the black piece.
On the front of the bottom piece are two small holes for the brass alignment pins. These stop the negative from slipping in too far.
Then there are two threaded holes into which the thumb screws go, mounting the top piece to the bottom piece.
The remaining two holes are blind holes (they don't go through the entire steel piece). These fit a compression spring. Mating blind holes are in the top piece, so that the springs are actually trapped in these blind holes, and when mounting the top to the bottom, the springs push the top piece up. This makes it much easier to mount the negatives.
You will notice that there are tiny holes in the blind holes... I drilled these through the top and bottom piece all in one go, so that I would have a guide to where exactly to drill the larger blind holes... easier than trying to measure everything exactly.
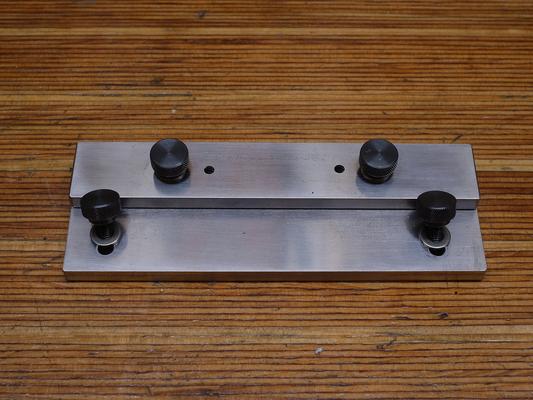
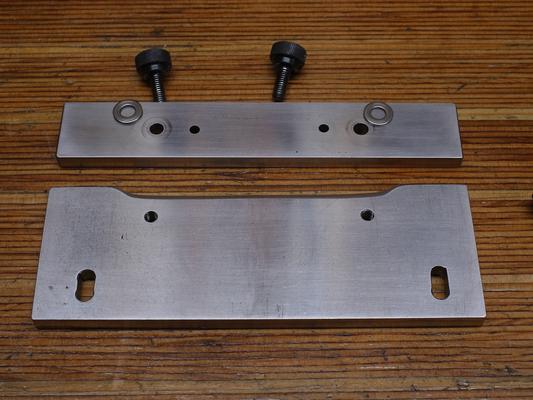
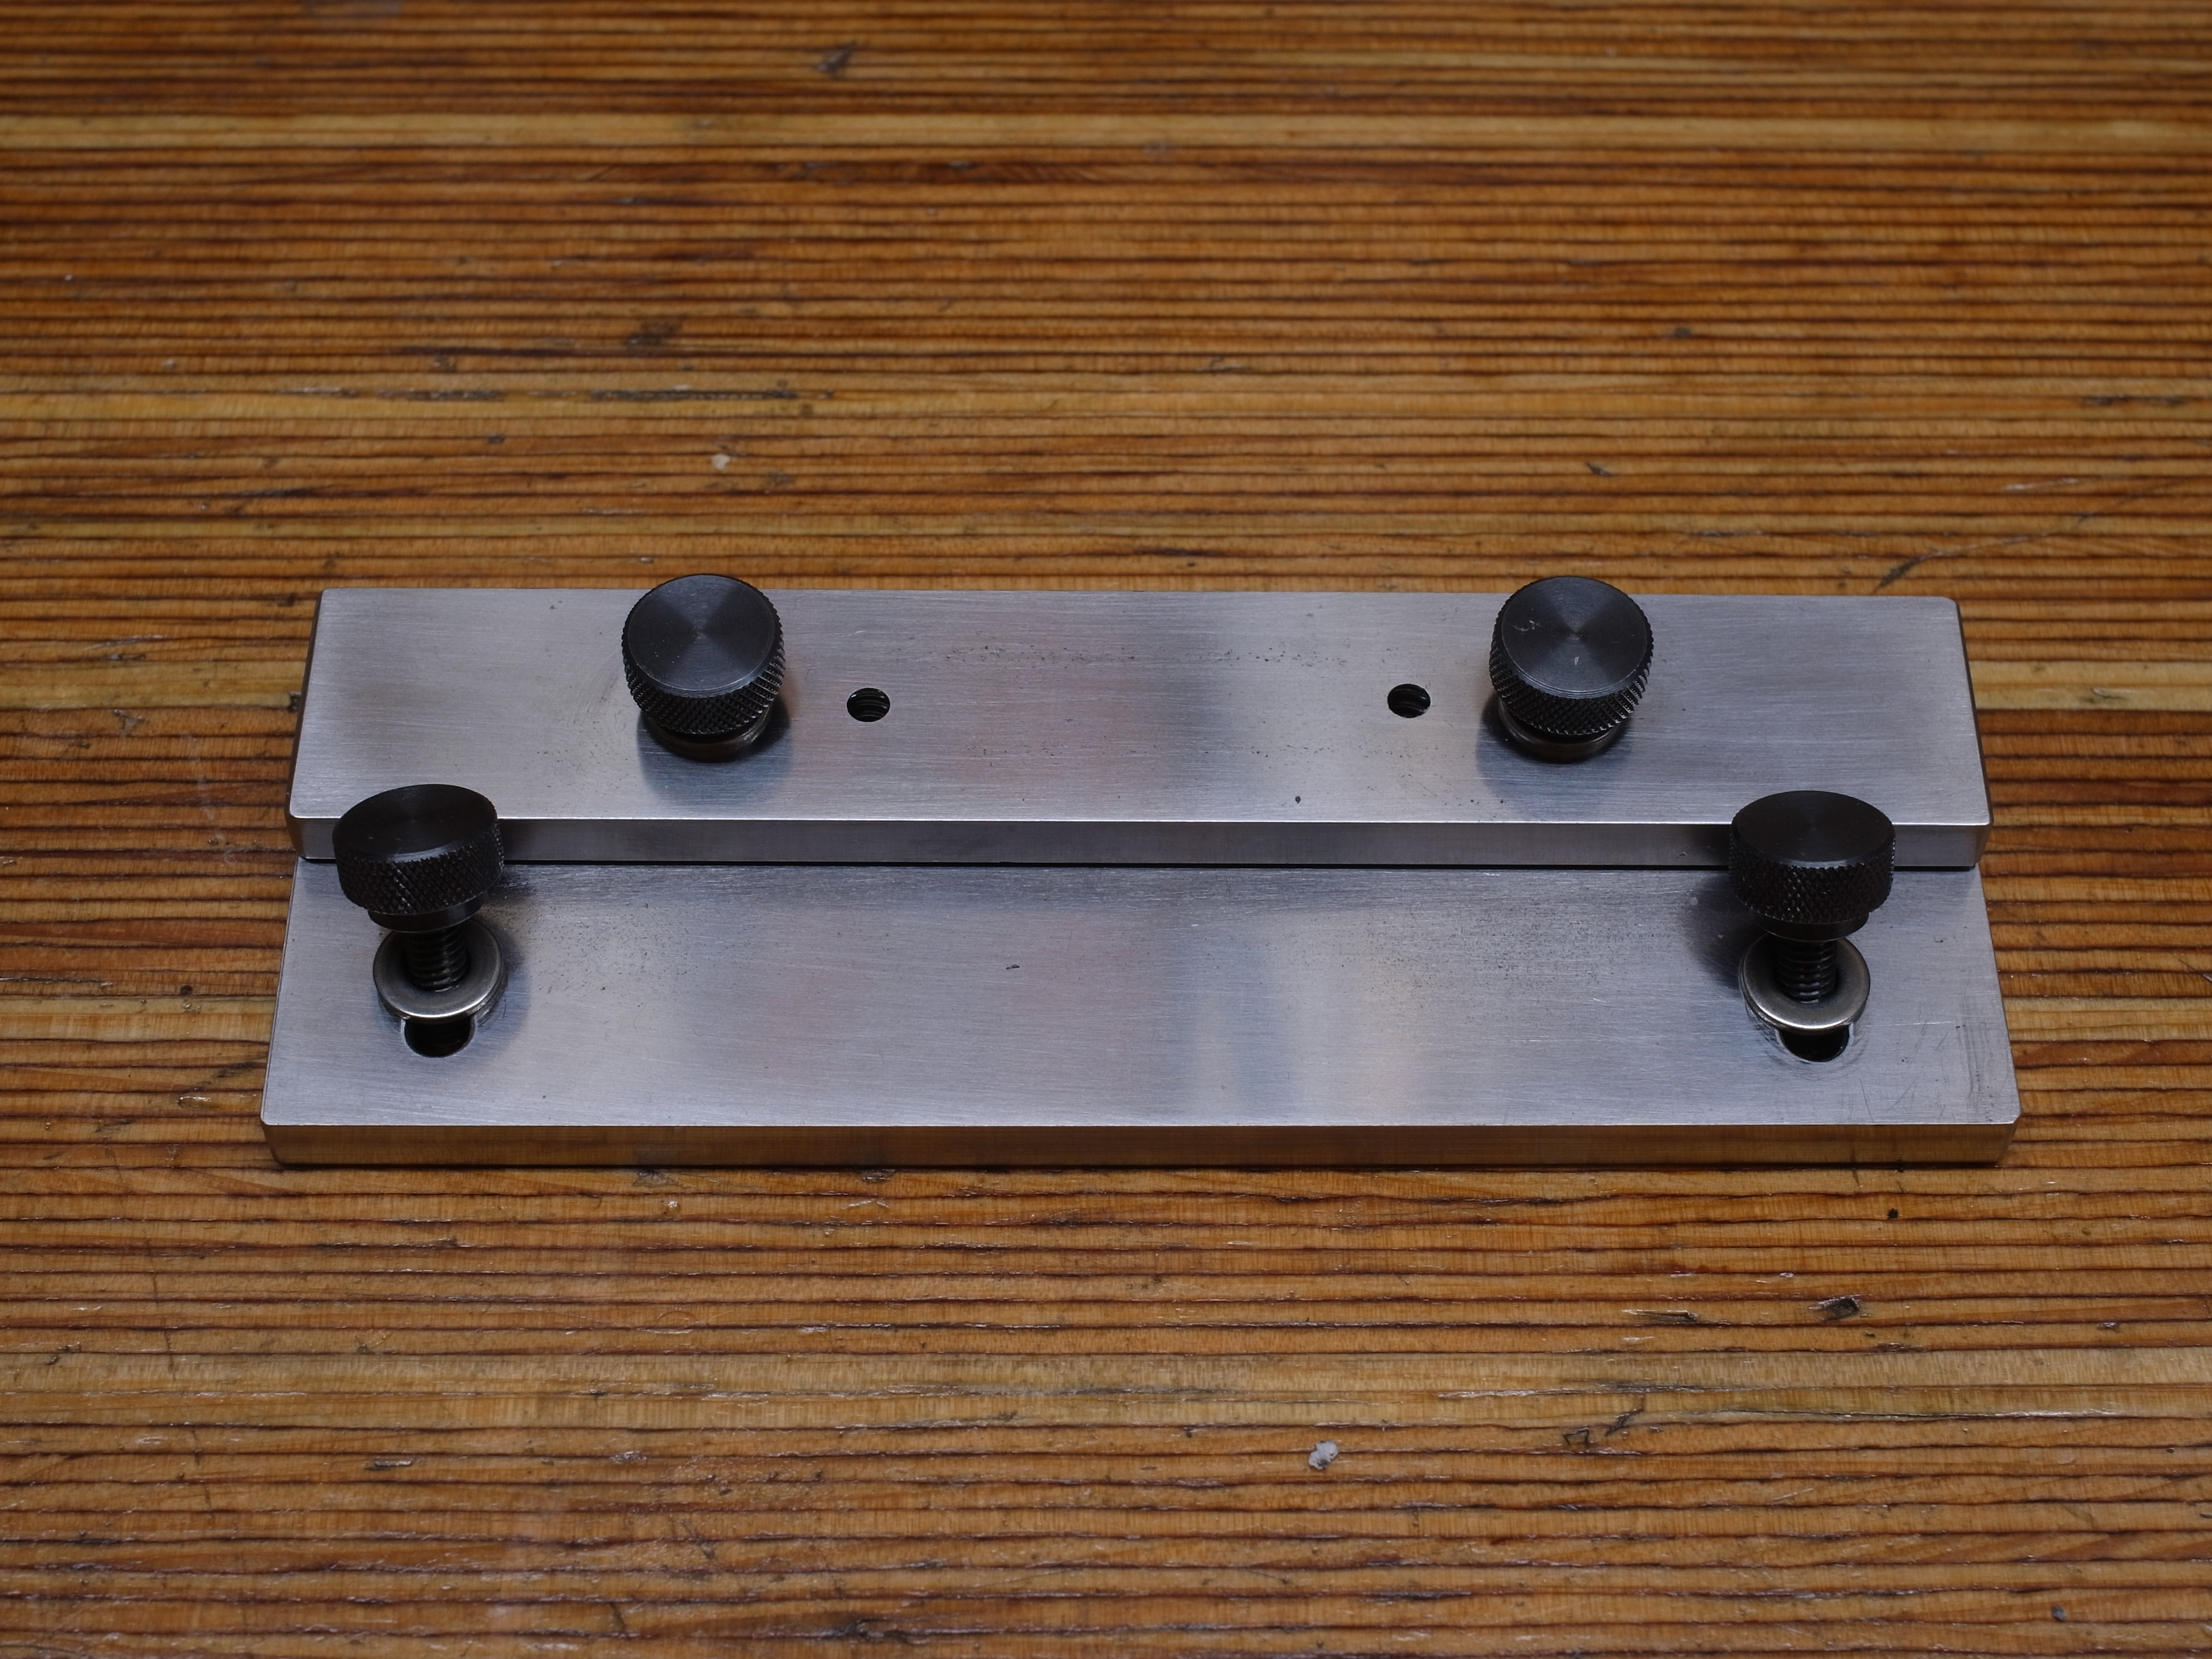
Here the same pieces from the other sides. The alignment pins should ideally also sit in blind holes...

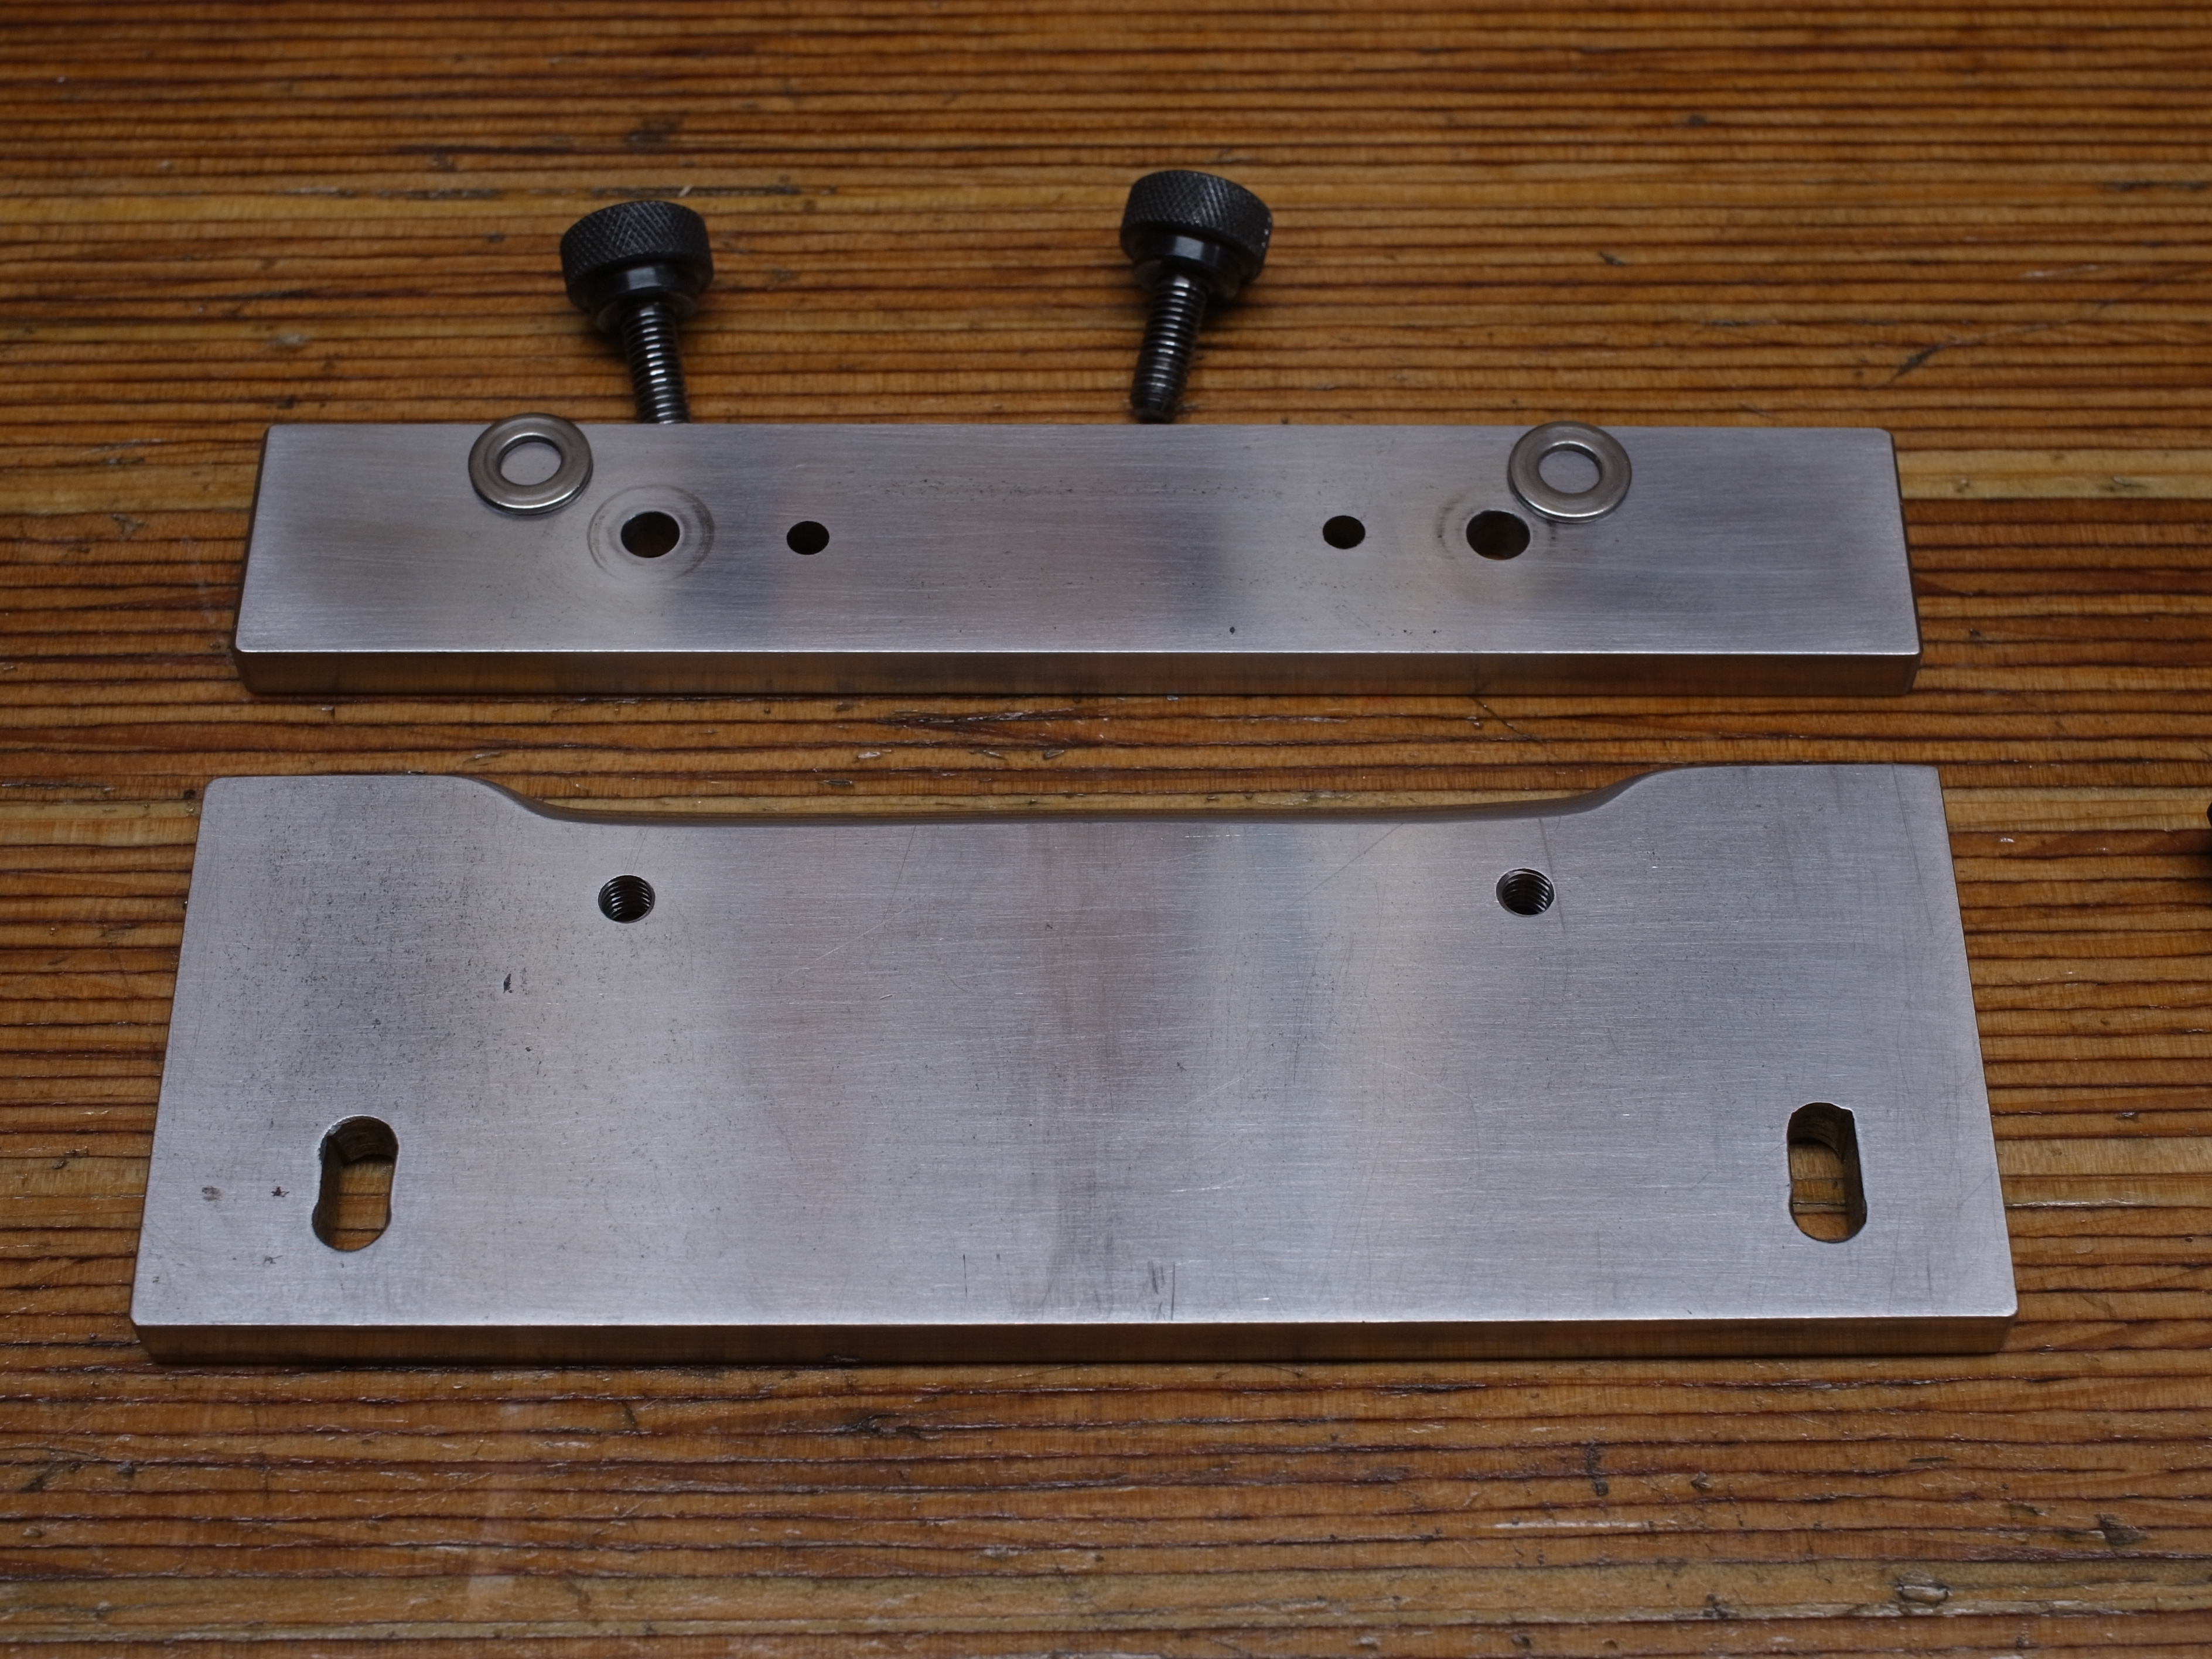
And this is the bottom part. For the most part it's the same as the other part:
It doesn't have the alignment pins, I figured the ones on the other part are sufficient.
As you can see in the next picture, there are again springs in blind holes.
The difference in this piece is, that the bottom piece is mounted through slots to the black piece. That way it can be moved back and forward. When I clamp a negative, I leave the bottom part loose within its slots, mount the negative between the top parts, then slightly pull down the slot-mounted part to flatten the negative, and finally tighten the piece to the black piece.
It sounds a lot more complicated that it is... just look at the pictures, it's fairly simple.
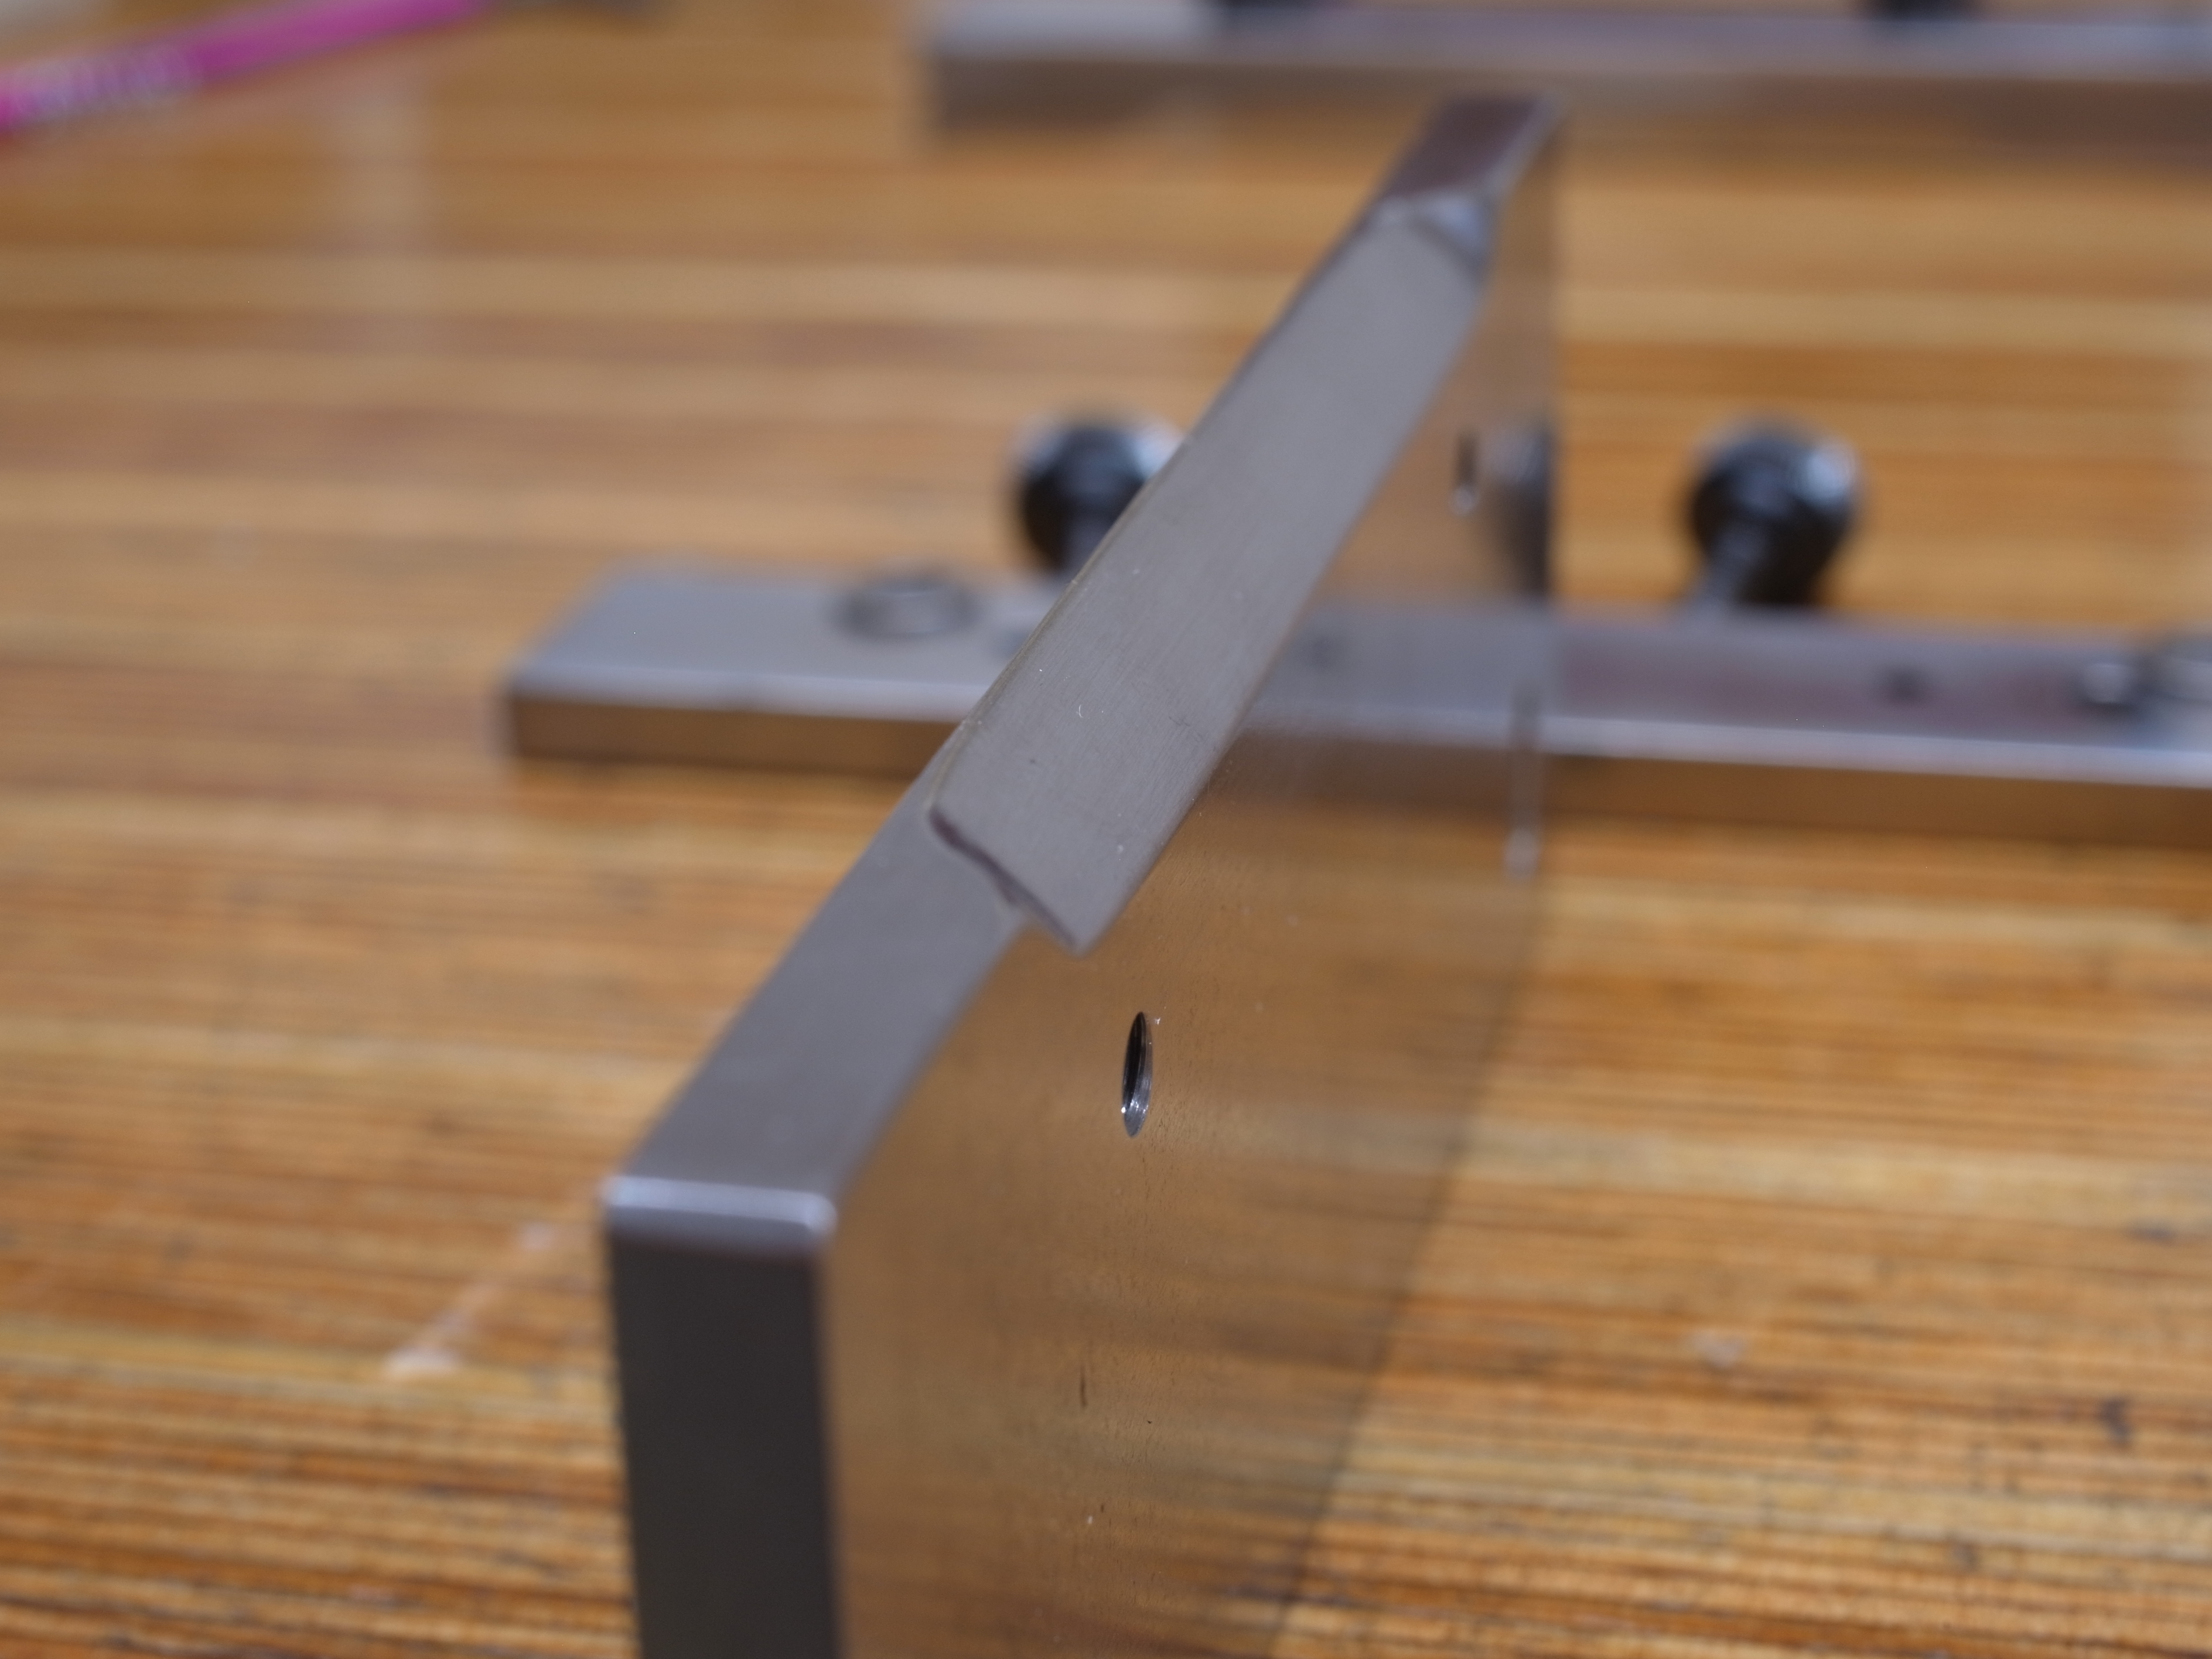
Here the same piece from the other side:
You can see the bevel I filed into the edges. At first these were straight, and caused some reflections. The bevel prevents that. I could have also just painted the edges mat-black I suppose... Reflections are something to watch out for when using steel or aluminum.

Notice that I originally had pretty much the same thing built all out of the black plastic. That didn't work... the plastic, once you put a bit of tension on it, is too slippery to hold the negatives in place, and also tends to bend.
I already had the steel lying around, just did a bunch of sanding to get it nice. The screws, thumb screws, compression springs, and washers are all from my favorite place to find parts, McMaster-Carr. They've got everything for the DIY-minded person... and a great web site that makes it easy to find parts.
I used these thumb-screws. And these compression springs.
I highly recommend a drill-press and a good tapping set if you should build this yourself, or something similar. Getting all the holes lined up is a bit of a challenge. I kind of like doing a bit of metal work (I do a lot of woodworking otherwise), so this was a fun project for me")
Last but not least...
I am not saying this is the ultimate way to mount negatives for DSLR scanning... There are much simpler ways to mount negatives, which may be sufficient for you. The "DigitaLIZA" for example is what Godfrey uses.
The main reason I built this holder is to avoid any glass, and to have a way to mount negatives very flat. I had a lot of trouble with anti-newton glass, which is also just another layer to collect dust.
It was initially made for 6×7 slides. For 35mm film, it could be wider, e.g. wide enough to mount six negatives.
First a shot of the whole apparatus:
The base is just a piece of plywood, with a window cut-out, which is also beveled. Plywood is not necessarily ideal, since it is prone to shed off some dust. A few layers of shellac could solve this though. This is the bottom of said piece:
On top of that is a piece of hard plastic, about 1/4" thick. The plastic has a cut-out for a diffusion piece (also plastic). It is mounted into a recess on the bottom of the black piece. The plywood and plastic piece are screwed together. It is quite easy to drill and tap plastic, and holds well.

Now come the more interesting parts, the steel pieces that actually hold the film strip. These are 1/4" thick steel pieces, about 3/4" and 1 1/2" wide. A bit over 5" long. The bottom piece as two holes in the back; the black Phillips screws pass through into threaded holes in the black plastic piece. This holds the bottom piece to the black piece.
On the front of the bottom piece are two small holes for the brass alignment pins. These stop the negative from slipping in too far.
Then there are two threaded holes into which the thumb screws go, mounting the top piece to the bottom piece.
The remaining two holes are blind holes (they don't go through the entire steel piece). These fit a compression spring. Mating blind holes are in the top piece, so that the springs are actually trapped in these blind holes, and when mounting the top to the bottom, the springs push the top piece up. This makes it much easier to mount the negatives.
You will notice that there are tiny holes in the blind holes... I drilled these through the top and bottom piece all in one go, so that I would have a guide to where exactly to drill the larger blind holes... easier than trying to measure everything exactly.

Here the same pieces from the other sides. The alignment pins should ideally also sit in blind holes...
And this is the bottom part. For the most part it's the same as the other part:
It doesn't have the alignment pins, I figured the ones on the other part are sufficient.
As you can see in the next picture, there are again springs in blind holes.
The difference in this piece is, that the bottom piece is mounted through slots to the black piece. That way it can be moved back and forward. When I clamp a negative, I leave the bottom part loose within its slots, mount the negative between the top parts, then slightly pull down the slot-mounted part to flatten the negative, and finally tighten the piece to the black piece.
It sounds a lot more complicated that it is... just look at the pictures, it's fairly simple.

Here the same piece from the other side:
You can see the bevel I filed into the edges. At first these were straight, and caused some reflections. The bevel prevents that. I could have also just painted the edges mat-black I suppose... Reflections are something to watch out for when using steel or aluminum.
Notice that I originally had pretty much the same thing built all out of the black plastic. That didn't work... the plastic, once you put a bit of tension on it, is too slippery to hold the negatives in place, and also tends to bend.
I already had the steel lying around, just did a bunch of sanding to get it nice. The screws, thumb screws, compression springs, and washers are all from my favorite place to find parts, McMaster-Carr. They've got everything for the DIY-minded person... and a great web site that makes it easy to find parts.
I used these thumb-screws. And these compression springs.
I highly recommend a drill-press and a good tapping set if you should build this yourself, or something similar. Getting all the holes lined up is a bit of a challenge. I kind of like doing a bit of metal work (I do a lot of woodworking otherwise), so this was a fun project for me
Last but not least...
I am not saying this is the ultimate way to mount negatives for DSLR scanning... There are much simpler ways to mount negatives, which may be sufficient for you. The "DigitaLIZA" for example is what Godfrey uses.
The main reason I built this holder is to avoid any glass, and to have a way to mount negatives very flat. I had a lot of trouble with anti-newton glass, which is also just another layer to collect dust.
Jockos
Well-known
Loads of awesomenes
So, when will these be available for order? Black anodized aluminum would probably be a good option!
DrTebi
Slide Lover
Haha! I was afraid someone would ask that question...So, when will these be available for order? Black anodized aluminum would probably be a good option!
danitoma
Newbie
Thanks for the inspiration! Gives me some ideas to work with, maybe just starting with adding springs to my current holder.
Have you found how much film needs to be gripped minimally? Sometimes I like to get the film edge markings and it would be great if that was possible.
Have you found how much film needs to be gripped minimally? Sometimes I like to get the film edge markings and it would be great if that was possible.
Godfrey
somewhat colored
...
I am not saying this is the ultimate way to mount negatives for DSLR scanning... There are much simpler ways to mount negatives, which may be sufficient for you. The "DigitaLIZA" for example is what Godfrey uses.
...
Um, no. Whatever gave you that idea? I posted a photo of my home-brew film channel device.
The new copy/repro stand I ordered has just arrived. Now I can do some testing with it using the new CL body and my Macro-Elmar-R 100/focusing bellows setup. Woo HOo!
dourbalistar
Buy more film
I am not saying this is the ultimate way to mount negatives for DSLR scanning... There are much simpler ways to mount negatives, which may be sufficient for you. The "DigitaLIZA" for example is what Godfrey uses.
Um, no. Whatever gave you that idea? I posted a photo of my home-brew film channel device.
The new copy/repro stand I ordered has just arrived. Now I can do some testing with it using the new CL body and my Macro-Elmar-R 100/focusing bellows setup. Woo HOo!
I think it's Huss that uses the DigitaLIZA.
He's posted some examples on this thread.Huss
Mentor
I think it's Huss that uses the DigitaLIZA.
Indeed! I posted this earlier in this thread, but here it is again:
This is how much detail I capture with a D850 and Nikon 60 2.8 lens, the pano image using a Lomo DIGITILIZA film holder, $150 copy stand and $20 lightpad from Amazon.
No messing with manual focus, in live view the camera's auto focus nails pin sharp focus instantly. Same thing with the D750 I used before the D850.
Noblex 135 Sport, Fuji C200, D850

1:1 crop from left corner, showing how sharp the Noblex 135 is (and of course the D850 scan!), and how flat the Lomo Digitiliza holds the film:

Godfrey
somewhat colored
...
The new copy/repro stand I ordered has just arrived. Now I can do some testing with it using the new CL body and my Macro-Elmar-R 100/focusing bellows setup. Woo HOo!
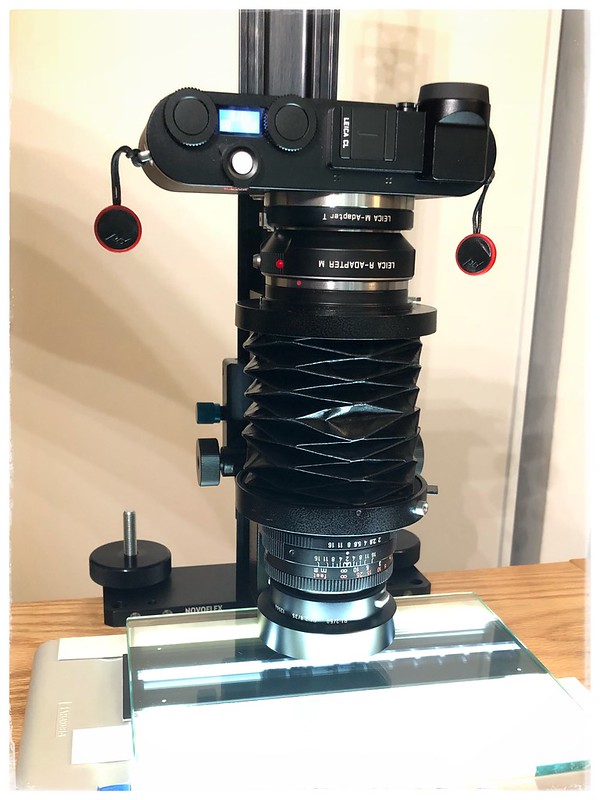
A little more info: The copy stand I just received is the Novoflex Magic Studio Macro-Repro Support.
The bottom of the support is a clamp made up of two thick, precisely machined pieces that are pulled together with a pair of large bolts and large diameter, weighted clamping wheels. Right behind the post is a third bolt with a wing-nut end on top that threads down through the top piece and bears on the bottom piece. You open these three bolts up and slide them over the end of any table or stand that you want to use as a base for your work, clamp the stand in position with the two weighted clamping wheels, and then wind down the third bolt so that it bottoms on the bottom plate. This makes the vertical column exceptionally rigid and prevents it from tilting backwards.
The support column is a silky smooth machined piece with a platform that travels on it very smoothly that has a clamping screw on the side. You loosen the clamping screw, slide the platform up to the top, and bolt your camera assembly to the platform, via a thick captive bolt, through a hole in the support. It only takes a very light amount of pressure on the clamping screw to lock the platform in position even with a heavy bellows/lens/camera assembly fitted, and the pieces are so smoothly finished and fitted that you can move the camera's position very, very precisely.
There are additional machined and threaded holes in the support for use with other accessories ... such as a few different sets of copy light arms, lights, camera pedestals, stage options, etc ... that make it part of a full system for macro and close up work. For the purposes of this thread in providing a sturdy and secure support for film capture, none of those are needed. All you need is a sturdy, level table with a table top that's up to about 1.5 inches thick.
I tested using it using a Leica CL body with the Macro-Elmarit-R 60mm and Macro-Elmar-R 100mm+Focusing Bellows-R, with of course the appropriate mount adapters. The 60mm lens is the correct one to use on this body for film capture of 35mm or 120 films, since the lens mount can handle both magnifications (1:2 and 1:3.5 respectively) with no additional accessories.
With the CL body, focusing is incredibly easy: I set the magnification ratio I'm looking for on the lens's focusing scale, turned on the focus peaking, set the lens aperture wide open, loosen the platform's clamping screw, and slowly raise or lower the camera assembly until the focus peaking shimmers on the surface of the negative. Snug the clamping screw and close the aperture down to f/5.6 or f/8: that's perfect focus. I then turn off the focus assist to provide a clear view for positioning of the subject. I did test shots this way of 1:3.5, 1:2, and 1:1 settings (the last with the Macro Adapter-R fitted to the camera assembly) using a precision metal ruler as a target—the magnification markings on the lens are exactly, precisely right on target.
The Novoflex Magic Studio Macro-Repro Support is pretty pricey at $260 but, WOW! Its precision, quality, and ease of use is so worth it! It blows away all the prior copy stands I've owned and used over the years, barring only the Leica BEOON, which is a more specialized use copy stand setup. And, like the BEOON, when not in use it packs down nearly flat and takes up very little space.
A brilliant piece of equipment! I'm very pleased with it. Now to make some negative captures with the CL...
DrTebi
Slide Lover
Glad it was of helpThanks for the inspiration! Gives me some ideas to work with, maybe just starting with adding springs to my current holder.
Have you found how much film needs to be gripped minimally? Sometimes I like to get the film edge markings and it would be great if that was possible.
The clamp works with just very little of the negative inside the metal strips, about 2mm are enough. It may still overlap with the manufacturer's markings though. I guess you will have to write down the film type etc... into the exif comment for example. Unless you want that info for artistic purposes. Then I am afraid you would need to find another method of mounting.
DrTebi
Slide Lover
Sorry, mixed that up!I think it's Huss that uses the DigitaLIZA.
DrTebi
Slide Lover
Sounds exciting.A little more info: The copy stand I just received is the Novoflex Magic Studio Macro-Repro Support.
The bottom of the support is a clamp made up of two thick, precisely machined pieces that are pulled together with a pair of large bolts and large diameter, weighted clamping wheels. Right behind the post is a third bolt with a wing-nut end on top that threads down through the top piece and bears on the bottom piece. You open these three bolts up and slide them over the end of any table or stand that you want to use as a base for your work, clamp the stand in position with the two weighted clamping wheels, and then wind down the third bolt so that it bottoms on the bottom plate. This makes the vertical column exceptionally rigid and prevents it from tilting backwards.
The support column is a silky smooth machined piece with a platform that travels on it very smoothly that has a clamping screw on the side. You loosen the clamping screw, slide the platform up to the top, and bolt your camera assembly to the platform, via a thick captive bolt, through a hole in the support. It only takes a very light amount of pressure on the clamping screw to lock the platform in position even with a heavy bellows/lens/camera assembly fitted, and the pieces are so smoothly finished and fitted that you can move the camera's position very, very precisely.
There are additional machined and threaded holes in the support for use with other accessories ... such as a few different sets of copy light arms, lights, camera pedestals, stage options, etc ... that make it part of a full system for macro and close up work. For the purposes of this thread in providing a sturdy and secure support for film capture, none of those are needed. All you need is a sturdy, level table with a table top that's up to about 1.5 inches thick.
I tested using it using a Leica CL body with the Macro-Elmarit-R 60mm and Macro-Elmar-R 100mm+Focusing Bellows-R, with of course the appropriate mount adapters. The 60mm lens is the correct one to use on this body for film capture of 35mm or 120 films, since the lens mount can handle both magnifications (1:2 and 1:3.5 respectively) with no additional accessories.
With the CL body, focusing is incredibly easy: I set the magnification ratio I'm looking for on the lens's focusing scale, turned on the focus peaking, set the lens aperture wide open, loosen the platform's clamping screw, and slowly raise or lower the camera assembly until the focus peaking shimmers on the surface of the negative. Snug the clamping screw and close the aperture down to f/5.6 or f/8: that's perfect focus. I then turn off the focus assist to provide a clear view for positioning of the subject. I did test shots this way of 1:3.5, 1:2, and 1:1 settings (the last with the Macro Adapter-R fitted to the camera assembly) using a precision metal ruler as a target—the magnification markings on the lens are exactly, precisely right on target.
The Novoflex Magic Studio Macro-Repro Support is pretty pricey at $260 but, WOW! Its precision, quality, and ease of use is so worth it! It blows away all the prior copy stands I've owned and used over the years, barring only the Leica BEOON, which is a more specialized use copy stand setup. And, like the BEOON, when not in use it packs down nearly flat and takes up very little space.
A brilliant piece of equipment! I'm very pleased with it. Now to make some negative captures with the CL...
How good is the focus peaking working out for you? Can you see film grain in your results?
I was using auto-focus with the Nikon setup (60mm Macro lens), and noticed that it didn't focus right.
Now with the new setup, the Pentax K-1 and the FA 50mm Macro, the auto-focus is right on target. Really useful... once I have the camera to negative distance set, it's so much quicker with the auto-focus. As a matter of fact, I don't even use the live view screen anymore.
Have you checked out some of the bellows systems from the old days? The Pentax, Nikon, and Olympus ones are supposed to be very nice. Dovetail slides etc.
Just wondering why you chose the Novoflex copy stand over a bellows system... maybe it's the object to lens distance? I am sure the Novoflex is great, just not exactly cheap
twopointeight
Well-known
Thank DrTebi for getting around to my question. I'll probably stick with the A7II and find a lens for it. I have small Leitz copy stand and a lightbox. That's all the easy part.
Godfrey
somewhat colored
...
How good is the focus peaking working out for you? Can you see film grain in your results?
Perfectly. Yes.
I was using auto-focus with the Nikon setup (60mm Macro lens), and noticed that it didn't focus right.
I never use autofocus for macro work. My Leica Macro-Elmarit-R 60mm lens is not even an autofocus lens...
Have you checked out some of the bellows systems from the old days? The Pentax, Nikon, and Olympus ones are supposed to be very nice. Dovetail slides etc.
I have the Leica Focusing Bellows-R. It's is a superb bellows unit with a dedicated bellows mount Macro-Elmar-R 100mm lens, built in Focusing rail, and other attachments. But the 60mm lens is more appropriate for this task...
Just wondering why you chose the Novoflex copy stand over a bellows system... maybe it's the object to lens distance? I am sure the Novoflex is great, just not exactly cheap
A bellows is one way to get the lens extension needed for close up focusing; another way is to use a macro lens with built-in extension in the focusing mount, and sometimes, when you need additional magnification, you use both bellows and macro lens together. Whichever you need to use, dependent upon the magnification range required and the appropriate focal length lens, the camera assembly with lens and focusing system needs to be mounted on a support to target the subject. I need a support to allow copying not only 35mm and 120 negatives but other flat or low profile, small subject targets as well. A good copystand is essential to 90% of my macro and copy needs. I was tired of using crappy stands that were not stable and were imprecise. The Novoflex is very stable and very precise; it's also very flexible in use and is part of a complete system of stands, bases, backgrounds, lights and accessories targeting macro and close-up photography. These qualities make it well worth the money for my uses.
Godfrey
somewhat colored
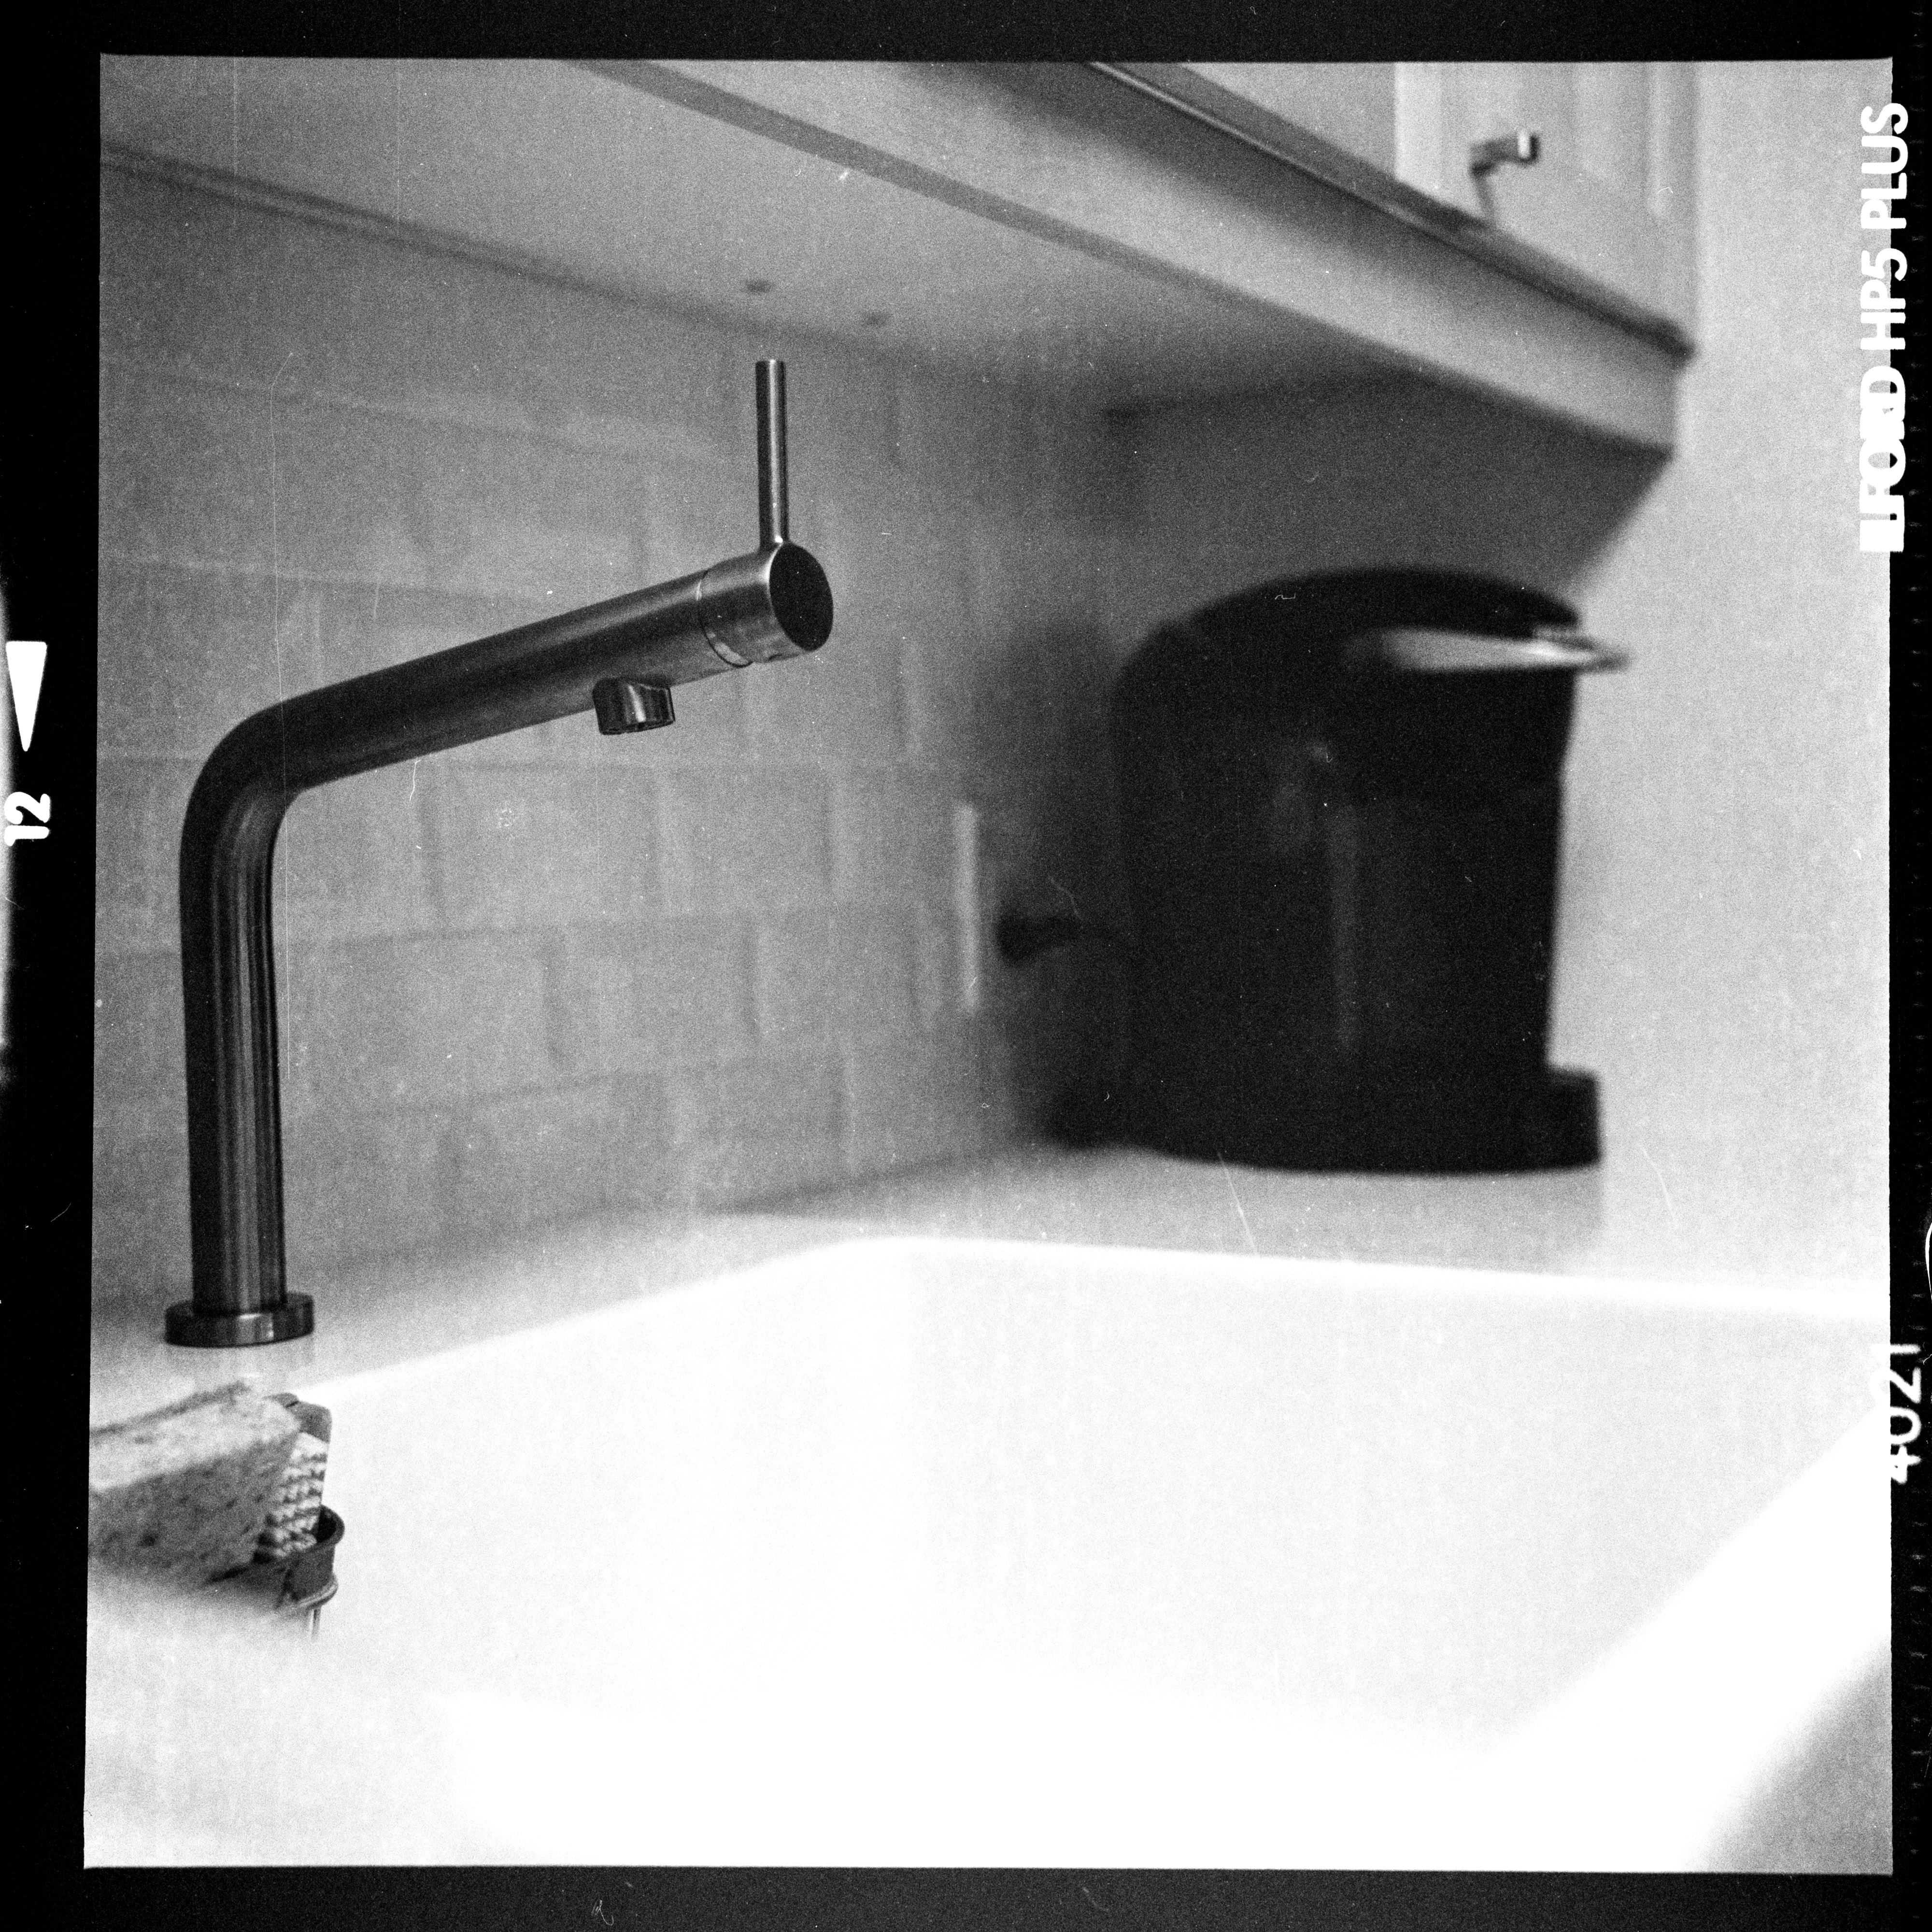
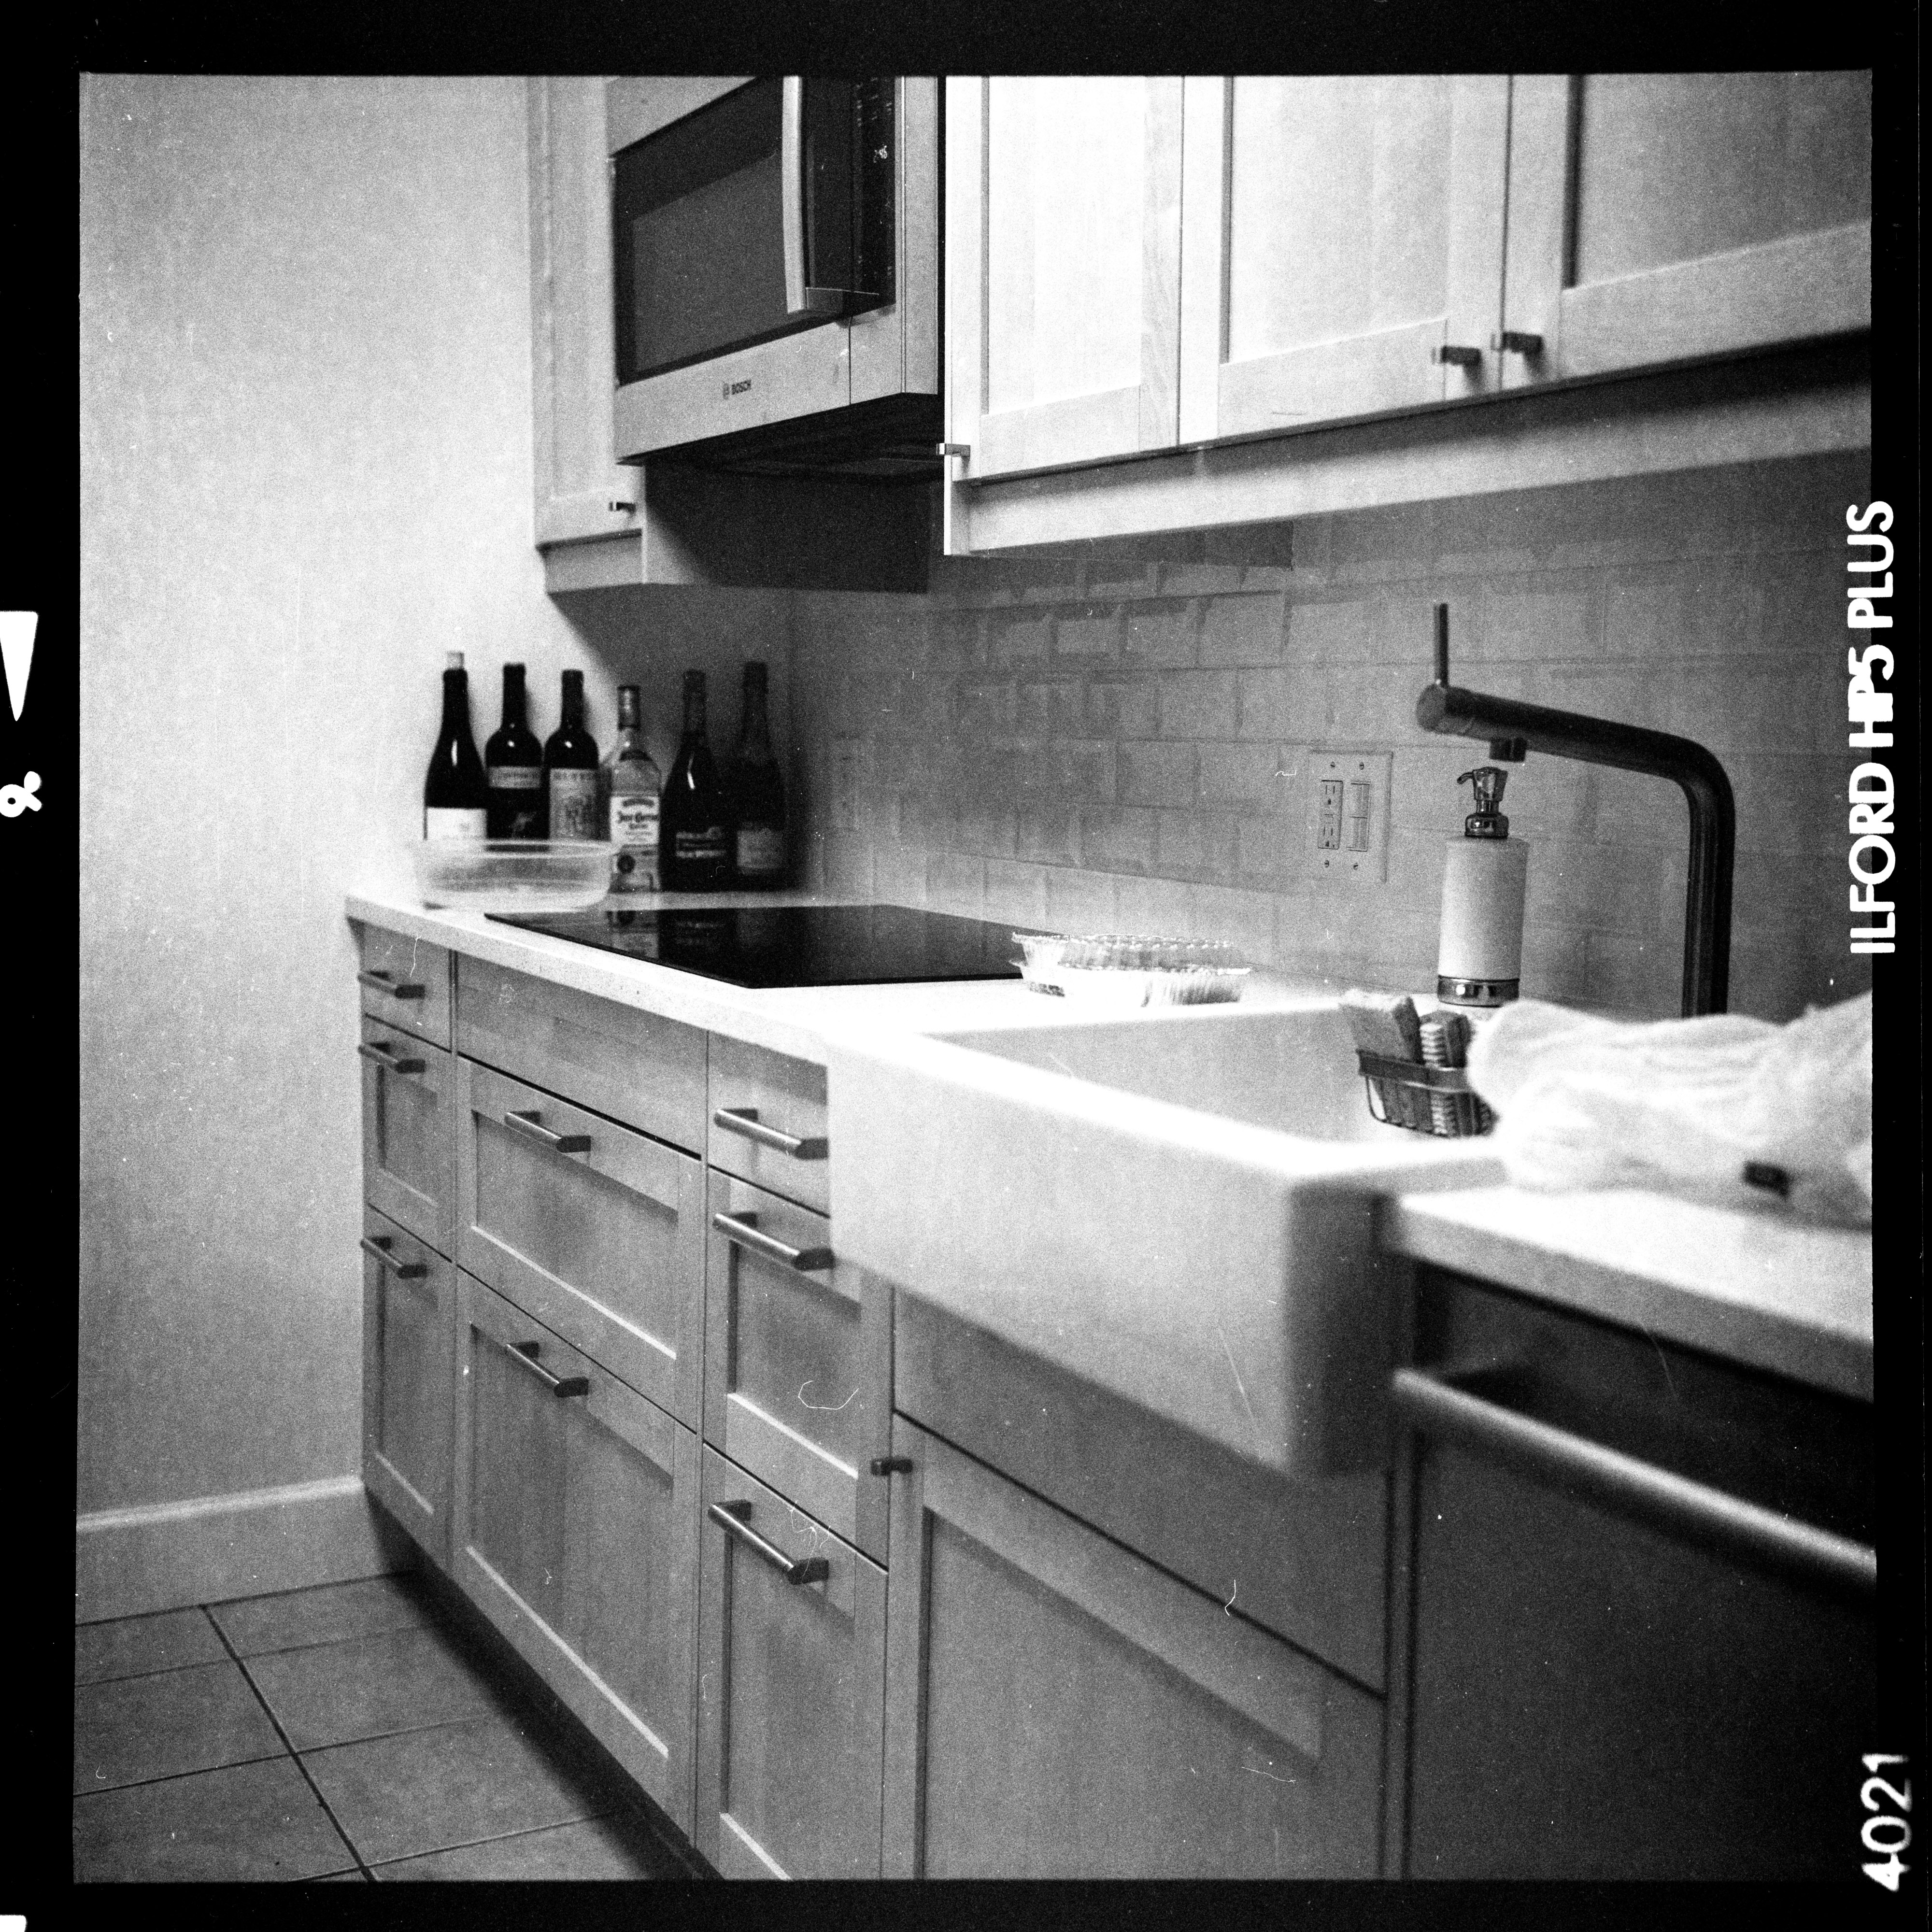
Here are three initial test scans taken with the Leica CL body and Macro-Elmarit-R 60mm lens using my well-worn (and not cleaned or edited) strip of 120 format B&W. (Clicking each image here will net a full resolution 4000x4000 pixel rendering.)

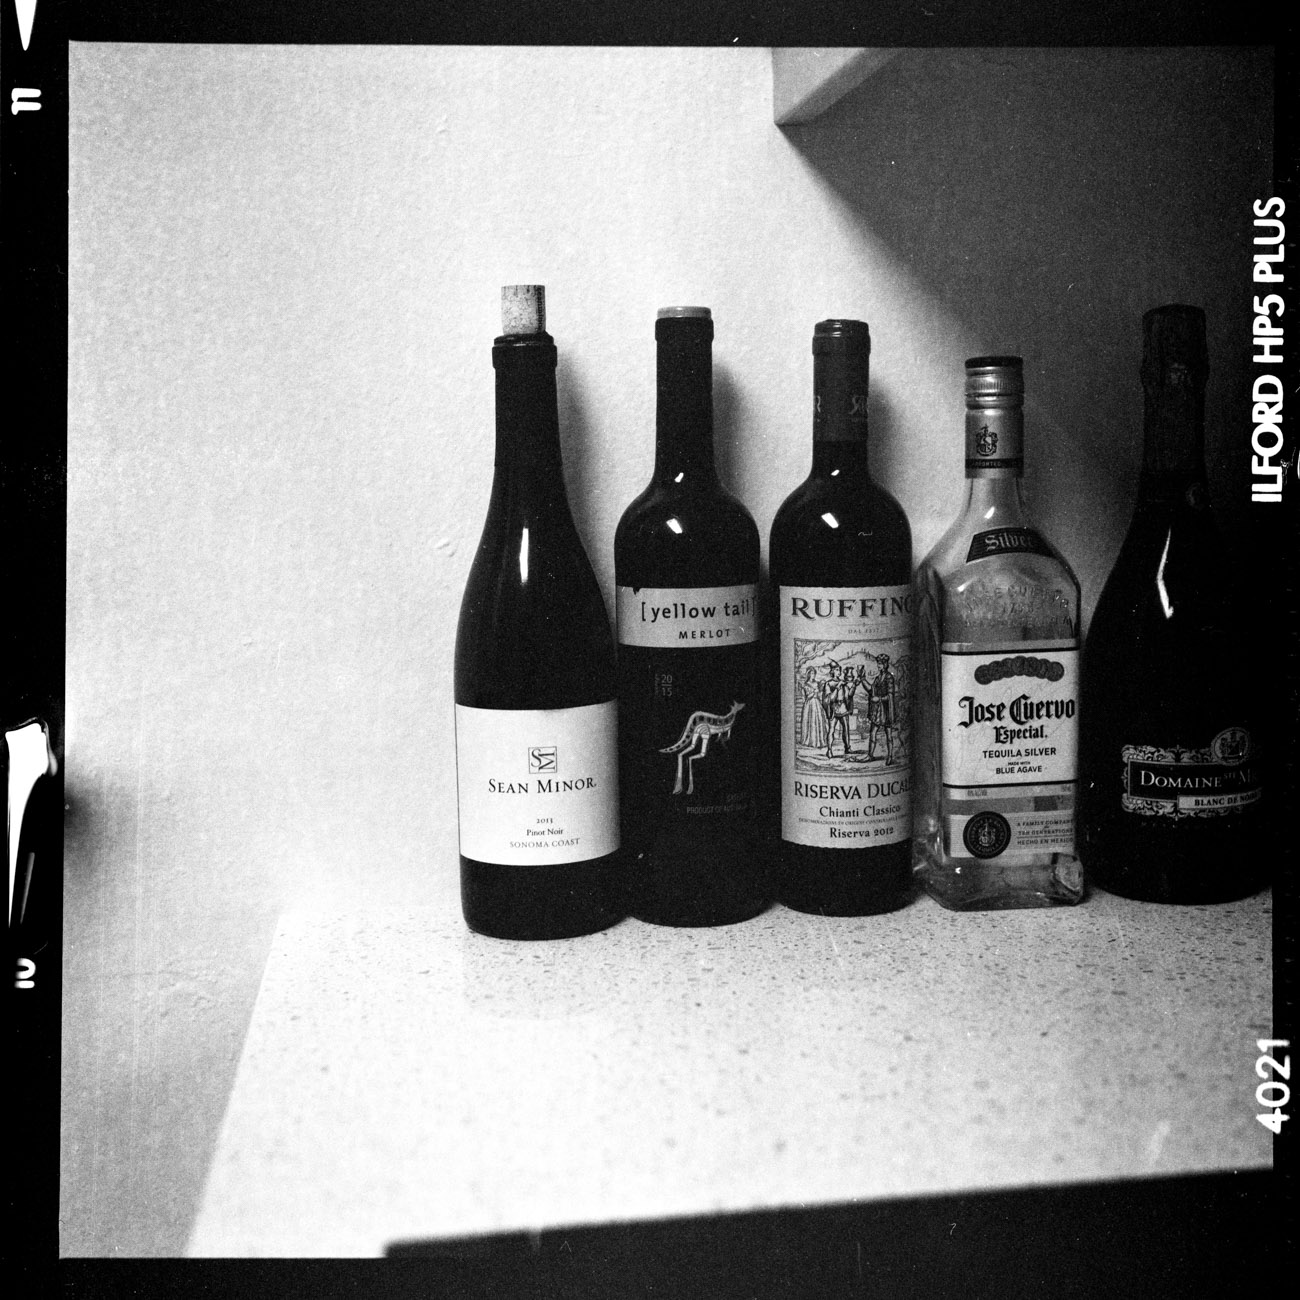

There's much more to be had with "good" negatives (these are too thin, really) but they were easy to hand for checking the scanning setup and image reversal processing in the simple case. The Leica CL's 24 MPixel resolution and Macro-Elmarit-R 60mm lens does this job well: You can see in the full rez images that the grain is nicely imaged throughout, and there is plenty of detail in the areas of good focus and exposure.
Here's a photo of today's hastily thrown together test scan setup:
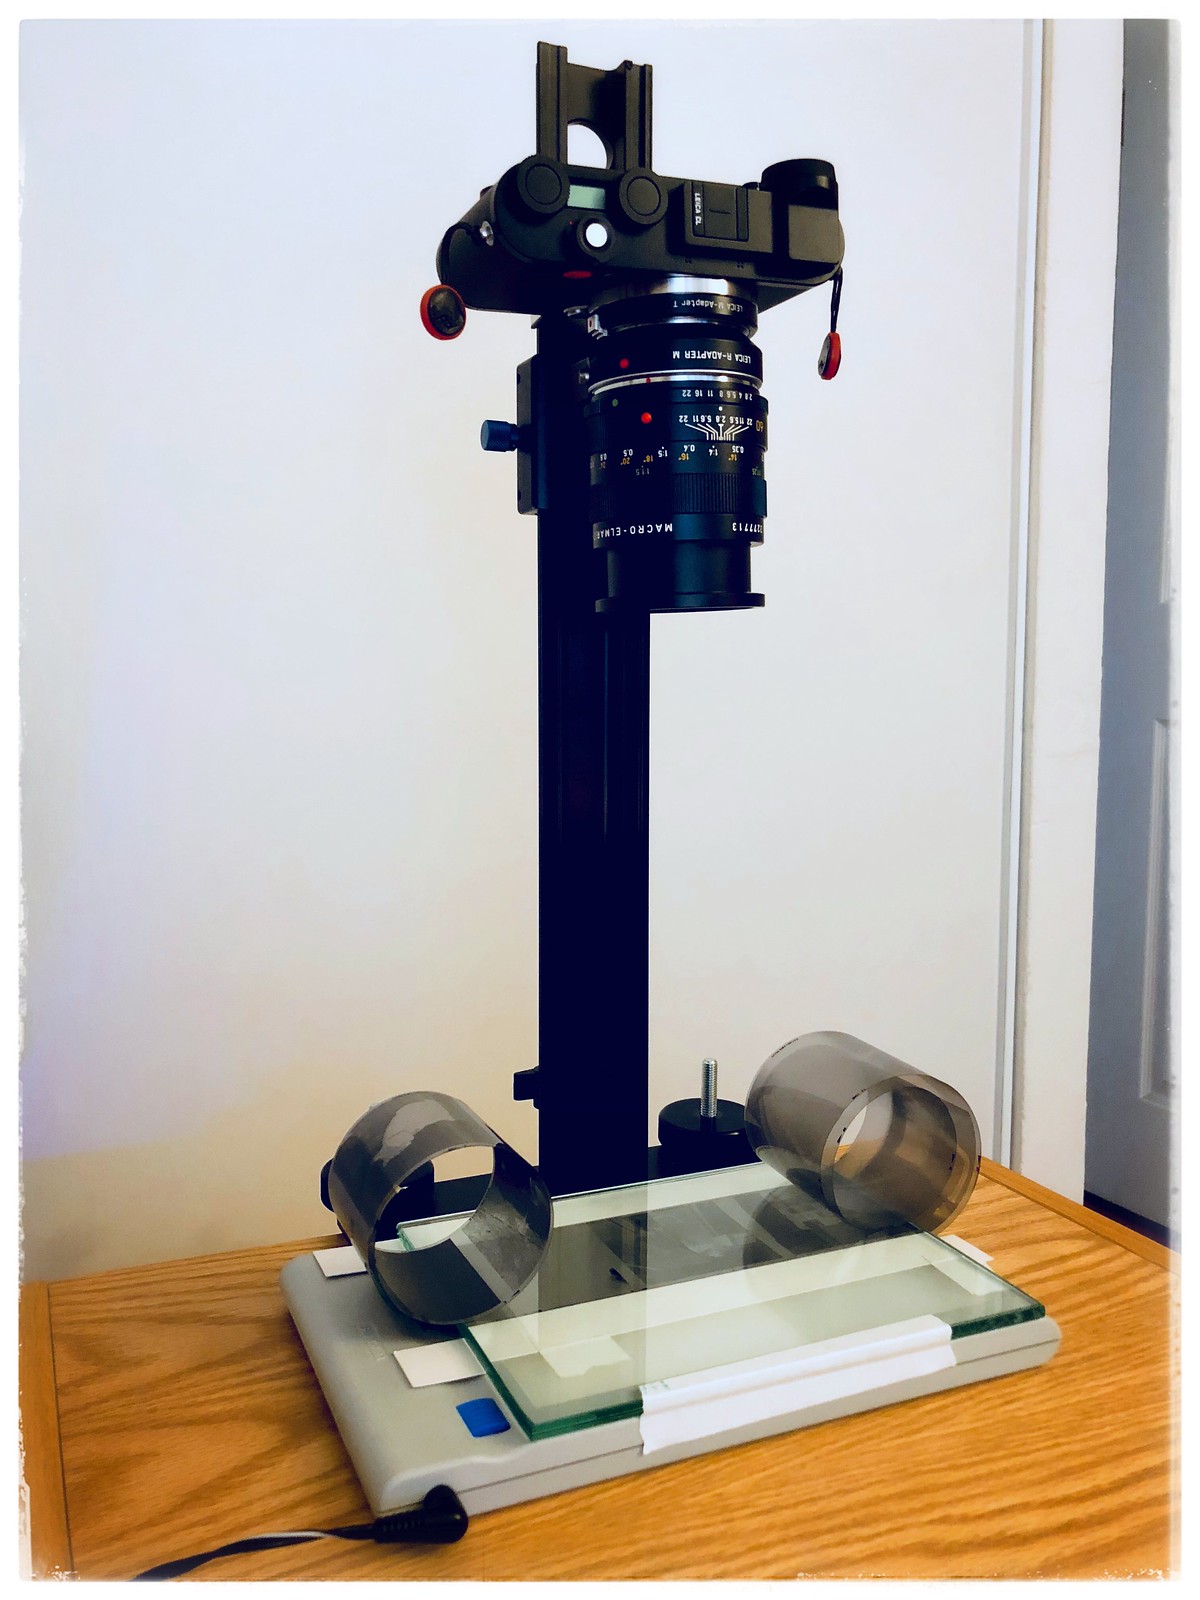
It's lacking some of the usual niceties, like proper masking of the individual negative and having the light panel be securely taped down for consistency. In order to prevent newton rings, I capture the film emulsion side up (the surface of the light panel is ANR, the glass is not) and then flip it during the image processing.
enjoy,
G

There's much more to be had with "good" negatives (these are too thin, really) but they were easy to hand for checking the scanning setup and image reversal processing in the simple case. The Leica CL's 24 MPixel resolution and Macro-Elmarit-R 60mm lens does this job well: You can see in the full rez images that the grain is nicely imaged throughout, and there is plenty of detail in the areas of good focus and exposure.
Here's a photo of today's hastily thrown together test scan setup:
It's lacking some of the usual niceties, like proper masking of the individual negative and having the light panel be securely taped down for consistency. In order to prevent newton rings, I capture the film emulsion side up (the surface of the light panel is ANR, the glass is not) and then flip it during the image processing.
enjoy,
G
DrTebi
Slide Lover
I would be curious to know whether you see much of a difference with masking. From my own experiments I concluded that it doesn't make any noticeable difference.It's lacking some of the usual niceties, like proper masking of the individual negative and having the light panel be securely taped down for consistency. In order to prevent newton rings, I capture the film emulsion side up (the surface of the light panel is ANR, the glass is not) and then flip it during the image processing.
enjoy,
G
You are definitely resolving down to the grain...
It would be great if you could post a scan of something like Velvia or Provia 100... To see whether a single shot resolves the finer grain as well.
By the way, the reason I asked you about bellows is actually not the bellows itself, but rather because many bellows systems come with a focusing rail. I thought that could be very useful for a DSLR scanner.
Godfrey
somewhat colored
I would be curious to know whether you see much of a difference with masking. From my own experiments I concluded that it doesn't make any noticeable difference.
You are definitely resolving down to the grain...
It would be great if you could post a scan of something like Velvia or Provia 100... To see whether a single shot resolves the finer grain as well.
By the way, the reason I asked you about bellows is actually not the bellows itself, but rather because many bellows systems come with a focusing rail. I thought that could be very useful for a DSLR scanner.
Whether masking makes a significant difference is really up to the lens being used. The Leica lenses I have are extremely well controlled on flare, so masking is not ordinarily required. But I usually do it anyway because it aids in making clean captures and can subtly improve contrast.
I was never a big fan of Velvia's over-saturated look, and haven't really shot much in way of color transparencies since the early 1980s. I don't think I ever shot any Provia 100 at all. I do have a bunch of Minox negatives shot on Agfa APX 25, which is finer grained than any color transparency can be. I'll be capturing them to high resolution files soon.
The Leica Focusing Bellows-R that I have includes a built-in fine-toothed focusing rail as part of the bellows assembly. But it's not useful for capturing 35mm or 120 format films unless I switch to the 100mm bellows-mount lens due to the magnifications required (the standard focusing mount of the 60 Macro or 50mm lenses when fitted to the bellows means they are already set to focus at a higher magnification than can cover the full frame of these negative formats), and then I have to set it up at near the height limits of the copy stand, which can induce more vibration and camera movement.
The main purpose of a focusing rail is to aid in precise focusing. If I'm able to achieve that without it because the copy stand's friction clamp works so smoothly, it's unneeded. But if I find I need the additional precision of a focusing rail, there are several I can add to the setup that are not too costly (about $150 or so for good quality). So far, I'm not seeing the need.
G
NickTrop
Mentor
I do so admire the determination and ingenuity of the photographic DIY'ers who embark on such endeavors. Wonking around with disassembled lenses and building digital film scanners and assorted other crazy-azz projects using ordinary household items. Fascinating, Captain.
Godfrey
somewhat colored
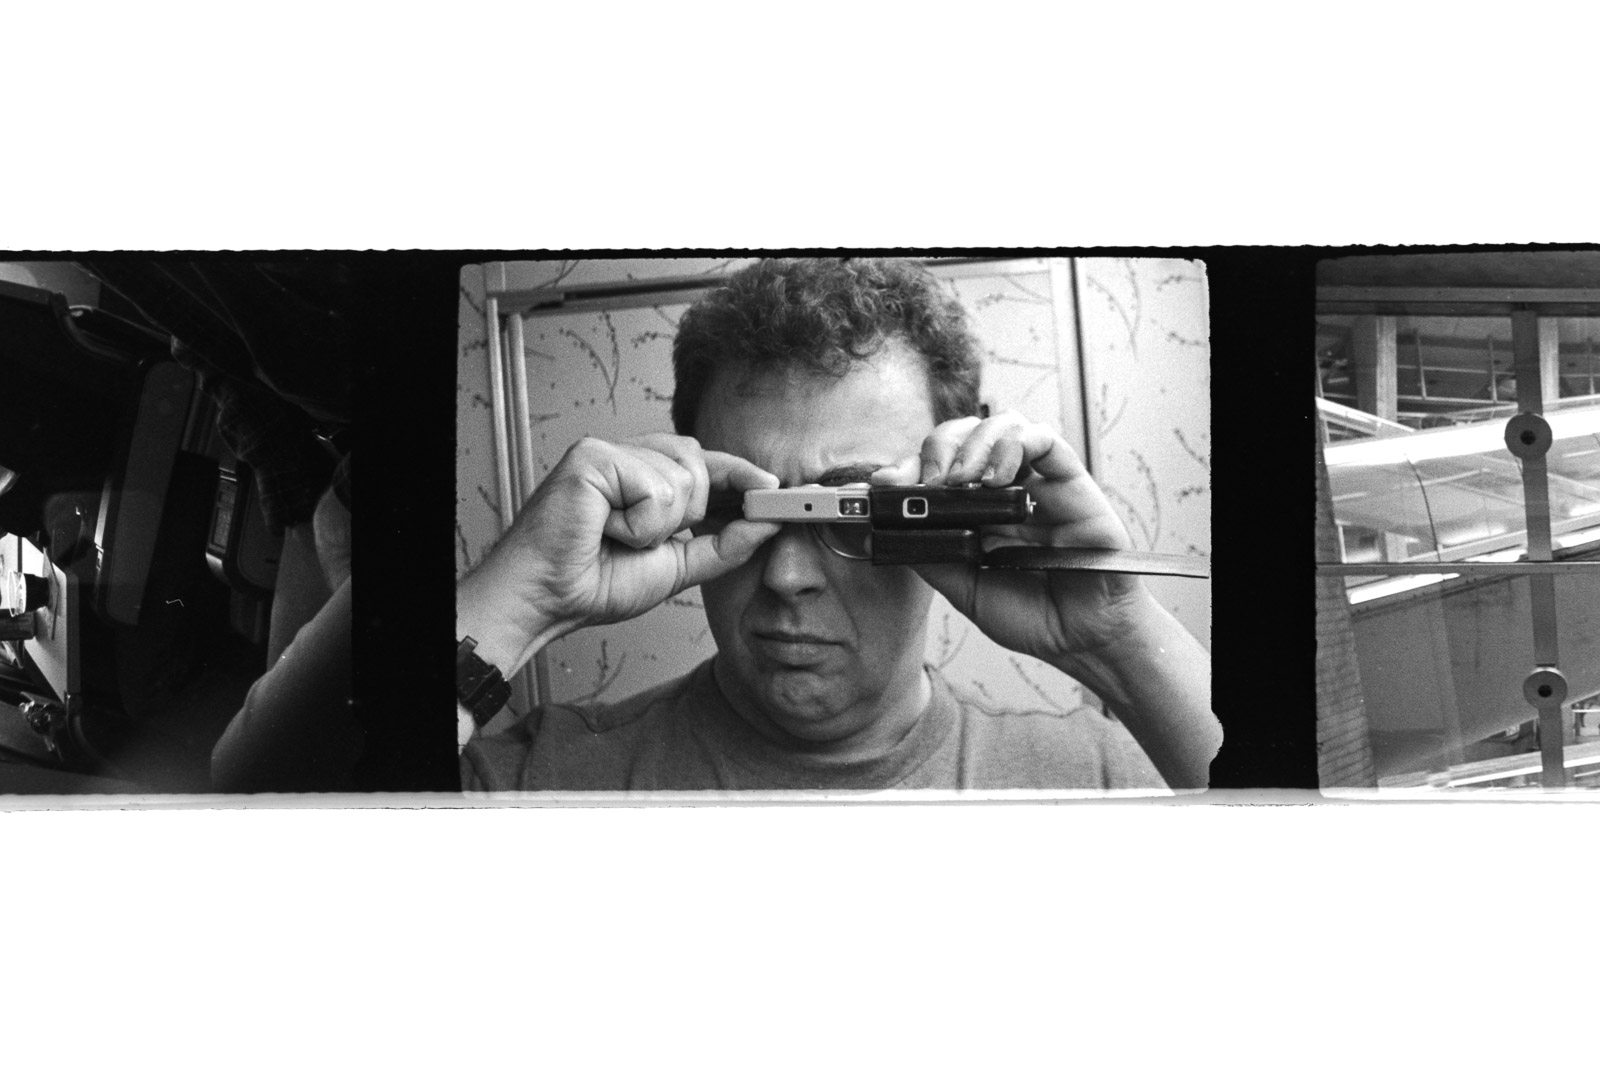
The question of whether there's enough resolution for very fine grained films came up again, so I decided to go to the the opposite end of my negative capture spectrum and test for system resolution capabilities. Using the CL fitted with Leica Focusing Bellows-R and Summicron-R 50mm f/2 lens, I set up for Minox film capture at about 1.75:1 magnification:
You can barely see it in the photo, but I have a little negative holder that was designed for a medium format film scanner to fit into the 120 film carrier, so I can use the same film channel to scan Minox negatives as I do with 120 film.
The photo shown below is a B&W self-portrait made in 1998 at Paris DeGaulle airport with a Minox C on APX 25 film processed in HC-110 developer. Remember that the original negative is 8x11 mm in size..
(Click image to obtain a full resolution rendering.)

This CL macro setup certainly shows it can image cleanly very fine grained APX25 film at 1.75:1 magnification. So what say, "hmm, what will it do with fine-grained 35mm film imaged at 1:1 magnification? Will I still see the grain?" The logic behind that question is that if I can see the grain structure clearly, there's no more detail to be had in the image than that.
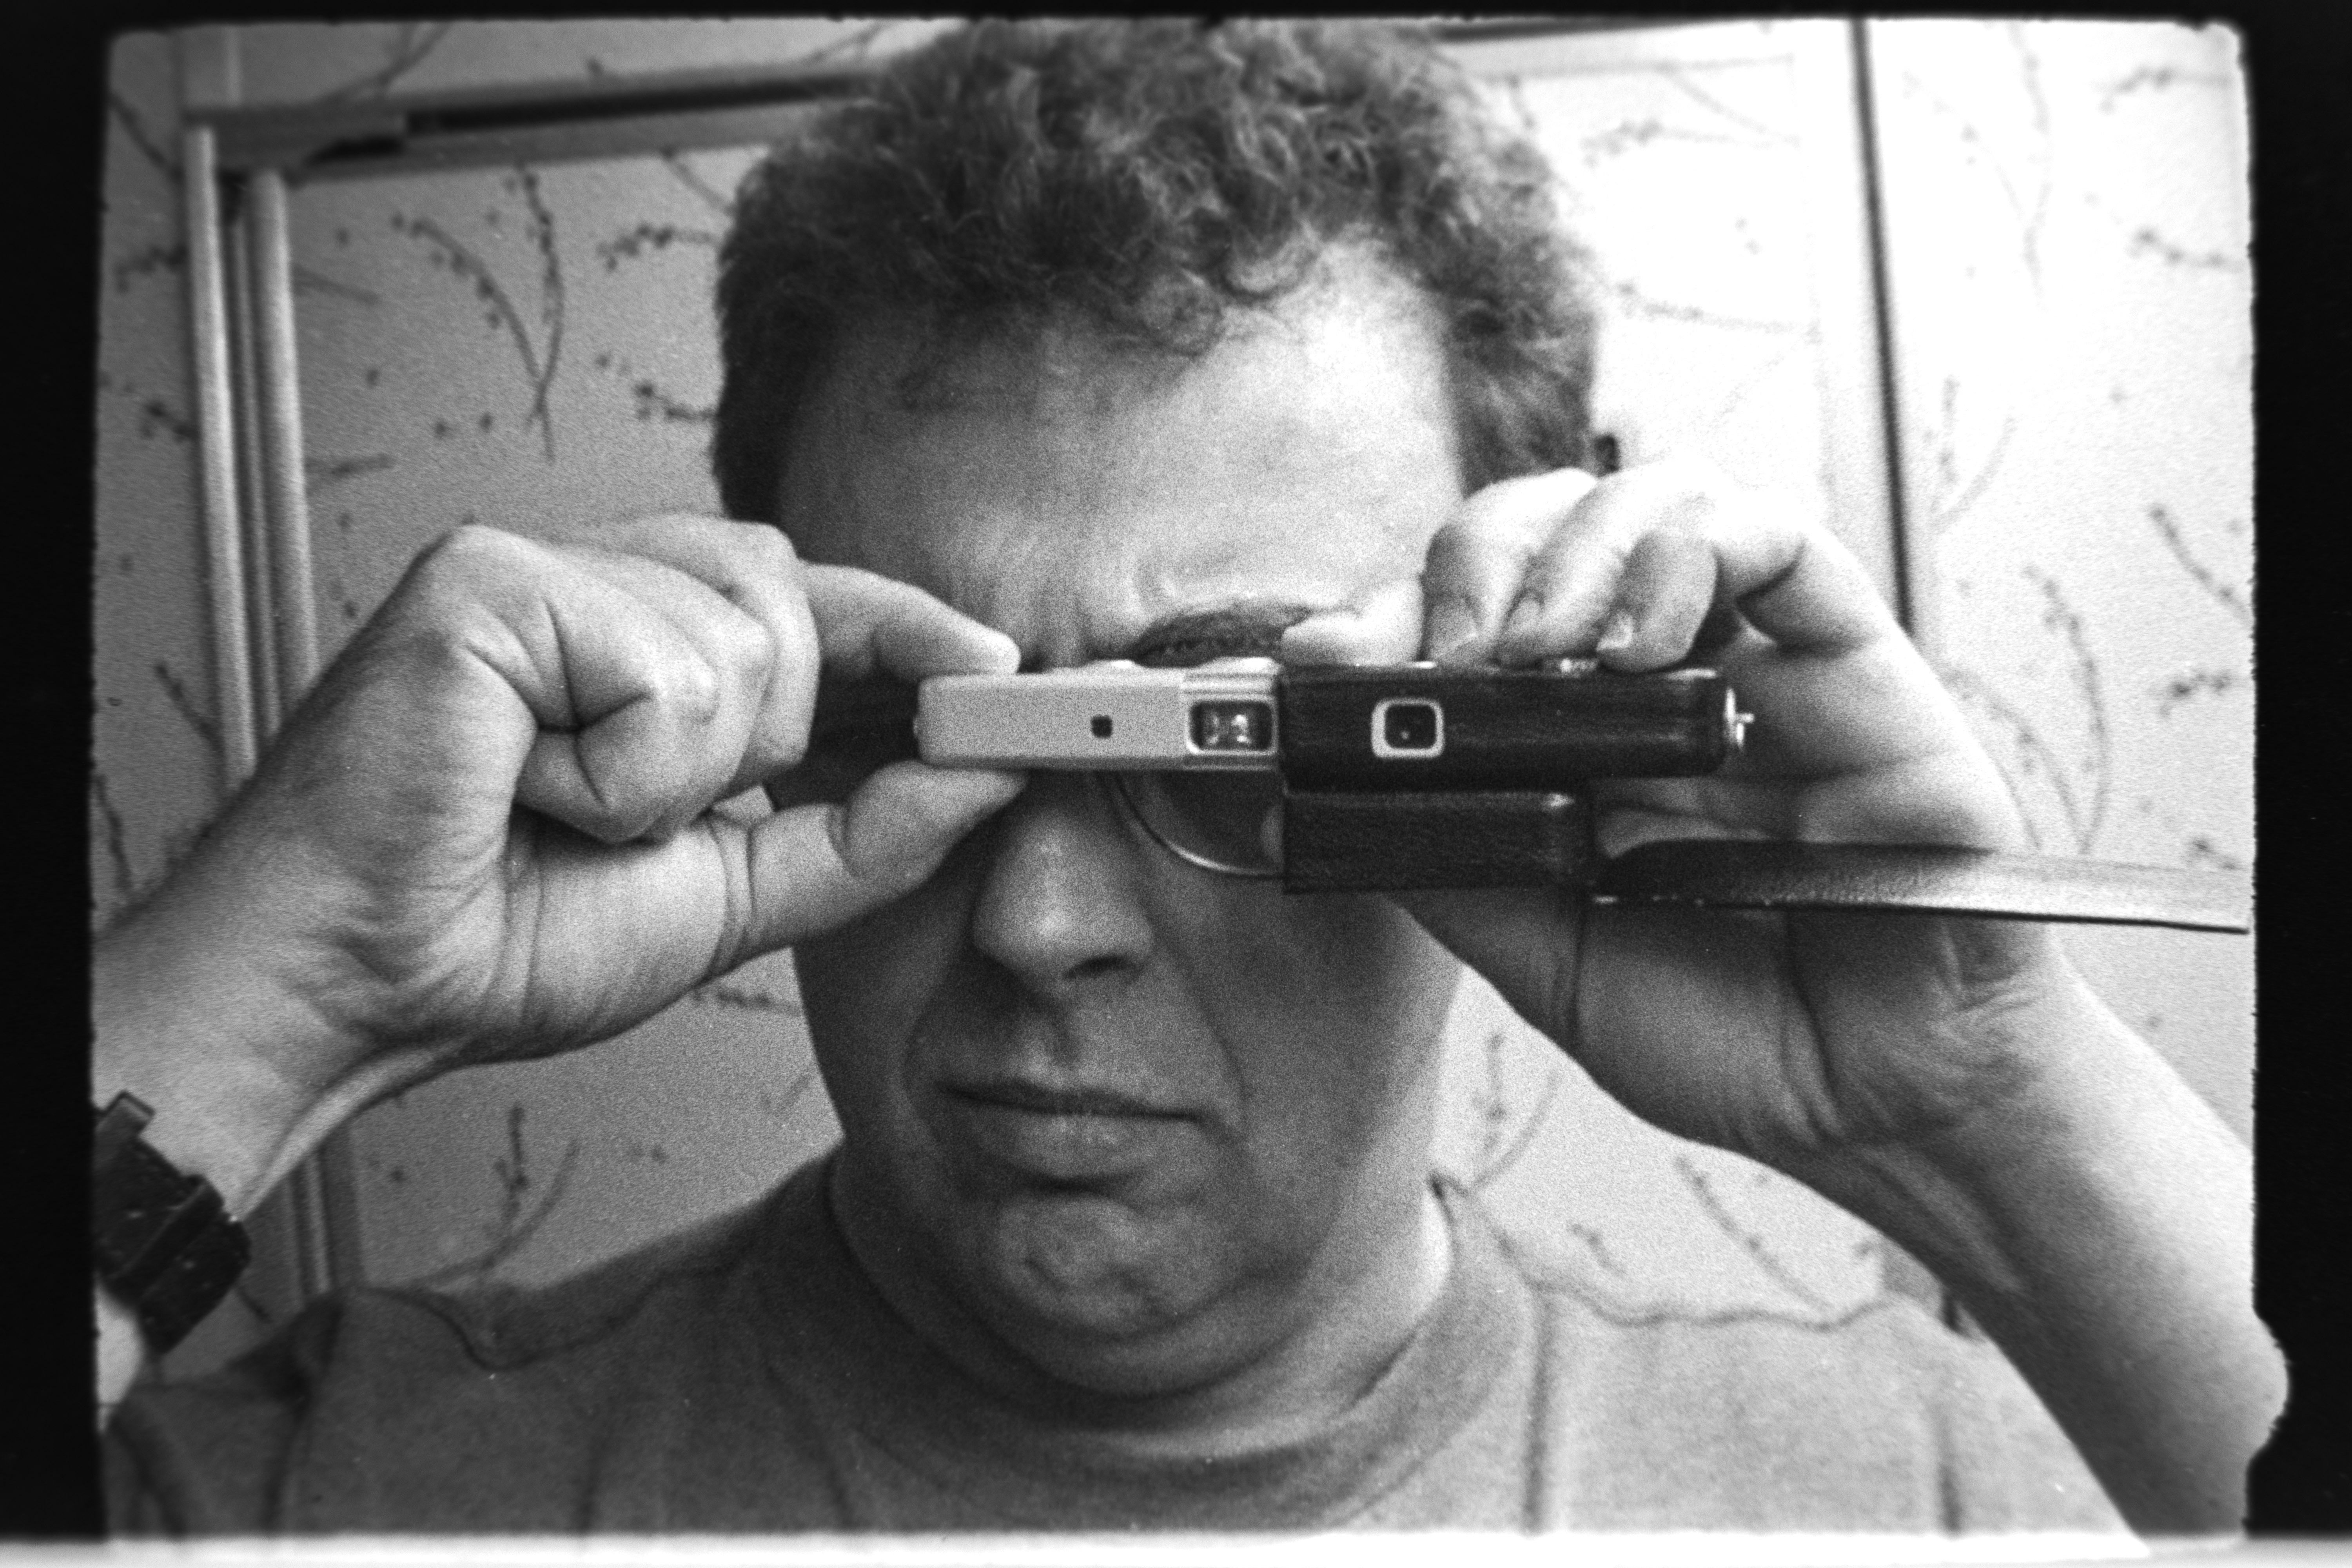
So I switched back to the Macro-Elmarit-R 60mm lens and fitted it with the Macro Adapter-R extension tube, enabling me to set it up for 1:1 magnification, and rephotographed the Minox film strip held exactly the same way as above:
That's good! I can still see APX25 grain structure at a 1:1 capture.
The final test is to consider that capture magnification for 6x6cm negatives is lower, down to about 1:3.75 magnification. Reset the lens configuration without the extension tube, reset the focus ... snap!
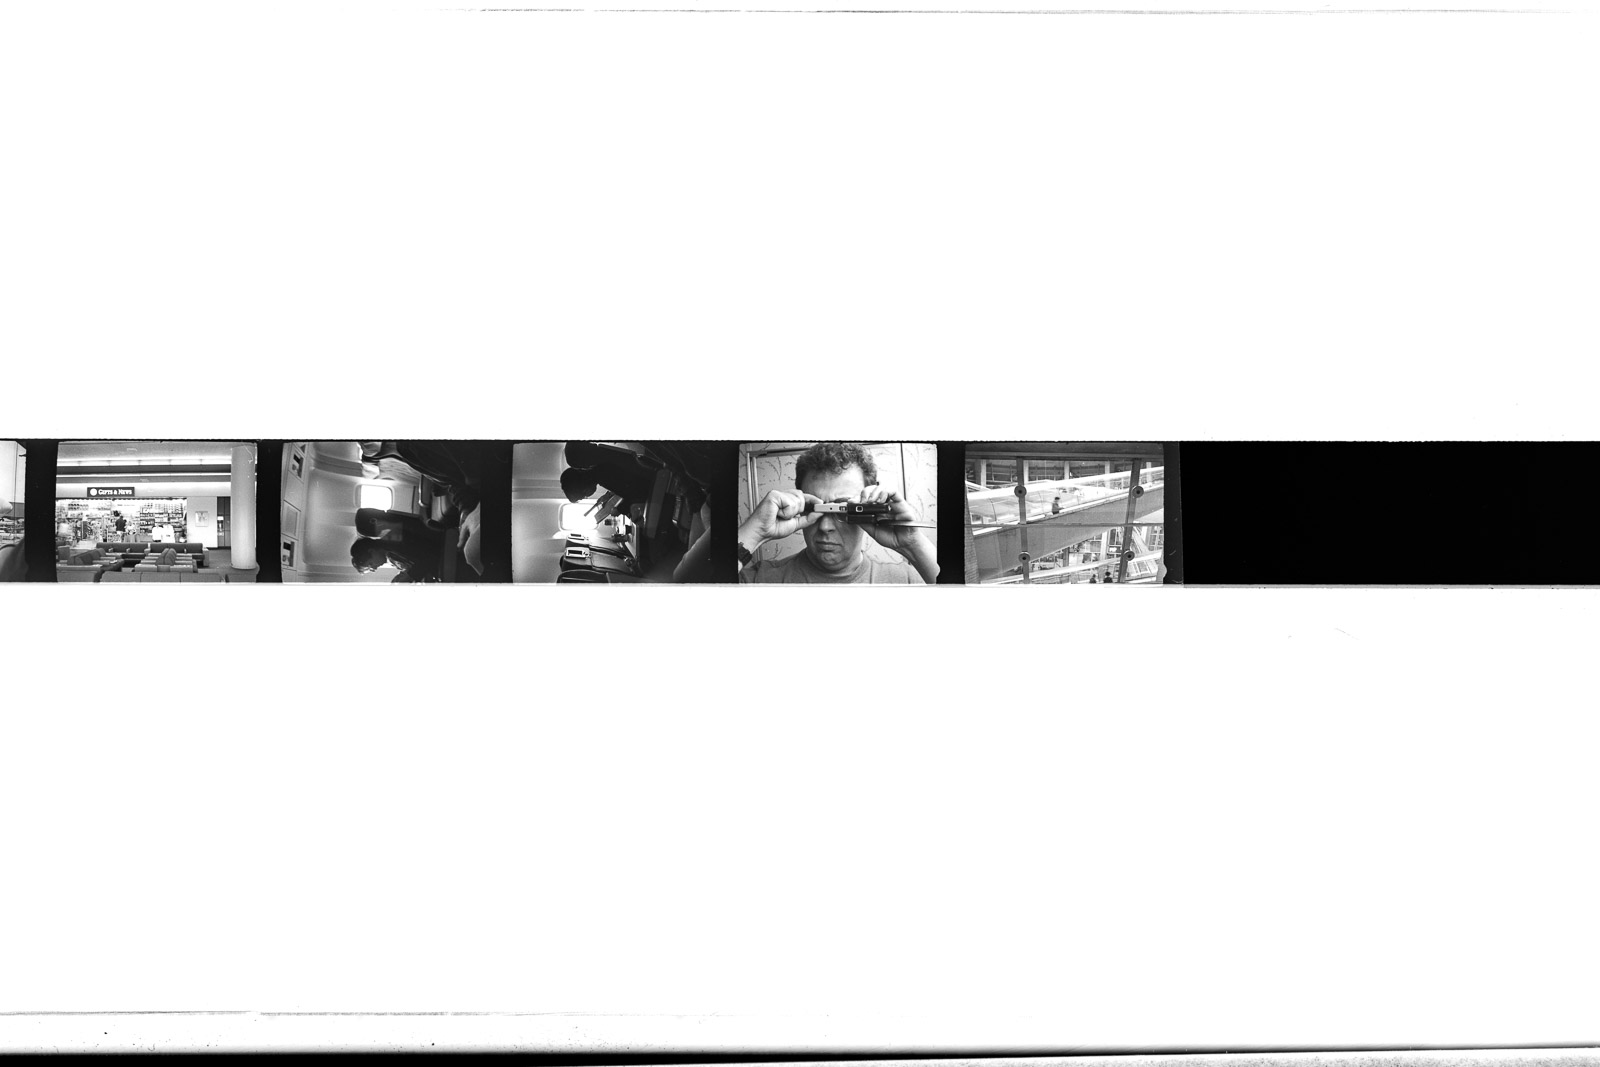
I can still see the grain structure in the 100% image with this capture, although it's beginning to get a bit more difficult to make out. My feeling is that, for my purposes, this is enough resolution for anything I'm likely to do with my photographs. So I'm now fully satisfied that the CL's APS-C sensor with the right macro copy gear is capable of returning a good, high resolution, 24 MPixel image from any film I'm going to throw at it, 120 format down to Minox subminiature format, and a 24 MPixel image of 4000x6000 pixels dimension is going to enable me to make lovely 13x20 inch prints at 300ppi output resolution, and 16x24 prints at 240ppi output resolution.
IF I were intent on imaging at the same resolution for larger film formats, and or looking to make even larger prints than that, I'd be looking for something with a larger pixel count sensor. To double linear resolution and get the same magnification capability as this setup provides, I'd need something on the order of a 96 MPixel resolution sensor (double the pixels in both linear dimensions). That would enable me to record negatives up to about four times the area of a 6x9cm negative with the same ability to capture the grain structure, presuming I have a lens and copy setup good enough to achieve those numbers optically.
Fun fun fun!
You can barely see it in the photo, but I have a little negative holder that was designed for a medium format film scanner to fit into the 120 film carrier, so I can use the same film channel to scan Minox negatives as I do with 120 film.
The photo shown below is a B&W self-portrait made in 1998 at Paris DeGaulle airport with a Minox C on APX 25 film processed in HC-110 developer. Remember that the original negative is 8x11 mm in size..
(Click image to obtain a full resolution rendering.)
This CL macro setup certainly shows it can image cleanly very fine grained APX25 film at 1.75:1 magnification. So what say, "hmm, what will it do with fine-grained 35mm film imaged at 1:1 magnification? Will I still see the grain?" The logic behind that question is that if I can see the grain structure clearly, there's no more detail to be had in the image than that.
So I switched back to the Macro-Elmarit-R 60mm lens and fitted it with the Macro Adapter-R extension tube, enabling me to set it up for 1:1 magnification, and rephotographed the Minox film strip held exactly the same way as above:

That's good! I can still see APX25 grain structure at a 1:1 capture.
The final test is to consider that capture magnification for 6x6cm negatives is lower, down to about 1:3.75 magnification. Reset the lens configuration without the extension tube, reset the focus ... snap!

I can still see the grain structure in the 100% image with this capture, although it's beginning to get a bit more difficult to make out. My feeling is that, for my purposes, this is enough resolution for anything I'm likely to do with my photographs. So I'm now fully satisfied that the CL's APS-C sensor with the right macro copy gear is capable of returning a good, high resolution, 24 MPixel image from any film I'm going to throw at it, 120 format down to Minox subminiature format, and a 24 MPixel image of 4000x6000 pixels dimension is going to enable me to make lovely 13x20 inch prints at 300ppi output resolution, and 16x24 prints at 240ppi output resolution.
IF I were intent on imaging at the same resolution for larger film formats, and or looking to make even larger prints than that, I'd be looking for something with a larger pixel count sensor. To double linear resolution and get the same magnification capability as this setup provides, I'd need something on the order of a 96 MPixel resolution sensor (double the pixels in both linear dimensions). That would enable me to record negatives up to about four times the area of a 6x9cm negative with the same ability to capture the grain structure, presuming I have a lens and copy setup good enough to achieve those numbers optically.
Fun fun fun!
ColSebastianMoran
( IRL Richard Karash )
I did actually order the current Pentax 50mm f/2.8 Macro lens with it... so if the sensor should be "a thick one", I hope this lens is designed to prevent problems with that...
My understanding is that designers of lenses for a camera incorporate facts about the sensor stack in their design. The biggest problems come when adapting a lens designed for no-stack onto a camera with a thick stack.
I haven't verified this in any testing, but it makes sense to me.
Godfrey
somewhat colored
My understanding is that designers of lenses for a camera incorporate facts about the sensor stack in their design. The biggest problems come when adapting a lens designed for no-stack onto a camera with a thick stack.
I haven't verified this in any testing, but it makes sense to me.
I have tested and verified that it does make a difference with the cameras and lenses I've had to work with. I've been doing adaptations of lenses to digital cameras since 2003, and working with digital imaging systems from as far back as 1984.
Share:
-
This site uses cookies to help personalise content, tailor your experience and to keep you logged in if you register.
By continuing to use this site, you are consenting to our use of cookies.