
KoNickon
Nick Merritt
I've come across a Contaflex I that I got some years ago and which never worked right -- the shutter would fire properly but apparently before the mirror would swing out of the way. Thought I would use the old lighter fluid treatment and it's coming around! The shutter will work in the correct sequence, but after a while it reverts to not reopening and exposing. However, I think it will be OK with ongoing treatment.
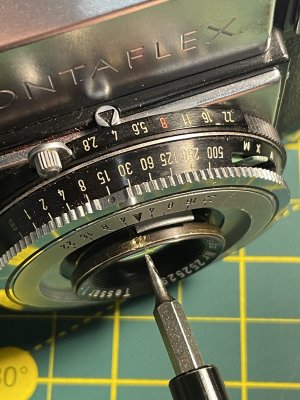
I think it would be easier if I could get better access to the shutter for purposes of cleaning, but I can't figure out how the front element comes off. Usually there are grub screws around the circumference of the focus ring that, once loosened, enable you to lift the focus ring off (and then be able to unscrew the front element and get access to the shutter and interior lens surfaces, which definitely need cleaning).
Here, there are two asymmetrically placed grub screws on the focus ring, which apparently only serve to let you switch the distance index between meters and feet (which are on opposite sides of the focus ring). But I can't see where the focus ring is attached to the front element. Anyone know how to do this? I know these are notoriously difficult cameras to work on, but I think what I want to do shouldn't be too difficult -- fingers crossed.
farlymac
PF McFarland
My albums on a Contaflex II overhaul :
https://flic.kr/s/aHsjGwBS2D
https://flic.kr/s/aHsjGFzN9G
https://flic.kr/s/aHsjGGUAkw
https://flic.kr/s/aHsjGJDajj
https://flic.kr/s/aHsjGNUCUC
Might be something in there that helps.
PF
https://flic.kr/s/aHsjGwBS2D
https://flic.kr/s/aHsjGFzN9G
https://flic.kr/s/aHsjGGUAkw
https://flic.kr/s/aHsjGJDajj
https://flic.kr/s/aHsjGNUCUC
Might be something in there that helps.
PF
KoNickon
Nick Merritt
Thank you sir! Looks like I have to remove one of the set screws on the focus scale ring (and loosen the other) so that I can get at the set screws holding the focus ring in place? Trying to get my head around that.
Dear Nick,
Phil did a lovely job fixing that Contaflex II a few years ago. You should find his images very helpful.
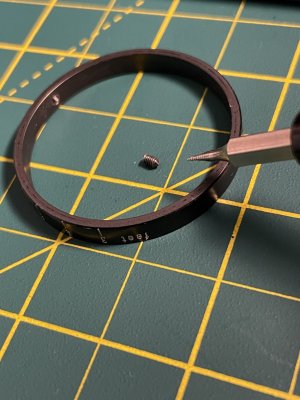
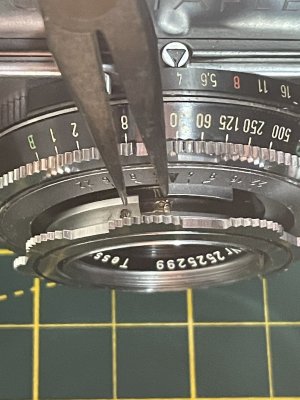
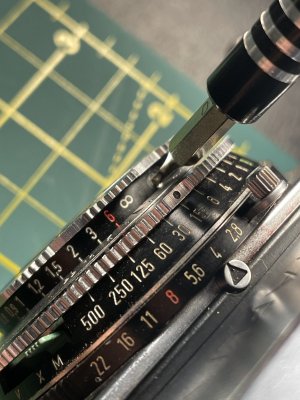
To reach the shutter you must first take out both of the two screws that secure the distance scale. You are then able to rotate the distance scale ring around the back of the serrated focus grip independently of the grip (through 360° or more if desired). You will then need to insert a screwdriver through one of the now empty threads in the scale ring you have just removed those screws from, in order to access, and loosen the three set screws beneath the scale ring, which are what lock the serrated focusing grip to the lens mount of the front lens piece. You'll need a good light, a sharp 1mm screwdriver and a gentle touch to find those small slots in the recessed screw heads. You must rotate the distance scale ring, until its vacant thread holes align with the heads of the focus ring retaining screws underneath the distance scale ring, to reach those three screws that secure the serrated focus ring.
But first, it's critical you take a sharpie or a dab of white liquid paper and mark the position of the serrated grip relative to the mount (Ie the ring which has the lens serial number along with "Carl Zeiss etc" on it) when focused at the infinity stop. Your infinity stop for the lens is part of the that serrated grip, you see. If your infinity setting is going to work out first time you reassemble, you *must* have the both the lens mount and the grip positioned in the same locations they came off. You should know if you're good to go, because during disassembly, you will clearly see three small dimples in the outside circumference of the lens mount after you have loosened its retaining screws and slid it off the mount. If at reassembly, you have positioned it well, the tips of the grip set screws should find those dimples easily, when you proceed to tighten them.
So that's the first critical point. Set infinity and align grip and mount to each other. Take a digital pic from the front showing the relationship for good measure too.
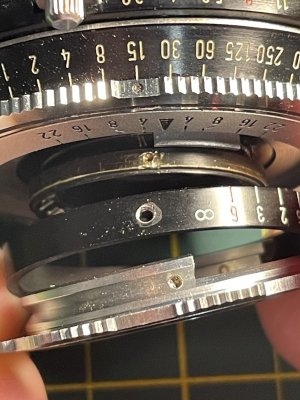
Having done this, you may—keeping the grip at infinity—loosen those 3 recessed screws for the grip (no need to completely extract them) and lift off the grip.
The multi start threads for focusing this front cell focus 45mm Tessar are cut directly into the outer circumference of the front lens cell mounting and the inner circumference of the middle lens cell mounting.
You already know the orientation of the front mount at infinity. To open up the shutter the middle mount needs to come out but first the front cell must be unscrewed from the middle cell.
Because the threads are multi start—helical—starting from its infinity position, you must note how many degrees the front rotates before the threads reach their starts. Note the orientation of the front cell and its mount at the exact moment the threads separate. You will obviously need to use the same thread start on re-assembly, if your previously marked relationship between front cell and grip is to come out OK the first time, when you re-install the serrated grip and lock in the infinity focusing distance.
The abbreviated version: mark grip and front mount relative to each other, at infinity; and mark the position the helicals part when the front cell comes out.
If a Contaflex I or II fails to run correctly, apart from any issues with the shutter proper, it's likely that the actuating rings behind the shutter require cleaning and lubrication. This means taking the shutter right out, necessary anyway for correct servicing, which is easily done by removing the retaining ring through the inside of the film gate. Note that the pre-tensioning of the aperture stop down will be lost when the shutter leaves the body. This is the purpose of the small toothed wheel inside the film gate. After the shutter is sorted and correctly re-fitted, you must remove the lock screw, loosen the centre screw, and re- tension the spring before the aperture will stop down before exposure.
Due to the location it is impossible to get a driver blade onto the screws for the wheel. You'll have to angle the tips of a couple of drivers (either by chamfering their edge to an angled blade, or heating and making a gentle bend in the shank at an acute angle not too far from the blade edge). This will enable you to loosen and fasten the screws without risking damage to their slots which might then dictate a total strip down.
The learn camera repair site has a copy of the Contaflex I–IV service manual published by ZI available to download.
Interestingly there were a few changes to the lens front from commencement of production. The rate of focus change from infinity to minimum (total degrees of front cell rotation) was altered at least once, maybe twice (each version needing its own grip with the appropriate stops). A shift from male filter threads to the more common female threads also occurred. The very earliest examples with an older speed scale and 1/500 booster spring used the old version of the Synchro-Compur shutter based on the Compur Rapid. It has no self timer, ten aperture blades instead of the later five, and used a different shutter mounting plate to later build examples which had the new speed scale shutter with self timer. You could say it's a smaller sibling of the one fitted to Eg a 2.8C Rolleiflex but modified for SLR use.
The manual is quite explicit about not being able to graft later shutters into a very early version, unless the whole front mounting for the later shutter is also fitted with it. For these reasons, obtaining the factory manual is highly recommended, because the shutter actuation of the oldest build examples is rather different from those which emerged during 1954.
Cheers,
Brett
Phil did a lovely job fixing that Contaflex II a few years ago. You should find his images very helpful.
To reach the shutter you must first take out both of the two screws that secure the distance scale. You are then able to rotate the distance scale ring around the back of the serrated focus grip independently of the grip (through 360° or more if desired). You will then need to insert a screwdriver through one of the now empty threads in the scale ring you have just removed those screws from, in order to access, and loosen the three set screws beneath the scale ring, which are what lock the serrated focusing grip to the lens mount of the front lens piece. You'll need a good light, a sharp 1mm screwdriver and a gentle touch to find those small slots in the recessed screw heads. You must rotate the distance scale ring, until its vacant thread holes align with the heads of the focus ring retaining screws underneath the distance scale ring, to reach those three screws that secure the serrated focus ring.
But first, it's critical you take a sharpie or a dab of white liquid paper and mark the position of the serrated grip relative to the mount (Ie the ring which has the lens serial number along with "Carl Zeiss etc" on it) when focused at the infinity stop. Your infinity stop for the lens is part of the that serrated grip, you see. If your infinity setting is going to work out first time you reassemble, you *must* have the both the lens mount and the grip positioned in the same locations they came off. You should know if you're good to go, because during disassembly, you will clearly see three small dimples in the outside circumference of the lens mount after you have loosened its retaining screws and slid it off the mount. If at reassembly, you have positioned it well, the tips of the grip set screws should find those dimples easily, when you proceed to tighten them.
So that's the first critical point. Set infinity and align grip and mount to each other. Take a digital pic from the front showing the relationship for good measure too.
Having done this, you may—keeping the grip at infinity—loosen those 3 recessed screws for the grip (no need to completely extract them) and lift off the grip.
The multi start threads for focusing this front cell focus 45mm Tessar are cut directly into the outer circumference of the front lens cell mounting and the inner circumference of the middle lens cell mounting.
You already know the orientation of the front mount at infinity. To open up the shutter the middle mount needs to come out but first the front cell must be unscrewed from the middle cell.
Because the threads are multi start—helical—starting from its infinity position, you must note how many degrees the front rotates before the threads reach their starts. Note the orientation of the front cell and its mount at the exact moment the threads separate. You will obviously need to use the same thread start on re-assembly, if your previously marked relationship between front cell and grip is to come out OK the first time, when you re-install the serrated grip and lock in the infinity focusing distance.
The abbreviated version: mark grip and front mount relative to each other, at infinity; and mark the position the helicals part when the front cell comes out.
If a Contaflex I or II fails to run correctly, apart from any issues with the shutter proper, it's likely that the actuating rings behind the shutter require cleaning and lubrication. This means taking the shutter right out, necessary anyway for correct servicing, which is easily done by removing the retaining ring through the inside of the film gate. Note that the pre-tensioning of the aperture stop down will be lost when the shutter leaves the body. This is the purpose of the small toothed wheel inside the film gate. After the shutter is sorted and correctly re-fitted, you must remove the lock screw, loosen the centre screw, and re- tension the spring before the aperture will stop down before exposure.
Due to the location it is impossible to get a driver blade onto the screws for the wheel. You'll have to angle the tips of a couple of drivers (either by chamfering their edge to an angled blade, or heating and making a gentle bend in the shank at an acute angle not too far from the blade edge). This will enable you to loosen and fasten the screws without risking damage to their slots which might then dictate a total strip down.
The learn camera repair site has a copy of the Contaflex I–IV service manual published by ZI available to download.
Interestingly there were a few changes to the lens front from commencement of production. The rate of focus change from infinity to minimum (total degrees of front cell rotation) was altered at least once, maybe twice (each version needing its own grip with the appropriate stops). A shift from male filter threads to the more common female threads also occurred. The very earliest examples with an older speed scale and 1/500 booster spring used the old version of the Synchro-Compur shutter based on the Compur Rapid. It has no self timer, ten aperture blades instead of the later five, and used a different shutter mounting plate to later build examples which had the new speed scale shutter with self timer. You could say it's a smaller sibling of the one fitted to Eg a 2.8C Rolleiflex but modified for SLR use.
The manual is quite explicit about not being able to graft later shutters into a very early version, unless the whole front mounting for the later shutter is also fitted with it. For these reasons, obtaining the factory manual is highly recommended, because the shutter actuation of the oldest build examples is rather different from those which emerged during 1954.
Cheers,
Brett
Last edited:
KoNickon
Nick Merritt
Brett, thanks so much for that detailed response! And yes, I plan to delve into Phil's albums some more. But I have to say that I think removing the shutter, which you describe so well, is beyond my capabilities. (I was wondering about that toothed wheel inside the film gate -- very tight quarters in there. I am really hoping that flushing can work -- I know, not the best way, but I don't think it'll do harm. We'll see -- I may decide to send it to a knowledgeable repairer ultimately. I do think I can have a go at removing the front cell as you describe so well -- though the idea of actually removing the distance ring grub screws (or more specifically, reinstalling them) is not something I look forward to. Classic overengineering by ZI.
My sample has the five-bladed aperture, but no selftimer. So maybe this is some sort of transitional version? Shutter speeds are "modern" (1/8, 1/15, 1/30, 1/60 etc.). But your comments about the running changes and the factory manual underscore the need for proceeding with great caution!
Thanks again -- I am sure your and Phil's input will come in handy for others too.
farlymac
PF McFarland
Brett, thanks so much for that detailed response! And yes, I plan to delve into Phil's albums some more. But I have to say that I think removing the shutter, which you describe so well, is beyond my capabilities. (I was wondering about that toothed wheel inside the film gate -- very tight quarters in there. I am really hoping that flushing can work -- I know, not the best way, but I don't think it'll do harm. We'll see -- I may decide to send it to a knowledgeable repairer ultimately. I do think I can have a go at removing the front cell as you describe so well -- though the idea of actually removing the distance ring grub screws (or more specifically, reinstalling them) is not something I look forward to. Classic overengineering by ZI.
My sample has the five-bladed aperture, but no selftimer. So maybe this is some sort of transitional version? Shutter speeds are "modern" (1/8, 1/15, 1/30, 1/60 etc.). But your comments about the running changes and the factory manual underscore the need for proceeding with great caution!
Thanks again -- I am sure your and Phil's input will come in handy for others too.
I took on that repair as a favor for a friend, Nick, and found out why the pro's really hated working on them. It's too time consuming, even if you've done a few before, and they usually lost money or a customer over the bill. I kind of went in blind, but did have a bit of knowledge about leaf shutters, so it was learn as I went on all the other stuff. Zeiss had a habit of over engineering things which meant they were robustly built, though sometimes complicated. With the Contaflex series it seemed kind of what I expected to find as I got deeper into the works. What it came down to was someone had "repaired" the camera before which messed up the shutter actuation, and it took me some time to figure out just what had been screwed up. But luckily that person didn't mess with anything else so none of the gear rings were out of sync. Just being one tooth off can jam the whole works.
It's also my opinion that once you open up a camera for a repair, you might as well do as much work on it as you can while it is accessible, so you're not having to go back in a short while later. I recently was asked to look at a camera with a battery issue (bad wire), and after I fixed that I took the dent out of the filter ring, replaced the light seals, and checked the rangefinder before returning it. The owner shouldn't need to get it serviced for a few years, and they can now use filters and a hood on it.
But I also remembered why I quit doing repairs, as my hands were complaining for a few days afterwards. I hope you can get your camera sorted out, Nick.
PF
KoNickon
Nick Merritt
Thanks, Phil! I am mentally girding myself to go in and at the very least clean the lens surfaces. Carefully tracking top dead center while removing the lens elements will be key.
I chuckled reading your description of that tiny screw that holds the shutter cover -- remove it, put it in a sealed container far away from everything else, is the message loud and clear. And it was very helpful knowing where in the shutter assembly the piece is that controls the shutter's second tripping, at about 8:00. Leaf shutters are marvels of mechanical design, but to me by and large all the different arms, cams, springs look the same. I have successfully worked on them in the past, but with great trepidation.
I chuckled reading your description of that tiny screw that holds the shutter cover -- remove it, put it in a sealed container far away from everything else, is the message loud and clear. And it was very helpful knowing where in the shutter assembly the piece is that controls the shutter's second tripping, at about 8:00. Leaf shutters are marvels of mechanical design, but to me by and large all the different arms, cams, springs look the same. I have successfully worked on them in the past, but with great trepidation.
mconnealy
Well-known
I fixed the aperture stop-down mechanism in my Contaflex I by following instructions I found in the Classic Camera Repair Forum. The important parts of the process as I recall was knowing how to get at the little set screws to take off the front lens, cleaning the blades, and resetting the tension. I would not have been able to sort out all of that without the clear directions I found on that site. What I overlooked for lack of guidance was how to dampen the noise which is likely caused by the swinging mirror. The result is that the camera has worked perfectly for me for years, but it is the loudest slr I have. Still a great favorite though, mostly because of its compactness and the quality of the classic Tessar lens.
 Contaflex I by Mike Connealy, on Flickr
Contaflex I by Mike Connealy, on FlickrKoNickon
Nick Merritt
I will check that forum out, but as I noted before, some of the "deep repair" is something I really would not want to try. But thanks for mentioning it! And I envy you the Teleskop lens. I do have a set of the closeup lenses, but (I need to check this) I think they're for the Contaflex IV, which I also have.
will_exposures
Newbie
Hello Nick. I'm in the same predicament with the scale ring and the focus ring. The one I bought, the focus ring falls off. If I tighten the scale ring on the focus ring, I can't tighten it on the camera lens. Thanks in advance.Thank you sir! Looks like I have to remove one of the set screws on the focus scale ring (and loosen the other) so that I can get at the set screws holding the focus ring in place? Trying to get my head around that.
KoNickon
Nick Merritt
I gave up and put the camera away, where it sits to this day. Hopefully someone out there can tell us how to do this!
will_exposures
Newbie
For sure. I understand. If I get it, would you like to know?I gave up and put the camera away, where it sits to this day. Hopefully someone out there can tell us how to do this!
KoNickon
Nick Merritt
Definitely. Thanks!For sure. I understand. If I get it, would you like to know?
will_exposures
Newbie
Just found out! Need a 1mm flat driver. To fit inside small set screw holes.Definitely. Thanks!
- Find infinity- should be easy since it has a prism. And mark it in the brass.
- Focus ring grip- back out the 3 set screws just enough to make flush from inside the ring.
- Put on scale ring and take out 1 set screw all the way out. Leave 2nd set screw in. Should be able to rotate freely
- Align the holes from both rings. With the empty set screw hole
- Be careful not to rotate the lens, since it’s at infinity
- Screw in focus/grip ring set screw from the empty hole of the scale ring.
- Rotate scale ring with driver and find the other 2 set screws.
- Then align scale ring to infinity and tighten.
Attachments
Share:
-
This site uses cookies to help personalise content, tailor your experience and to keep you logged in if you register.
By continuing to use this site, you are consenting to our use of cookies.