
fidget
Lemon magnet
FED/Zorki shutter set-up.
This is what I do to set up the shutter curtains on FED and Zorki cameras. There are frequent questions posted about this subject, so I thought that it could be of value if I documented it.
I don't claim to be an expert on this, I've just developed this procedure over a couple of years. It has worked well for me when setting up my FED, Zorki and Zenit shutters, hopefully it will be of use to others.
........ Dave..
Last edited:
fidget
Lemon magnet
It is common for these shutters to have been misadjusted at some stage, often over-tightened to overcome shutter problems related to debris in the path of the curtains or lack of appropriate lubrication as old grease dries out. The adjustments shown here will not help to clear problems caused by these or speed selection and release mechanism faults. You are advised to check that the curtains, their mechanisms and paths are in suitable condition and preferably serviced prior to making these adjustments.
These notes do not cover the slow speed mechanism, which deserves a tutorial of its own.
Checking the general operation of the shutter release and curtains.
This procedure checks that the shutter release and general curtain path are serviceable. Any problems seen here should be rectified before attempting to adjust the curtain tension.
Remove the camera lens and back. Looking through the film aperture from the rear, against a bright, uniform background (wall, window etc), cock and release the shutter repeatedly for all speeds from the fastest down to a 25th or 30th, depending on the camera. For each speed you should see the background at a consistent brightness across the film frame aperture.
If it starts (from the right) through a much darker area, or both curtains travel without a gap between them, then you may have a problem in the release mechanism.
If it ends in a much darker area, indicating that the second curtain has caught up with the first, be sure to check for debris and dried grease behind the removable top and bottom curtain shields and around the gears at the base of the large curtain drum, inside the shutter crate.
Check that the curtains work on the ”B” setting, failure of the second curtain to be released can be a problem in the selector/release mechanism or low spring tension on the second curtain. Press the shutter button as you might in normal use, both gentle, gradual presses and more enthusiastic jabs, it makes a difference to the mechanism.
If all is OK, carry on to the more detailed checks.....
Last edited:
fidget
Lemon magnet
Adjusting the curtain tension.
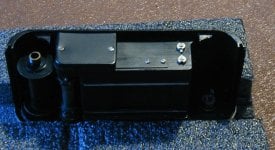
The first image below shows the spring tension adjustment shafts and their locking nuts on a FED2 (the nuts are usually locked by small screws). This arrangement is typical for the cloth curtains of FED, Zorki, Zenit and perhaps a few others.
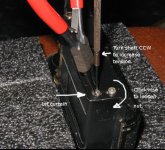
To adjust, remove the locking screws then release the locking nut whilst holding the shaft end with a screwdriver, as Image 2. Note that the shafts and nuts have left hand threads. It's a little fiddly but is easier than it looks when you've got the hang of it.
I use a block of firm foam with a slot cut in it to hold the camera whilst I work on it, makes jobs like this a little easier.
The shaft nearer the camera back tensions the first curtain. Make adjustments as required whilst holding the shaft at all times when not locked by the nut. I would not recommend that all tension is removed from the curtains as the ribbons can come off their guides and be creased or damaged if not seen and rectified, but if you feel the need, or do it accidentally, it shouldn't otherwise be a problem.
The first image below shows the spring tension adjustment shafts and their locking nuts on a FED2 (the nuts are usually locked by small screws). This arrangement is typical for the cloth curtains of FED, Zorki, Zenit and perhaps a few others.
To adjust, remove the locking screws then release the locking nut whilst holding the shaft end with a screwdriver, as Image 2. Note that the shafts and nuts have left hand threads. It's a little fiddly but is easier than it looks when you've got the hang of it.
I use a block of firm foam with a slot cut in it to hold the camera whilst I work on it, makes jobs like this a little easier.
The shaft nearer the camera back tensions the first curtain. Make adjustments as required whilst holding the shaft at all times when not locked by the nut. I would not recommend that all tension is removed from the curtains as the ribbons can come off their guides and be creased or damaged if not seen and rectified, but if you feel the need, or do it accidentally, it shouldn't otherwise be a problem.
Attachments
Last edited:
fidget
Lemon magnet
The curtains operate with their curtain ribbons overlapping and some shafts and drums loosely coupled. This tends to cause them to become synchronised to each other unless there is a large enough mismatch in spring tension. The different shutter speeds are obtained by setting different gaps between the curtains (done on the speed selector), which move at the same rate for every speed, therefore if one speed is correct, then the others will be too.
{The exception to this is 25th (or 30th), the flash sync speed and all slower speeds. The first curtain has made it all the way across the frame before the second is released, so it is possible that their speeds are different, but not enough to effect the overall exposure}
There are two elements to checking and adjusting the curtain spring tensions:
Adjusting one or the other so they travel across the aperture with a constant gap, (synchronised) and:
Adjusting both by a similar amount to regulate their rate of travel across the frame, to give an even exposure.
The following checks use a CRT monitor or TV as a means of “seeing” a sample of the path of the curtains. If we have a suitable shutter speed and screen refresh rate ( the rate at which the screen picture is built up from the top to the bottom, horizontal line by line), we will see stripes when looking through the operating curtains. What we see will vary according to the refresh rate of the screen and the shutter speed selected. A faster refresh rate will make the stripes for a given shutter speed appear more vertical. It's better to run slower as this shows up the movement of the curtains more clearly. Most fast screens can be turned down for these tests, look in monitor properties and choose a low rate which your monitor will support.
My screen was set to 60Hz for these tests, a lower rate would be even better. Alternatively, try your CRT TV, it may be quite suitable. A suitable rate is indicated when the strip you see is clearly leaning to the right.
Curtain synchronisation.
In this section we aim to check and adjust as necessary to ensure that the pair of curtains travel across the film frame aperture with a constant gap between them.
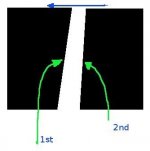
Hold the camera upright and level, again with the lens and back off, looking through the frame at a bright, relatively plain screen. Arrange your view to see most of the screen “square on” as viewing at an angle will cause distortions in what is seen. Release the shutter at various speeds between 1000th and 125th. You should see something like that shown in the images below.
Note how the width of the strip doubles as the next slower speed is used. Fire the shutter at 250th several times. You should see one or more bright stripes from the top to the bottom of the frame, slightly sloping from the right to the left. Each time the shutter is fired the stripe might be seen in a different position.
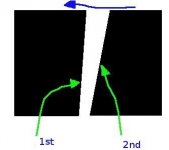
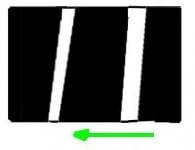
For the moment, concentrate on a stripe which occurs near the centre of the frame. Get an idea of it's shape. It should be fairly straight sided, tilted to the right and could have non-parallel sides like Image 2 or 3 below. The leading edge of the stripe (the left side, remember that this runs right to left) shows the track of the edge of the leading curtain, the trailing edge is the path of the second curtain.
Our aim here is to get the sides of the stripe to be parallel.
If the stripe is wider at the top than the bottom (image 2), then the second curtain is catching up to the first and so either the first curtain tension is too low or the second is too high. (extreme cases of this can lead to “capping” where the second curtain actually closes on the first before their travel is completed, although this is usually due to impediments to free movement).
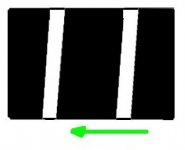
Similarly, if the strip is narrower at the top (image 3) then the first curtain is pulling away from the second, indicating either an over-tensioned first or an under-tensioned second curtain. (Try this at some other speeds, you should see a similar shape to the stripe, although the slower speeds give wider stripes and the differences become more difficult to see).
You could adjust one of the curtains now if you have a feel for which one you want to re-tension, or you could read through the next section of the curtain checks, which may help you to choose which curtain to adjust. Either way it's better that the curtains are in sync before adjustments are made to regulate the speed of the curtains as a pair.
When running correctly, we should see one or more stripes that are similar to that in the last image below where the important feature is its parallel sides.
{The exception to this is 25th (or 30th), the flash sync speed and all slower speeds. The first curtain has made it all the way across the frame before the second is released, so it is possible that their speeds are different, but not enough to effect the overall exposure}
There are two elements to checking and adjusting the curtain spring tensions:
Adjusting one or the other so they travel across the aperture with a constant gap, (synchronised) and:
Adjusting both by a similar amount to regulate their rate of travel across the frame, to give an even exposure.
The following checks use a CRT monitor or TV as a means of “seeing” a sample of the path of the curtains. If we have a suitable shutter speed and screen refresh rate ( the rate at which the screen picture is built up from the top to the bottom, horizontal line by line), we will see stripes when looking through the operating curtains. What we see will vary according to the refresh rate of the screen and the shutter speed selected. A faster refresh rate will make the stripes for a given shutter speed appear more vertical. It's better to run slower as this shows up the movement of the curtains more clearly. Most fast screens can be turned down for these tests, look in monitor properties and choose a low rate which your monitor will support.
My screen was set to 60Hz for these tests, a lower rate would be even better. Alternatively, try your CRT TV, it may be quite suitable. A suitable rate is indicated when the strip you see is clearly leaning to the right.
Curtain synchronisation.
In this section we aim to check and adjust as necessary to ensure that the pair of curtains travel across the film frame aperture with a constant gap between them.
Hold the camera upright and level, again with the lens and back off, looking through the frame at a bright, relatively plain screen. Arrange your view to see most of the screen “square on” as viewing at an angle will cause distortions in what is seen. Release the shutter at various speeds between 1000th and 125th. You should see something like that shown in the images below.
Note how the width of the strip doubles as the next slower speed is used. Fire the shutter at 250th several times. You should see one or more bright stripes from the top to the bottom of the frame, slightly sloping from the right to the left. Each time the shutter is fired the stripe might be seen in a different position.
For the moment, concentrate on a stripe which occurs near the centre of the frame. Get an idea of it's shape. It should be fairly straight sided, tilted to the right and could have non-parallel sides like Image 2 or 3 below. The leading edge of the stripe (the left side, remember that this runs right to left) shows the track of the edge of the leading curtain, the trailing edge is the path of the second curtain.
Our aim here is to get the sides of the stripe to be parallel.
If the stripe is wider at the top than the bottom (image 2), then the second curtain is catching up to the first and so either the first curtain tension is too low or the second is too high. (extreme cases of this can lead to “capping” where the second curtain actually closes on the first before their travel is completed, although this is usually due to impediments to free movement).
Similarly, if the strip is narrower at the top (image 3) then the first curtain is pulling away from the second, indicating either an over-tensioned first or an under-tensioned second curtain. (Try this at some other speeds, you should see a similar shape to the stripe, although the slower speeds give wider stripes and the differences become more difficult to see).
You could adjust one of the curtains now if you have a feel for which one you want to re-tension, or you could read through the next section of the curtain checks, which may help you to choose which curtain to adjust. Either way it's better that the curtains are in sync before adjustments are made to regulate the speed of the curtains as a pair.
When running correctly, we should see one or more stripes that are similar to that in the last image below where the important feature is its parallel sides.
Attachments

Last edited:
fidget
Lemon magnet
Curtain speed.
In this section the rate of travel of the pair of curtains across the frame is checked and regulated.
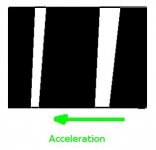
Again at a 250th (or a speed that suits you) fire the shutter repeatedly and get an idea of the width of the stripe near the left hand side of the frame (you may see two or even more if your screen has a high refresh rate). Compare the width of this to a stripe seen towards the right (it's best to compare those which occur on the same release if you have the patience). You might see something like that in Image 1 below. Where the left stripe is noticeably sloped more to the right and/or is narrower than the right, indicating that the curtain pair is accelerating and thus one (if they've not been synchronised yet) or both are over-tensioned. The converse applies when the left stripe is more vertical and/or wider.
If the curtain synchronisation is yet to be set up, this will indicate whether to increase the tension of one {if the left stripe is wider} or decrease the tension of the other {if the left stripe is narrower}.
The tension of both curtains is adjusted to get the stripes the same width and with the same slope on either side of the frame. Adjustment of both curtains is best done gently, make small changes, maybe half or quarter turn at a time. After adjustment check that the curtains remain synchronised as large changes in both can upset this setting. If tension has been released, check that the second curtain is capable of making its solo trip across the frame at 25th and “B”.
When you've finished, you might see something like that in Image 2, a constant gap traveling at a constant speed across the aperture, even exposure!
This can be a fiddly and sometimes tedious process and it may be that the curtains cannot be set up to perfection, but hopefully you will be able to get it quite close.
{Edit to text and Image 1 to add detail}
In this section the rate of travel of the pair of curtains across the frame is checked and regulated.
Again at a 250th (or a speed that suits you) fire the shutter repeatedly and get an idea of the width of the stripe near the left hand side of the frame (you may see two or even more if your screen has a high refresh rate). Compare the width of this to a stripe seen towards the right (it's best to compare those which occur on the same release if you have the patience). You might see something like that in Image 1 below. Where the left stripe is noticeably sloped more to the right and/or is narrower than the right, indicating that the curtain pair is accelerating and thus one (if they've not been synchronised yet) or both are over-tensioned. The converse applies when the left stripe is more vertical and/or wider.
If the curtain synchronisation is yet to be set up, this will indicate whether to increase the tension of one {if the left stripe is wider} or decrease the tension of the other {if the left stripe is narrower}.
The tension of both curtains is adjusted to get the stripes the same width and with the same slope on either side of the frame. Adjustment of both curtains is best done gently, make small changes, maybe half or quarter turn at a time. After adjustment check that the curtains remain synchronised as large changes in both can upset this setting. If tension has been released, check that the second curtain is capable of making its solo trip across the frame at 25th and “B”.
When you've finished, you might see something like that in Image 2, a constant gap traveling at a constant speed across the aperture, even exposure!
This can be a fiddly and sometimes tedious process and it may be that the curtains cannot be set up to perfection, but hopefully you will be able to get it quite close.
{Edit to text and Image 1 to add detail}
Attachments
Last edited:
fidget
Lemon magnet
Additional notes. ")
Adjustment of the top and bottom curtain shields.
These are the shields which can be seen when looking in through the open lens mount. They not only help trap light getting round the curtains, but have one or two other uses which may not be obvious.
When cocking the shutter, the laths of the curtains are pulled back in the channel provided by the shields. It is easy (I've missed it a couple of times already) to allow the shields to give too much clearance for the laths, leading to leaks onto the film as the laths are able to separate on their way across the frame. As you cock the shutter, notice how the curtain laths are almost non-overlapping as they start off, and gradually overlap more during the wind. The starting point of the curtains is the likely point of leakage.
(Test for this by cocking with a bright light shining into the lens mount whilst looking at the rear of the curtains). Clearly, this will only give problems if light is on the curtains as you wind, so may look like an intermittent problem.
Set up the clearance to give a close fit for the pair of laths.
I notice that later FEDs have the lath side of the shield coated with a velvet type of material, this could help to hold the laths together more effectively as they are wound.
Edit.....Nov 07
Note that no checks have been made for the actual effective shutter speed, rather we have made the mechanics run to give an even exposure. You might understand that increasing or decreasing the tension to change the shutter speeds (or noise) is likely to simply create uneven exposure as the gap moves across the frame. How much leeway there is in this is an attribute of that particular camera.
When looking at a bright even scene for the initial shutter release checks, you may see odd patterns if the scene is lit by flourescent lighting.
Remember that the shape of the lens mount will begin to effect the stripes, as when viewing at the extremes of the aperture it shields your view, cutting them off at the top and bottom.
Remember that the curtains move from the right to the left as we are looking through the back.
Remember that the curtain tension shafts have a left hand thread.
EDIT: Some concerns have been raised regarding possible damage to the RF mechanism of the Zorki 5 when tripping the shutter without a lens fitted. Some caution should be used when running one of these At least a sensible precaution would be to hold the rf cam arm back into the body as if a lens were fitted.
Last edited:
rxmd
May contain traces of nut
Can we have this stickied?
reagan
hey, they're only Zorkis
Yeah, great job here Dave. I've done this operation several times and this is good info for every FSU junkie.
fidget
Lemon magnet
Thanks for the comments guys, seems that there may not be many who would find this of use.
Should this have been posted in a repair forum or such?
(shameless bump coming.......)
Dave
Should this have been posted in a repair forum or such?
(shameless bump coming.......)
Dave
reagan
hey, they're only Zorkis
IMHO, most folks looking for FSU maint/adj/help/info come right here to the FSU forum. With two forums dedicated [mostly] to Barnack-esque LTMs and their cousins, I can't believe there aren't many who use this info. In the 18 mo. I've been hanging out here, I've seen questions about this process come up about a gazillion times... no wait, a BA-zillion... no... which is more?
Again, two thumbs up, Dave.
 Many thanks. I added it to my subscribed threads.
Again, two thumbs up, Dave.
Screwy
All the gear no idea
All good stuff , Be nice if a mod could sticky it so that its easier to find .
Paul
Paul
fidget
Lemon magnet
I edited the second part of the instructions to clarify some detail.
The setting up of the "rate of travel" across the film plane is presented here in a simple form. I will look at a further addition which expands upon this adjustment.
BTW I've just spent an evening setting up another FED2. This just would not give stable and repeatable results, even though it is fully serviced and otherwise (as far as i can see) fault free. I will run some film through it to see if this shows on photos in practical use.
Dave..
vicmortelmans
Well-known
Can this be explained?
Each picture has an exposure gradient and is overexposed at the side of low index numbers, but has normal exposure at the other side. Isn't that strange?
This is how I understand the shutter works as a sequence of events:
- release button pushed
- first curtain starts it's movement = exposure starts!
- exposure speed button starts to spin and after 1/60sec (e.g.) it 'hits' the release for the second curtain
- second curtain starts it's movement (should be ~at the same speed of the first curtain) = exposure stops!
- first curtain is completely open
- second curtain is completely closed
If the second curtain runs faster than the first, the part of the film that's exposed last will be underexposed. If the second curtain runs slower than the first, the part of the film that's exposed last will be overexposed.
But the part of the film that's exposed first (which is the part at the lower index numbers side), should always be properly exposed, unless there's something wrong with the exposure speed timer itself. But in that case, the whole picture will be over/underexposed.
Can someone explain?
Groeten,
Vic
top view (Zorki 1):
( )____/( )
>> film movement
.. 4 3 2 1 film index
<< shutter movement
fidget
Lemon magnet
Hi Vic, I think that your explanation of the sequence of events in the chain is good. I agree with your understanding of the exposure across the frame. I'm not sure if I should see attachments in your post (I can't) and I'm not sure what would need to be explained, as you've done such a good job.
Only the point about the exposure always starting as the right one, as you say, is subject to the photogs settings of speed and aperture and the mechanics of the camera not being faulty. So, if you see an exposure which starts incorrectly but ends correctly, this suggests that the initial operator chosen settings were not appropriate for the scene and/or camera/film/process. This could be be for many reasons, only one of which is that the actual shutter speed of the camera is subject to a surprising variation between cameras.
.
So, I don't think that it is strange, rather one of several indicators of the same problem. The problem you see is typical of the over-tight shutter springs.
Dave..
Last edited:
mjflory
Accumulator
Thank you, Dave. This is tremendously helpful. I spent a little time this evening checking the speeds on my Zorki 3M and Zorki 1D (or so I believe it to be, but that's another story... I've dubbed it the Reidski ). I cleaned out the Reidski's shutter, but your tutorial arrives just as I'm about to leap into real adjustment.
-- Michael
). I cleaned out the Reidski's shutter, but your tutorial arrives just as I'm about to leap into real adjustment.-- Michael
gb hill
Mentor
As a proud receipient of Fidgets(Dave) Technological genius! My Fed 2 runs as smooth as a Singer sewing machine. No more stuck or dragging shutter curtains for me! From not even knowing anything about what a tension screw was to becoming a Oleg jr. my Fed is as smooth as hot butter. Just follow Daves simple instructions and that fsu will have a feel like it just rolled out of the KMZ factory.
Serously though, the info with pics were a big help and I recommend this service for your fsu and save alot of bucks. I was almost ready to ship this thing off, I'm glad I didn't. Thanks Dave!
Greg
My Fed 2 runs as smooth as a Singer sewing machine. No more stuck or dragging shutter curtains for me! From not even knowing anything about what a tension screw was to becoming a Oleg jr. my Fed is as smooth as hot butter. Just follow Daves simple instructions and that fsu will have a feel like it just rolled out of the KMZ factory. Serously though, the info with pics were a big help and I recommend this service for your fsu and save alot of bucks. I was almost ready to ship this thing off, I'm glad I didn't. Thanks Dave!
Greg
beachhutblues
Newbie
Excellent advice
Excellent advice
Excellent advice.
Ive resurrected many a "dead" FSU camera over the years this way, and rarely had a complete failure.
I thought it was "my little secret"!
Now everybody knows I wont be able to get all those cheap FSU cameras at fairs anymore...which I tell the vendor are no-good because they dont work!
mike goldberg
The Peaceful Pacific
Working on a recently arrived Fed-2c [mushroom knob]:
With fidget's post of some months ago... along with a bit of support from Spyderman,
I backed off curtain tension about 1/4 turn on the front shaft, or Curtain 2. To get the balanced images with the camera held near my PC monitor, against a blank screen in Notepad... I had to tighten up a tad on Curtain 2, and fiddle with the shaft on rear
Curtain 1, about 1/8 turn this way/that way.
The net result:
Shutter speeds are quieter, and winding, already smooth, is even softer. Now it's time for a test roll. Cheers, mike
ErnestoJL
Well-known
I´ve been (and still I am) a fan of the Contax/Kiev family however...
One day I was tempted by a nice Zorki 1 (d or e) and thought that there should be a very good reason why too many people love this Barnack descendant cameras.
Then I decided to buy it and try it.
Fortunately the two Zorkis are OK, but this info means gold if something wrong happens.
Thanks for posting such detailed info to save those babies!
Cheers
Ernesto
payasam
a.k.a. Mukul Dube

Share:
-
This site uses cookies to help personalise content, tailor your experience and to keep you logged in if you register.
By continuing to use this site, you are consenting to our use of cookies.