
Lutz
Member
R
RML
Guest
Lutz, you keep amazing me. ")
rbiemer
Unabashed Amateur
![tinker's falls[pinhole].jpg](/data/attachments/0/109-7319ec4cd34b3c3b06cc96c19a649a74.jpg)
dazedgonebye
Mentor
Heads Up for some interesting pinhole "lenses" for Canon EOS cameras.
http://cgi.ebay.com/Finney-Pinhole-...ryZ30077QQssPageNameZWDVWQQrdZ1QQcmdZViewItem
http://cgi.ebay.com/Finney-Pinhole-...ryZ30077QQssPageNameZWDVWQQrdZ1QQcmdZViewItem
rtphotos
Established
Hi Stephanie,
Good start on your pinhole photography! Definitely try making a smaller hole with a pin or sewing needle. And rather than tape, I use very thin brass shims that can be gotten from many hobby/crafts stores. The idea is to make a very tiny and round hole - not jagged. Brass is easy to work with and soft.
Bringing this back OT , I've made pinhole photographs using my Leica rangefinder and Crown Graphic (kalart). With the Leica, I used a spare body cap and drilled a 1/4" hole in it, and attached the brass shim (with pinhole) to the cap.
With the Crown Graphic, I removed the lens and shutter from the lens board, leaving a big hole which I then covered with the brass shim/pinhole.
The quality of the images from the Crown was much sharper over the Leica even though the pinhole was identical. I think this was mainly because of the amount I needed to enlarge the the 35mm film, as opposed to the 4x5 negative of the Crown. The Crown also allowed me the choice to use polaroid film. Most of my other pinhole photography used tri-x film.
A tripod is a MUST for these one minute+ exposures!
In either case, it was much fun! I enjoy the idea of making things from scratch and not needing to buy ready-made pinhole cameras or pinhole lenses. My best success with pinholes was a "camera" I made out of a soup can!
I wish you luck with your pinhole experiments. Perhaps you will find some success and be able to participate in the upcoming Worldwide Pinhole Photography Day!
rt
Good start on your pinhole photography! Definitely try making a smaller hole with a pin or sewing needle. And rather than tape, I use very thin brass shims that can be gotten from many hobby/crafts stores. The idea is to make a very tiny and round hole - not jagged. Brass is easy to work with and soft.
Bringing this back OT
, I've made pinhole photographs using my Leica rangefinder and Crown Graphic (kalart). With the Leica, I used a spare body cap and drilled a 1/4" hole in it, and attached the brass shim (with pinhole) to the cap. With the Crown Graphic, I removed the lens and shutter from the lens board, leaving a big hole which I then covered with the brass shim/pinhole.
The quality of the images from the Crown was much sharper over the Leica even though the pinhole was identical. I think this was mainly because of the amount I needed to enlarge the the 35mm film, as opposed to the 4x5 negative of the Crown. The Crown also allowed me the choice to use polaroid film. Most of my other pinhole photography used tri-x film.
A tripod is a MUST for these one minute+ exposures!
In either case, it was much fun! I enjoy the idea of making things from scratch and not needing to buy ready-made pinhole cameras or pinhole lenses. My best success with pinholes was a "camera" I made out of a soup can!
I wish you luck with your pinhole experiments. Perhaps you will find some success and be able to participate in the upcoming Worldwide Pinhole Photography Day!
rt
trittium
Well-known
Today, I made a semi-screw mount semi-pinhole lens using an old enlarger lens. I used a Wollensak 90mm (3 1/2 inch) velostigmat. Theses are really easy to take apart. I removed the aperature blades and replaced them with a piece of black plastic from the bag bulk film comes in (with a pinhole in it of course). Then I reassembled the lens and put one layer of electrical tape around the outside. If you "screw the lens in" it attaches and stays in no problem.

I uses a safety pin to make the pin hole which is about f175. I was using ilford
fp4+. Proper exposure was about 7 seconds in bright sun light. Here are some results


Total cost: $14 much cheeper than the ones on ebay
I uses a safety pin to make the pin hole which is about f175. I was using ilford
fp4+. Proper exposure was about 7 seconds in bright sun light. Here are some results
Total cost: $14 much cheeper than the ones on ebay
Last edited:
vicmortelmans
Well-known
trittium said:Today, I made a semi-screw mount semi-pinhole lens using an old enlarger lens. I used a Wollensak 90mm (3 1/2 inch) velostigmat. Theses are really easy to take apart. I removed the aperature blades and replaced them with a piece of black plastic from the bag bulk film comes in (with a pinhole in it of course).
So if I get it right, you've just modified the lens to have a tiny aperture setting? So you have a pinhole diaphragma, rather than a pinhole lens. I'm surprised that your pictures are still a bit in focus, because I would expect the characteristics of your lens stay what they were (i.e. 90mm). Did you take into account to mount it at the right film distance? If you would, you'll probably get much sharper images. The sharpness you have now is probably due to the huge DOF given the pinhole diaphragma. Also a real pinhole lens with the same pinhole size may give even sharper images; maybe you should try to remove all the optics from the lens and just keep the pinhole...
Groeten,
Vic
trittium
Well-known
vicmortelmans said:So if I get it right, you've just modified the lens to have a tiny aperture setting? So you have a pinhole diaphragma, rather than a pinhole lens. I'm surprised that your pictures are still a bit in focus, because I would expect the characteristics of your lens stay what they were (i.e. 90mm). Did you take into account to mount it at the right film distance? If you would, you'll probably get much sharper images. The sharpness you have now is probably due to the huge DOF given the pinhole diaphragma. Also a real pinhole lens with the same pinhole size may give even sharper images; maybe you should try to remove all the optics from the lens and just keep the pinhole...
Groeten,
Vic
Vic,
I did not correct for focal length, but i could mount it on the 90mm Leitz NY Wollensak lens I have to correct it. I cannot remove the rear optic from the lens, that probably has the greatest effect on the image. Right now the lens has a spread about 40mm. This was my first test. I am definately going to try some other techniques to improve my design. To tell you the truth, I was suprised they came out relatively in focus as well. If I have any more developments, I will be sure to post them here.
Last edited:
kaiyen
local man of mystery
Well,the most amazing thing to me is that you have a Wii...
Nice work. I think modifying a lens would be my approach, too, at this point. I'm also thinking of doing some film canister style pinholes. I bought some at Union Square in NYC while I was there in December.
allan
Nice work. I think modifying a lens would be my approach, too, at this point. I'm also thinking of doing some film canister style pinholes. I bought some at Union Square in NYC while I was there in December.
allan
Stephanie Brim
Mental Experimental.
Yeah, I think the Wii thing is amazing, too. I haven't been able to get my hands on one yet for my boyfriend and I and I have Zelda sitting at home mocking me.
But anyway, I plan to keep working on this. It would be an excellent project when I'm 8.5 months pregnant and don't really want to do much else.
But anyway, I plan to keep working on this. It would be an excellent project when I'm 8.5 months pregnant and don't really want to do much else.
Topdog1
Well-known
Leicagoodies, no longer in operation, sold pinholes from 28mm - 50mm that were made from Leica body caps. Unfortunately, Leicagoodies.com is temporarily out of service.
/Ira
/Ira
trittium
Well-known
I have improved my design. This time I made the hole smaller, and faced the cone created by the pin up like so (___/ \___). I am going to try using metal next. My plan is to create a dent in a sheet of metal, and then slowly sand away the metal to create a small hole.


Last edited:
Stephanie Brim
Mental Experimental.
Yeah, good results. The sanding idea is a good one and I may try it.
trittium
Well-known
Thanks Stephanie, the only problem I foresee with the metal is sanding it unevenly. This would lead to a poor quality hole.
DrLeoB
Shoot a IIIc "K" !!!
Any further progress?
When I was an electron microscopist, we often discarded old pin-hole apertures. Find a local EM lab and buy a nice new one.... They are even platinum!
When we had to have a custom diameter, we partially punched 0.010" bras shim stock, left the needle in the dent and polished until we got the desired diameter. Polishing paper was 0.03 micron grit. Takes about 5 minutes to make a VERY round
pinhole.
fgianni
Trainee Amateur
You may want to improve the coating on those holes, there seem to be some flare
colyn
ישו משיח
Topdog1 said:Leicagoodies, no longer in operation, sold pinholes from 28mm - 50mm that were made from Leica body caps. Unfortunately, Leicagoodies.com is temporarily out of service.
/Ira
They're working fine for me. Site is up and running..
JoeV
Thin Air, Bright Sun
Getting on the pinhole bandwagon a bit late here at RFF. I post lots of pinhole images over at F295; great bunch of folks.
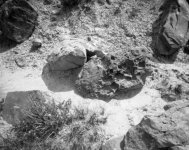
I shot these images yesterday in the Ojito Wilderness in New Mexico. F280 brass pinhole in homemade 4x5 box view camera. 45 second exposure on preflashed grade 2 paper negative.
Good prints can be had from contact printing paper negatives. I've also had success enlarging paper negatives!
For my in-camera negatives, I used graded paper, contrast grade 2, in order to control the contrast of the negative in daylight conditions. The blue/UV daylight will activate the high-contrast portion of the emulsion in VC/MG papers, which is why I use graded paper negatives.
If you're doing close-up/still-life/diorama types of compositions, then you can get by with a pinhole smaller than the so-called 'optimal' size as defined by the Rayleigh criteria. Such calculations tend to find the optimal size between diffraction effects and geometric effects, but are optimized for objects at infinity; closer in, the geometric effects outweigh diffraction, so a smaller pinhole size is better.
Pre-flashing paper negatives in the darkroom, prior to loading the camera or film holders, brings up shadow detail that would otherwise not register. This helps to control excess contrast. I give enough exposure so that the paper would show a very faint light gray tone.
Attachments

Last edited:
Tom Harrell
Well-known
Joe,
What do you use to "preflash" the paper? What settings do you use?
Thanks,
Tom
What do you use to "preflash" the paper? What settings do you use?
Thanks,
Tom
JoeV
Thin Air, Bright Sun
Tom, I apologize for not getting back to this thread for so long. I use a 7.5 watt, round frosted night light bulb, that is mounted inside a custom made (metal soup can) housing. The housing is suspended 30 inches above the work surface of my darkroom, and is stopped down with a black paper diaphragm to a 1/8" hole.
To calibrate this light source for preflashing paper negatives, I did a test strip series, in increments of 2 seconds each, using my darkroom's enlarger timer connected to the light source. For my process (Arista brand grade 2 glossy RC paper) I preflash to 8 seconds. I also rate this paper negative media at a 'speed' (exposure index) of around 2.
The preflashing is done such that if no additional exposure were given, the paper would acquire a faint, light gray tint.
I also develop the paper negatives using a diluted paper developer. For instance, using Agfa Neutol WA, I'll use a 1:20 dilution, and develop by inspection.
These paper negatives scan well for quick internet postings, but they also contact print nicely. I've also enlarged them from 4x5 to 11x14; I had to open up the enlarger lens all the way, and still use an exposure time of over a minute. In my condensor enlarger, the paper backing of the paper negative makes it kind of work like a diffusion enlarger would.
Not only for pinhole purposes, but I've experimented with alternative lenses on my Speed Graphic, with paper negative media. For instance, I use the front objective element from a 7x50 binocular, which just unscrews from the barrel of the binocular, and mounts to a simple plywood lens board to the Speed. I run this lens wide open at F3, for images with narrow DOF and 'swirly bokeh'. As an example, see my avatar image, shot with the binocular lens onto paper negative media. See the 'Alternative Photography' section of F295 for more great ideas around adapted optics for photographic purposes.
~Joe
Last edited:
Share:
-
This site uses cookies to help personalise content, tailor your experience and to keep you logged in if you register.
By continuing to use this site, you are consenting to our use of cookies.