Godfrey
somewhat colored
To evaluate what an orange or green filter does on B&W film, I'm accustomed to doing a couple of test exposures of the Xrite Color Checker—one without a filter, and one each with the two filters—and then comparing them. I've become so accustomed to looking at test exposures this way it makes sense to me.
But I realized that trying to see exactly how the filterless exposure compared against the two filtered exposures, and how they differed from each other, was a bit difficult given the Color Checker's distribution of the color tiles.
I got the idea in my head that I could take a color image of the CC and the three exposures, mark each tile as to its position on the grid, and then decompose it into three sets of 18 tiles. I then ordered the tiles take by the M10-M without a filter from dark to light, and rearranged the colored tiles and the two sets of tiles made with the orange and green filters the same way next to each other.
The result, I think, gives me a better feel for what the M10 Monochrom sensor is actually seeing and how it changes with the orange and green filters. Here's the graphic I created to display it:
(The full resolution image of this graphic is the size of my 27" computer display and can be downloaded from Flickr.com. Just click on the image to get there... )
What do you think?
G
Some of the older books I have on filters published separate examples under various lighting conditions. The change in response will be different under direct sunlight versus artificial light. If most of the light is "cold" or "warm"- the filtered value will change. What I did- line up the various filters on a slide sorter and photographed them with the M Monochrom.
Pál_K
Cameras. I has it.
The distribution of colors on that color checker chart has never made any sense to me for the very reason you state: it’s difficult to ascertain how gradations of color in a real scene are affected by different fliters.
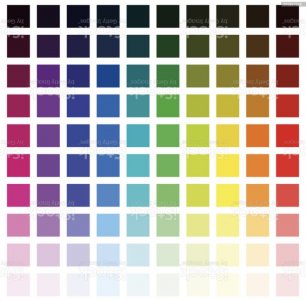
Other than just going outside and making several neighborhood photos (the same scene with different filters), I would use something like this chart with different filters:

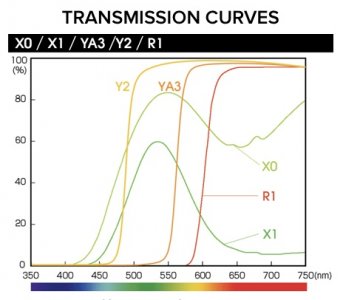
Simple. Easy to understand. The colors are ordered in their natural spectral order by frequency. If you get the specifications for a filter and look at its transmission curve, you can essentially see the effects of that curve superimposed on the chart.

Other than just going outside and making several neighborhood photos (the same scene with different filters), I would use something like this chart with different filters:

Simple. Easy to understand. The colors are ordered in their natural spectral order by frequency. If you get the specifications for a filter and look at its transmission curve, you can essentially see the effects of that curve superimposed on the chart.

Last edited:
Dralowid
Michael
Are the Wratten numbers relevant here?
Freakscene
Obscure member
To evaluate what an orange or green filter does on B&W film, I'm accustomed to doing a couple of test exposures of the Xrite Color Checker—one without a filter, and one each with the two filters—and then comparing them. I've become so accustomed to looking at test exposures this way it makes sense to me.
But I realized that trying to see exactly how the filterless exposure compared against the two filtered exposures, and how they differed from each other, was a bit difficult given the Color Checker's distribution of the color tiles.
I got the idea in my head that I could take a color image of the CC and the three exposures, mark each tile as to its position on the grid, and then decompose it into three sets of 18 tiles. I then ordered the tiles take by the M10-M without a filter from dark to light, and rearranged the colored tiles and the two sets of tiles made with the orange and green filters the same way next to each other.
The result, I think, gives me a better feel for what the M10 Monochrom sensor is actually seeing and how it changes with the orange and green filters. Here's the graphic I created to display it:
(The full resolution image of this graphic is the size of my 27" computer display and can be downloaded from Flickr.com. Just click on the image to get there... )
What do you think?
G
It’s really useful. I did something similar for my monochrome microscope camera with a range of filters, because I often have to photograph histological sections like this: https://onlinelibrary.wiley.com/doi/10.1111/jfd.12948 (this is by one of my students) into monochrome for journal reproduction, but the contrasts need to be maintained. This can be tricky.
Marty
Pál_K
Cameras. I has it.
I just used that as an example. You can see the Y2 yellow filter cuts off anything below 750nm and transmits everything above pretty well. So, blue to blue-green would appear dark. If you transpose or overlay that Y2 curve on the color tile chart I posted, you can see which tiles would be darker and which would be lighter and if you photographed that chart with a Y2 filter, it would match the curve.Are the Wratten numbers relevant here?
Godfrey
somewhat colored
Some of the older books I have on filters published separate examples under various lighting conditions. The change in response will be different under direct sunlight versus artificial light. If most of the light is "cold" or "warm"- the filtered value will change. What I did- line up the various filters on a slide sorter and photographed them with the M Monochrom.
This is fine, but does not address what I was trying to achieve.
My goal was to learn a baseline for using the M10-M in sunlight ... I only rarely use filters in low light or indoors. Looking at example images under various lighting circumstances generally does not net me enough understanding for previsualizing things, and a single point/single light source test is similarly limited in its information value for my purposes.
(When I do need filtering under conditions of artificial lighting (whether for portaiture, table top, or macro work), it is because I have done some specific testing of that subject in that light (usually with a ColorChecker) to see what the camera or film did and whether the results met either the accuracy I was looking for or the aesthetic effect I was after.)
From Wikipedia, paraphrased: "The ColorChecker was introduced in a 1976 paper by McCamy, Marcus, and Davidson in the Journal of Applied Photographic Engineering. It was designed to be a reference standard, based on sound engineering principles. The chart’s color patches have spectral reflectances intended to mimic those of natural objects such as human skin, foliage, and flowers, to have consistent color appearance under a variety of lighting conditions and to be stable over time.
(See ColorChecker - Wikipedia where a good bit more about this ColorChecker can be found. )
Since I know and have used the ColorChecker for years and years to evaluate lighting and filtration, I was looking for a way to see more clearly what the M10-M was doing with the CC color swatches, and how orange and green filters affected that. I wanted it to be 'at a glance' so that I could look down a particular color column and be able say in an instant "Oh look, this filter will lighten this group of tones and that filter will darken three out of four of them." You can't get that information from a single point test.
G
Godfrey
somewhat colored
The distribution of colors on that color checker chart has never made any sense to me for the very reason you state: it’s difficult to ascertain how gradations of color in a real scene are affected by different fliters.
Other than just going outside and making several neighborhood photos (the same scene with different filters), I would use something like this chart with different filters:
View attachment 4817826
Simple. Easy to understand. The colors are ordered in their natural spectral order by frequency. If you get the specifications for a filter and look at its transmission curve, you can essentially see the effects of that curve superimposed on the chart.
View attachment 4817825
This is another perfectly valid means of analyzing light and filtration, but does not provide the level of information for my purposes that the ColorChecker does. Knowing how the spectrum will change is useful, and I did another test with exactly that, a continuous spectrum chart and grayscale output, but simple things like "dark skin" and "light skin"—two of the most common things one has to deal with photographically—appear nowhere on a spectrum display being a complex combinant of several different colors.
I even reordered the ColorChecker swatches into a roughly spectrum order and graphed the differences that way, but the resulting graph and grayscale patches are similarly hard to apprehend at a glance, at least for me.
The beauty, to me, of ordering the swatches according to what the M10-M sees, and then seeing how the filters affects those values, is that I can instantly see for each of the swatches I might be interested in how to change the filtration to achieve the results I want.
The ColorChecker is not a simple tool and takes some understanding and experience to know how to use it best. Each row has a different purpose for the color samples it contains, and you have to look at each row separately most of the time. It's not a "glance and get a gestalt" kind of tool. Few people I've talked with about using it seem to really understand it, other than the professionals in lighting and publishing who swear by it. I spent the time to learn it because I had a need to, once upon a time when I was involved in publishing a project's materials that had to be accurately reproduced, and that knowledge has proven valuable to me over the years.
G
Last edited:
Godfrey
somewhat colored
Are the Wratten numbers relevant here?
I presume your question is to Pál_K, and he's responded to it. I've never spent much time learning Wratten numbers.
However, just to be complete, I used a B+W MC 040 4x (two stop) orange filter and a Hoya MC G(X1) green filter (about 6x or two and a half stops) for my filtered test exposures.
G
peterm1
Mentor
Green filters will tend to darken skin tones ("apple green" - a kind of pale green was a common filter color for "healthy" - i.e. having the appearance of tanned, skin tones back in the day). It will also lighten foliage of course too as green filters with green foliage will just do that. In relation to the warmer tones - yellow, orange and red - orange is middle of this pack and tends to lighten skin tones somewhat and will darken blues somewhat too - skies for example. Red filters (which is kind of a stronger version of orange) on the other hand makes (European) skin tones look positively ghostly (white) and also darken skies and other blues much more dramatically than will orange much more than orange does. For a good idea of how these function in the real world, check a color circle. Colors (of filters) that are on the same side of the color circle will always lighten similar colors in the image, and colors of the filters that are on the opposite side will darken those opposite-side colors in the image. In short, green - is good for portraits but contrary-wise produce somewhat anemic results for images including foliage. Orange - is midway between yellow and red, will lighten skin tones (sometimes desired for dramatic portraits but often not so good for more lifelike portraits) but be useful for darkening blue skies
and bringing out clouds. So it all depends on your subject and scene.
and bringing out clouds. So it all depends on your subject and scene.
Last edited:
Godfrey
somewhat colored
This is all good, Peter, but it's almost a quote out of the Kodak Pocket Photo Guide filter section, which I've had and read many, many times since 1966. And used the suggestions and preview filters to select filtration with. 
It does not address my fundamental question ... which was "Given the colors presented by the ColorChecker and a Leica M10 Monochrom, how does the M10-M sensor render them?" And then, "How do the orange and green filters modify that rendering?" Ultimately, I'll image the yellow, red, and blue filters into the matrix as well, but I have to find what dark corner of my equipment closet those filters have hidden themselves in...
G
Share:
-
This site uses cookies to help personalise content, tailor your experience and to keep you logged in if you register.
By continuing to use this site, you are consenting to our use of cookies.


