FED2 - DIY VF/RF Service (long w/images)

L

Laika

Guest
The FED2 is one of the more popular Soviet RFs and for good reason, but often you hear people mention its “small and dim” viewfinder as one of its major shortcomings. While we can’t do much about the design, we can make sure we are getting the best out of it with simple cleaning and adjusting. To do a thorough job the top cover need to come off - at this point those of us who are all thumbs are already backing away, but don’t panic, the FED2 is an easy camera to work on even if it’s your first. I have done several of these, and the improvement in general view and RF contrast/clarity has been from good to dramatic. Also with the top cover components removed it’s a great time to give everything a good clean (and most of them need it). A friend of mine was horrified when he started scrubbing away at the winder knurling and realized that the dark brown muck coming out of it was what he now refers to as “man fat” :D. Its worth remembering the FED2 is turning 50 next year :)

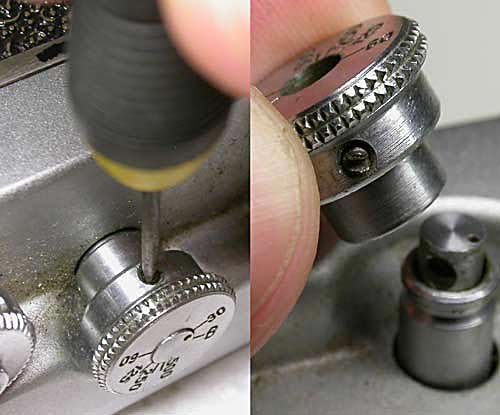
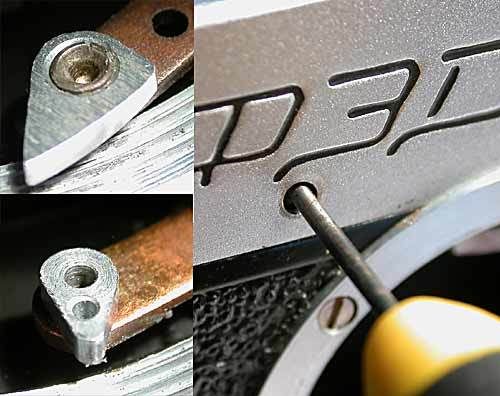
This first photo shows a rear view of a first (production) version and a late model that is going to get a bit of TLC. Here you can pick some of the differences in the models… The late model has the “mushroom” style winder knob, less knurling on the rewind knob, a higher positioned accessory shoe (required if you want to use a external viewfinder (except the Soviet “turret” finder)), different shutter speed dial and is missing the two screws on the back of the top cover (replaced with a hidden screw under the winder knob (see later picture)). Also of note the first version has a nice extra engraving on the top cover.

If you interested in the different FED2 models check out Jim Blaziks great web page … geocities.com/fzorkis/ EDIT 2008: This site is no longer up.. pity it had some stunning cameras. Here is a link to another thread showing my refinished FED2's here on RFF
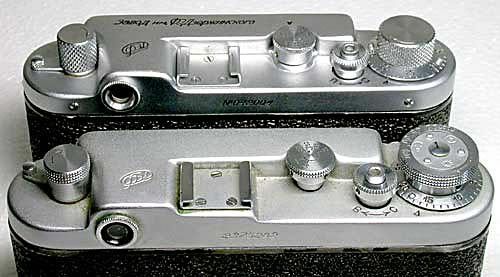
twobodies_web.jpg
 
Last edited by a moderator:
Equipment used: Tray (ie. Paper dev tray), Small screwdriver set, long nose pliers with padded jaws (heat shrink etc.), Lens spanner wrench (see comment), Q-tips, Window cleaner, Toothbrush, Strong soap or solvent for cleaning chrome parts, Matt black paint & small brush (optional), A couple of drops of oil or grease.

Comments: I always work on a camera in a tray, like a 8x10 paper dev tray or a kitty litter tray (get a new one just for cameras and don’t let kitty near it :D), working with small parts you will drop them at times and it only takes one part lost and your camera is out of action, it’s also handy if you’re working on the kitchen table to be able to pick up the whole lot in the tray come dinnertime. The screwdrivers I used are a little set made by Stanley in a yellow box, I find the sets you see a lot in the clear and blue plastic box are often poor quality and the tips snap off; try and get something a cut above the cheapest. I have a set of long nose pliers that I’ve put heat shrink on the jaws for adjusting the RF cams and starting off a tight bezel without scratching or marring the finish. Lens spanner wrench, buy one if you’re going to work on a few cameras or lenses, mine was $15 from micro-tools (see link). A cheap DIY option is to file down the tips of an old set of long nose pliers to make a tool that will work, but take extra care not to slip and gouge the top cover!
https://www.micro-tools.com/store/home.aspx
 
Last edited by a moderator:
Set a shutter speed (after cocking as always) and note it down somewhere. Unscrew both screws from the shutter speed dial and lift off the dial, partial winding of the shutter makes accessing the locking screw easier. Note you don’t have to remove the screws, just unscrew them a few turns.

speeddial_web.jpg
 
Last edited by a moderator:
Unscrew the locking screw in winder knob, unscrew winder knob anti-clockwise, remove film counter dial and spring. Remove any spacer washers from the shaft. Note the order they come off in, I have stuck them in some poster putty (Blu-Tack) but even a bit of sticky tape will make your life easy later. In this picture you can see the extra top cover screw in the late models that is hidden by the winder.

winder_web.jpg
 
Last edited by a moderator:
Unscrew the locking screw around shutter collar (put it into the rewind position if required to access the screw), screw off collar anti-clockwise.

shutter_web.jpg
 
Last edited by a moderator:
Unscrew the three screws holding on the accessory shoe.

shoe_web.jpg
 
Last edited by a moderator:
Lift up rewind knob and remove screw, now lift off the knob (the diopter arm is not removed at this point) and collar. From the inside (w/ back off) you can remove the rewind fork, spring and washer. Note: Early FED2’s will have three small screws in the diopter arm, they can be removed along with the arm.

rewind_web.jpg
 
Last edited by a moderator:
Unscrew the eyepiece anti-clockwise, pliers with padded jaws might be needed just to get them started, but I tend only to resort to them after losing some skin off my fingers. Use care not to scratch or gouge anything!

vfwindow_web.jpg
 
Last edited by a moderator:
Unscrew RF cover anti-clockwise and remove. Now using the lens spanner, unscrew the RF lens anti-clockwise and remove. Note that it is actually two pieces, the inner lens is rotated to correct the vertical alignment. After cleaning I like to open up the gap slightly (shown bottom right) with a screwdriver to help it grip the outer collar; you may notice it looks as though when the factory set it they put a dab of glue on it to hold it in position, I have found it unnecessary to re-glue it…

rfwindow_web.jpg
 
Last edited by a moderator:
Unscrew the three screws on the front of the top plate, the center is a short screw covering the RF adjustment. Older models will also have two screws at the back, later cameras don’t have these but do have an additional screw hidden under the winder that will need to be removed (see section on the winder for image).

coverscrews_web.jpg
 
Last edited by a moderator:
Carefully lift up the top plate from the winder end, note that the diopter comes with the cover, use no force to remove the cover. Try and leave the diopter on the body by sliding the cover over the arm so you can see how it all works together.

cover_remove_web.jpg
 
Last edited by a moderator:
At this point observe how the diopter arm moves the lens backwards and forwards and how the spring is attached. Early FED2s are slightly different but the concept it the same.

diopter_web.jpg
 
Last edited by a moderator:
Unscrew the two screw holding the cover over the viewfinder and remove it, this will allow you to clean the side of it the rangefinder beam comes through much better than trying to do it with the cover in place, if the viewfinder glass seems to be glued in place I tend to leave it undisturbed and clean it in place, this one I removed to you can see how it all works.

vf_dioptor_web.jpg
 
Last edited by a moderator:
Now your FED is stripped down as far as you need to go and you are ready to start cleaning. Blow, brush or wipe any obvious dirt from the top of the body. Now using the Q-tips and window cleaner clean both surfaces of the RF prism, the three sides of the viewfinder prism, both sides of the diopter lens, the viewfinder eyepiece and the rangefinder vertical adjustment lens. Take your time and under a strong light check the glass for streaks, bits of fluff from the Q-tip, specks of dust etc.. You can use your standard lens as a good loupe to magnify things. Hold it up to your eye looking into it from the front holding the back of the lens about 1 inch from whatever you are viewing. Move the object back and forth to get focus (don’t forget to open the aperture up!). Again take your time here to get things really clean, a tip for getting that last hair/speck of dust off is to put a tiny bit of poster putty on the end of a small screwdriver, make into a point and lightly touch it on the dust spot. Don’t press it on or you may leave an oily mark and have to start over.

clean_web.jpg
 
Last edited by a moderator:
Give the chrome work a good scrubbing with a toothbrush and very hot soapy water. I’ve used car wash shampoo (for bugs and tar) with good results, but I guess you can use whatever you have. Pay a lot of attention to all the knurling. For really dirty parts I have used enamel thinners, that really strips out the muck quickly but also dries out your skin and may lift any flaky paint from the engravings, so beware. Don’t forget to stick a few Q-tips into the rewind post in the body where the rewind fork goes to get it clean.

If so equipped it might be a good idea to give the flash PC contacts a rub with some steelwool/fine sandpaper to ensure good contact while you have the top off.

Optional Step
Once the top cover is clean you may want to give the inside of it around the RF/VF optics a quick coat of matt black paint to cut down on any internal reflection that may cause problems say if you were shooting towards the sun. I had the paint already so thought it couldn’t hurt, I dried it with a hair drier so it was ready to go back together quickly. Note the inconsistent chroming of the inside of the top plate. The top and bottom plates are made of brass.

cover_black_web.jpg
 
Last edited by a moderator:
Reassembly is in reverse order

Reassembly Notes & Tips: Try and half slide the diopter control (with spring in place) onto the body post and thread the top cover over it, once it’s on and before doing anything else check that it is operating correctly. Look into the eyepiece socket: you should be able to see the diopter lens move back and forth as you move the arm. I tend to screw the accessory shoe and extra top screw (if a late model) down first to ensure that the top plate is leveled (with the back on the camera). When tightening the winder knob check the tension on the film counter, you can adjust it by bending the fingers on the spring slightly and/or locking the set screw in place with the winder knob at slight less than fully tightened. When reassembling the rewind parts put a drop of oil on your fingers and rub it on the shaft of the rewind fork. Put a drop on a Q-tip and run it through the body post where the fork goes as well.
 
Last edited by a moderator:
Last of all you need to check and adjust as required the RF on your camera. The basic adjustment is to remove the RF cover and using a small screwdriver rotate the inner RF lens until the vertical adjustment is correct in the viewfinder. Now set the lens to infinity and adjust the RF screw behind the cover screw (see image) until the RF shows correct infinity focus on an object in the distance (I use the moon:)), that’s the basic adjustment but it doesn’t take into account any variation in close focusing. To adjust a close focus error you need to adjust the cam that rests on the back of the lens as well. This is how I go about it (after setting infinity). I measure off 2M on a table and stand a book or video cassette case up to focus on, then check the lens reading, say it’s off by “X” amount. Now with my padded jaw pliers turn the cam in one direction a small amount (sorry I forget which way does what at the mo), now you must reset the infinity focus again (it will have changed), now recheck the close focus again, at this point you will know if you turned the cam in the right direction or not. Now repeat this process over and over until both the close focus and infinity are correct…. Done.

Note the different shaped cams: the pie shaped of the later models and the tear drop shape of the early models.

rf_adjust.jpg


Phew :p
 
Last edited by a moderator:
laika,

this is fantastic and i thank you for all the work and time you have put into it!
i might just buy another fed 2 just to take it apart and work on it.
this is great!
in case you haven't noticed, i made this thread a sticky - it will now be the first post we see when we come to the russian rf section.
so, any more (repair) plans for the future??

joe
 
Bravo Laika! :D :D :D I am very impressed by your technical knowledge of Fed 2. I am wondering if you are familiar with Bessa R2? I am always very curious on the topic of adjusting the R2's rangefinder but afraid that I may void the warranty of my R2s. If you are able to produce a step by step guide to Bessa R2 repairs I am sure and all R2 users and I are deeply indepted to you! :p
 
backalley photo said:
laika,

this is fantastic and i thank you for all the work and time you have put into it!
i might just buy another fed 2 just to take it apart and work on it.
this is great!
in case you haven't noticed, i made this thread a sticky - it will now be the first post we see when we come to the russian rf section.
so, any more (repair) plans for the future??

joe

Thanks Joe, I hope it helps out a few fellow Soviet RF addicts

More repair plans? Too many! :rolleyes: I have got to get out and shot more hehehe. Let me think, I've got a friends FED2 I’m putting new red shutter curtains in (he is doing the wildest refinish on this one I’ve seen), one of my FED2s for curtains, another 2 that is a full rebuild and refinish in every respect (long term project), a Zorki 5 that needs some winder tweaks and a pair of FED3s I bought for 0.01c that will become one custom shooter (this one has jumped the queue to first place) and there must be a couple more I've forgotten...I think I may just have to give up sleeping :D.... Well I've got a couple of shorter projects I thought I might write up and post but they can get outa hand, I thought this one might take an afternoon but ended up taking the best part of a weekend, but worth it if it helps out a few people.


Peter wrote:
...If you are able to produce a step by step guide to Bessa R2 repairs I am sure and all R2 users and I are deeply indepted to you!

If you can sell them to me for $20 each I get a dozen of them and get to work :D
 
Last edited by a moderator:
Back
Top