errorlogin
Love vintage Hifi, too!
Hmmm.....that was actually not my intention. I just love the camera and I am happy to hear, that others use and like it, too! ")
pinkarmy
Well-known
got my first IIIb last september, so good that i got one more.
i planed to collect a few more (in secret)
and then you post this thread.
i WON'T thank you for taking this camera to the spotlight. ;D
i planed to collect a few more (in secret)
and then you post this thread.
i WON'T thank you for taking this camera to the spotlight. ;D
ssmc
Well-known
Cool camera that I was not really aware of! I also like the way you presented it on the "retro" fabric backgroud, and the disassembly pics and instructions are excellent (I always enjoy this sort of thing even for gear I don't own)
Lastly there is no need to apologise for your English - as a former teaching assistant at a US college, I feel safe saying that your writing is better than a lot of native speakers, and infinitely better than my German
Regards,
Scott
Lastly there is no need to apologise for your English - as a former teaching assistant at a US college, I feel safe saying that your writing is better than a lot of native speakers, and infinitely better than my German
Regards,
Scott
Crazy Fedya
Well-known
Thank you, errorlogin, for excellent tutorial on cleaning rangefinder in Vitomatics. I have Vitomatic IIa, that I like very much, and I have one suggestion. If you put a dot with black marker on viewfinder, where it will overlap with rangefinder yellow image , it will make rangefinder image a lot more usable, giving it a lot more contrast. I think I saw this on Rick Oleson's pages.
errorlogin
Love vintage Hifi, too!
Hey, that's great! I could not believe it, but I gavet it try. It works! Incredible....
OK, the original image will fade out a little bit, but the yellow rangefinder image will be much more contrastier.
Thank you for this!
Jan.
OK, the original image will fade out a little bit, but the yellow rangefinder image will be much more contrastier.
Thank you for this!
Jan.
Film Man
Newbie
Ed. Trzoska specialises in servicing and repairing Voigtlander/Zeiss classic cameras. I have a Vitomatic lllb which he has serviced to an excellent standard. He can be contacted at:
Ed.G.Trzoska
Euro Photographic Services
150 Harrowgate Drive
Birstall,
Leicester
LE4 3GP
Tel: 0116 2674247
Email: [email protected]
Ed.G.Trzoska
Euro Photographic Services
150 Harrowgate Drive
Birstall,
Leicester
LE4 3GP
Tel: 0116 2674247
Email: [email protected]
Retrotech68
Established
Thanks Film Man. I heard a lot og good things about Mr. Troszka. I will either call or drop him a line asap.
Thanks again.
Thanks again.
johnwood
Member
Hmm...I've done all the reading I can find, but can't seem to find a definitive answer to the following: For the IIcs/IIIcs, which Proximeter? Proximeter I, Proximeter II...something else? The Prox I/II each say IIa or IIb... No Proximeter I've seen says I/II/III CS. Does anyone know if the design between 3rd and 4th generation Vitomatics changed...or are Proximeters for IIb just fine on IIcs/IIIcs?
Thanks for any help. I've had my finger on the 'buy' button several times, only to have doubt pull my finger away from the keyboard. Also, I've only seen two angled Proximeters for Vitomatic, the one above, in this thread; another on KEH. I've seen an angled one in different configuration, but for Vitessa T.
I would be grateful for any any advice! I want to shoot this CS at closer range
Thank you...
j
Last edited:
pinkarmy
Well-known
which Proximeter? Proximeter I, Proximeter II...something else?
I? or II?
it depends on how close you want to get to your subject.
Proximeter II is closer than Proximeter I, that is.
or you could also use both at the same time to get even closer.
...The Prox I/II each say IIa or IIb... No Proximeter I've seen says I/II/III CS. Does anyone know if the design between 3rd and 4th generation Vitomatics changed...or are Proximeters for IIb just fine on IIcs/IIIcs?
i think it's about the diameter of the lens
Ultron lens is bigger than the Color-skopar.
My Vitomatic IIIb with Ultron lens uses the Proximeter for Vitomatic IIa
johnwood
Member
i think it's about the diameter of the lens
Ultron lens is bigger than the Color-skopar.
My Vitomatic IIIb with Ultron lens uses the Proximeter for Vitomatic IIa
Ah...that's what I was looking for! Thank you!! Ok, so, no need to second-guess the ones marked IIa...cool. I think I'll be buying shortly. Thanks again, I really appreciate your generous help.
Marco B
Member
Vitomatic III CS cleaning
Vitomatic III CS cleaning
Hi all,
First post here on RangeFinderForum. I just got my hands on a lovely Vitomatic III CS, the last model of the Vitomatic series (about '67-'69 if I understand well from the internet). It is very similar to the III b, just with a CdS (Cadmium Sulfide) instead of Selenium exposure meter. As a consequence, there are a few small differences, including the incorporation of a battery compartment for a mercury cell.
Since my Vitomatic III CS needed a cleaning too, and Jan's posts and photos here in this thread were so helpful, I decided to add to this by showing some photos of the cleaning process on my III CS camera. I will do this in a couple of posts with attached images.
Actually, this the first time I have done this and disassembled part of a camera. You learn a lot, I never understood why rangefinders were actually called rangefinders (as you understand, this is also the first time I have a rangefinder in my hands), but disassembling explains a lot (as did Jan's photos of it).
The thing that needed cleaning most, was the front glass before the view finder window, it was severely fogged as visible in Jan's images. And the difficult to reach yellowish glass element in the range finder mechanism (which I haven't disassembled). Lastly, I needed to clean out the battery compartment, it had a completely corroded battery in it. I carefully removed the stuff and cleaned it out using cotton sticks, as I didn't want my hands in the toxic mercury salts.
Anyway, these first photo's in this post show the top part. To get to the glass to be able to clean it from the inside, I did what Jan didn't do, I actually disassembled the front view finder glass assembly by bending the metal clips that hold it. I used a small screw driver for this, careful not to scratch the innards or break the small metal clips, only applying the minimal amount of force necessary to bent them. You can probably do this only a couple of times... There are six of them, that hold the glass in it's frame locked in the top part, see the left and right images.
Attachments

Marco B
Member
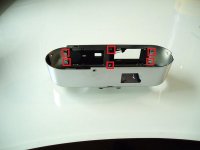
A top view of all the parts (except main glass) that form the view finder front glass. You may be wondering what that bended black plastic thing is on the left... it is the battery check button! It makes contact with a "switch" inside the camera frame. More on this later. Also notice the small dark bronze colored metal part in the lower left corner of view finder window in the large black plastic part. It houses a tiny mirror used to reflect the image of exposure as set on the lens onto the plastic? surface in the bottom part of the view finder window, so you can see the shutter speed and F-stop in the view finder without aid of any digital display, smart!
Be careful not to touch it, it seems glued onto the plastic frame using a tiny drop of some cement. It might be difficult to re-adjust to a correct position if loosened.
Be careful not to touch it, it seems glued onto the plastic frame using a tiny drop of some cement. It might be difficult to re-adjust to a correct position if loosened.
Attachments

Marco B
Member
Front view of the III CS. Notice the white plastic battery compartment on top of the CdS exposure meter assembly on the left. There is a couple of small wires and two resistors, that is about all the visible "electronics". The actual CdS cell seems to reside behind the black "square" inside the marked area in this photo. I guess the visible "screw hole" to the left of it, is a kind of potentiometer used to calibrate the exposure meter...?
Attachments

Marco B
Member
Removal of the exposure meter assembly. Notice that, in order to remove it, you need to turn/slide it towards you, as visible in the left image. Be careful, as the tiny needle with the hole that is visible in the view finder as a reference of the lens set exposure, is sandwiched between the exposure meter assembly and the white plastic battery compartment. You could easily break it if you are not careful.
Attachments


BW400CN
Bessamatic forever!
Very nice thread!
I´m more into Bessamatic and Avus but I have a Vito CSR and Vitoret LR too, which are later "brick" versions with a bit a "cheaper" shutter and a Color-Lanthar or a Color-Skopar as an option. The Vitomatic with an Ultron is quite a good alternative for a Leica when you only need one lens.
The Color-Skopar is maybe 1 stop slower, but for all waht I have seen at my Bessamatics it is sharper and more contrasty wide open. the Color-Skopar 2,8 50mm was the first computer designed lens ever back in the early 50th!!!

Voigtländer Vito CSR + Vitoret LR von LeBleuBeau auf Flickr
Vito CSR + Vitoret LR

Bessamatic CS mit Septon 2,0 50mm von LeBleuBeau auf Flickr
Bessamatic CS with Septon 2,0 50mm (the Bessamatic version of the Ultron)

50mm vorne_ji von LeBleuBeau auf Flickr
The 3 versions of the Color-Skopar 2,8 50mm (no difference in lens and coating, only the housing and the focus distance was changed!)
I´m more into Bessamatic and Avus but I have a Vito CSR and Vitoret LR too, which are later "brick" versions with a bit a "cheaper" shutter and a Color-Lanthar or a Color-Skopar as an option. The Vitomatic with an Ultron is quite a good alternative for a Leica when you only need one lens.
The Color-Skopar is maybe 1 stop slower, but for all waht I have seen at my Bessamatics it is sharper and more contrasty wide open. the Color-Skopar 2,8 50mm was the first computer designed lens ever back in the early 50th!!!
Voigtländer Vito CSR + Vitoret LR von LeBleuBeau auf Flickr
Vito CSR + Vitoret LR
Bessamatic CS mit Septon 2,0 50mm von LeBleuBeau auf Flickr
Bessamatic CS with Septon 2,0 50mm (the Bessamatic version of the Ultron)
50mm vorne_ji von LeBleuBeau auf Flickr
The 3 versions of the Color-Skopar 2,8 50mm (no difference in lens and coating, only the housing and the focus distance was changed!)
Marco B
Member
Vitomatic III CS cleaning - continued
Vitomatic III CS cleaning - continued
Another image of the Vitomatic III CS. Here you see the removed exposure assembly in the lower right corner of the photo. Notice the small curved black plastic part to the right of it. It seems to act as an electric insulator for some electrical contact points on the bottom of the assembly, keeping it clear from the camera's metal frame. Don't forget to re-place it on assembly. Also notice the now free floating brass needle on the camera which is visible in the view finder and used to set correct exposure (by adjusting time or F-stop). Amazing how this is all "inserted" in the view finder image through simple tiny "mirrors", prisms and lenses!
Attachments

Marco B
Member
Final two images.
I have now cleaned and reassembled the chromed top cover, and cleaned other surfaces I could reach. Like Jan wrote, the most difficult part to reach is some of the elements inside the range finder mechanism. I didn't want to disassemble that part entirely, as it wasn't very obvious how it all fits together, not even mentioning whether I could be refitted and re-adjusted easily. See Jan's images here for how it looks.
What I did to clean the yellowish glass inside it, which is difficult to reach, is to carefully insert a cotton stick (70% alchol on it), through the black metal hole in front of it.
I had already noticed the rangefinder's setting seemed to be "off", with the distance not being accurate. I couldn't make the images fit at infinity setting on the lens. If you look at Jan's close-up images of the rangefinder mechanism, as referenced above, there is an image that shows the rangefinder mechanism looking from the side. It shows a small steel bolt with a spring fitted inside an apparently galvanized steel part. I noticed that turning / tightening this bold shifted the rangefinder's results to more accurate readings, so I re-adjusted the mechanism and used some measuring tape as reference. I needed to tighten the bold by about 1 full turn to get an accurate setting.
The right image shows the cleaned (notice the no longer fogged glass for the view finder), re-adjusted and reassembled camera.
The left image is just before re-assembly. There is one thing to take not off: when fitting the top part on the camera, make sure the tiny battery check button is fully slided out. Otherwise it will not fit to the correct side of the metal contact it is supposed to operate, see the barely visible copper contact I marked on the camera body.
That's all. Now I need to get a replacement battery for that mercury cell to try it out! Anyone have a good suggestion where I can buy one? (I know about the voltage issues with non-mercury cells, if anyone has suggestions on this part too, and especially related to the III CS, I would be grateful)
I have now cleaned and reassembled the chromed top cover, and cleaned other surfaces I could reach. Like Jan wrote, the most difficult part to reach is some of the elements inside the range finder mechanism. I didn't want to disassemble that part entirely, as it wasn't very obvious how it all fits together, not even mentioning whether I could be refitted and re-adjusted easily. See Jan's images here for how it looks.
What I did to clean the yellowish glass inside it, which is difficult to reach, is to carefully insert a cotton stick (70% alchol on it), through the black metal hole in front of it.
I had already noticed the rangefinder's setting seemed to be "off", with the distance not being accurate. I couldn't make the images fit at infinity setting on the lens. If you look at Jan's close-up images of the rangefinder mechanism, as referenced above, there is an image that shows the rangefinder mechanism looking from the side. It shows a small steel bolt with a spring fitted inside an apparently galvanized steel part. I noticed that turning / tightening this bold shifted the rangefinder's results to more accurate readings, so I re-adjusted the mechanism and used some measuring tape as reference. I needed to tighten the bold by about 1 full turn to get an accurate setting.
The right image shows the cleaned (notice the no longer fogged glass for the view finder), re-adjusted and reassembled camera.
The left image is just before re-assembly. There is one thing to take not off: when fitting the top part on the camera, make sure the tiny battery check button is fully slided out. Otherwise it will not fit to the correct side of the metal contact it is supposed to operate, see the barely visible copper contact I marked on the camera body.
That's all.
Now I need to get a replacement battery for that mercury cell to try it out! Anyone have a good suggestion where I can buy one? (I know about the voltage issues with non-mercury cells, if anyone has suggestions on this part too, and especially related to the III CS, I would be grateful)Attachments


BW400CN
Bessamatic forever!
http://www.weincell.com/
http://www.smallbattery.company.org.uk/index.htm
there you get replacements with the right voltage
If you are located in Europe
http://www.foto-wolfgang-greiss.de/startseite.html
He still has a stock of mercury PX625 for sale - just ask!
http://www.smallbattery.company.org.uk/index.htm
there you get replacements with the right voltage
If you are located in Europe
http://www.foto-wolfgang-greiss.de/startseite.html
He still has a stock of mercury PX625 for sale - just ask!
Marco B
Member
http://www.weincell.com/
http://www.smallbattery.company.org.uk/index.htm
there you get replacements with the right voltage
Thanks for the links. I ordered the MR-9 adapter with silver oxide battery as a replacement for the mercury cell. Curious to try the camera out once it arrives!
Marco B
Member
Self timer on Prontor 500 SLK-Y?
Self timer on Prontor 500 SLK-Y?
One last question, my III CS has a Prontor 500 SLK-Y shutter on the Ultron lens. It has a handle with a red dot on the lower left side when looking from the front side of the camera. I guess this may be the self-timer? I have seen a self-timer referenced in a Vitomatic IIa manual, also operated from the shutter, but the shutter on the IIa is different from the Prontor on the III CS. What is the function of the handle and how to operate it?
Share:
-
This site uses cookies to help personalise content, tailor your experience and to keep you logged in if you register.
By continuing to use this site, you are consenting to our use of cookies.