
Fragomeni
Member
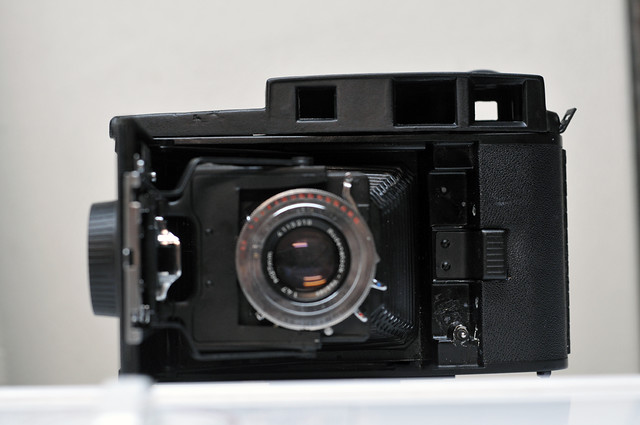
Here's a tip to help with the light leaks. Take a look at my camera. Look at the original images I posted where you can see the two metal tabs that I fixed along the bottom of the camera. Now look at the most recent image I posted of the finished camera. You notice that this area with the metal tabs is now covered by the area of the body that I built of with epoxy (the silver painted ugly area). The reason that I did this is because quite simply light has a hard time turning corners so I made an actual wall inside of which the film holder tightly sits. When good pressure is applied via the springs light will not be able to leak under the holder between it and the film gate. I also made sure to instal light baffles (black adhesive-backed foam from the hobby shop) along the inside edges where the holder slides in. When the holder is inserted it compresses all of the foam which form fits to the holder and any remaining light leaks are cured. Let me know if this doesn't make sense and I'll try to post some images to show what I mean in order to clarify if needed.Update on mine, taped a major light leak yesterday, but still have some to go, it created bands of light going from the point of film insertion into the 4x5 holder.
Fragomeni
Member
I've found that the EV dial is a little slow to set up jumping between say EV 10 and 15 or something like that but that could be avoided by setting it ahead of time according to your knowledge of what the light levels will likely be. I'm going to take it out and see how it preforms in a street shooting situation. I think the EV dial will actually be advantageous. Some of the choice regarding DOF and shutter speeds is out of your hands but for me street shooting is more about capturing fleeting moments and I find that those moments can be missed when fiddling with setting aperture dials and shutter speed rings. I'm excited to see if it makes a quicker job of shooting on the streetPeople are always talking about how triplet lenses are inferior. Don't believe the hype. But I still think the shutter is a bit cumbersome to work with.
")
shadowfox
Darkroom printing lives
Here's a tip to help with the light leaks. Take a look at my camera. Look at the original images I posted where you can see the two metal tabs that I fixed along the bottom of the camera. Now look at the most recent image I posted of the finished camera. You notice that this area with the metal tabs is now covered by the area of the body that I built of with epoxy (the silver painted ugly area). The reason that I did this is because quite simply light has a hard time turning corners so I made an actual wall inside of which the film holder tightly sits. When good pressure is applied via the springs light will not be able to leak under the holder between it and the film gate. I also made sure to instal light baffles (black adhesive-backed foam from the hobby shop) along the inside edges where the holder slides in. When the holder is inserted it compresses all of the foam which form fits to the holder and any remaining light leaks are cured. Let me know if this doesn't make sense and I'll try to post some images to show what I mean in order to clarify if needed.
Thanks for the information.
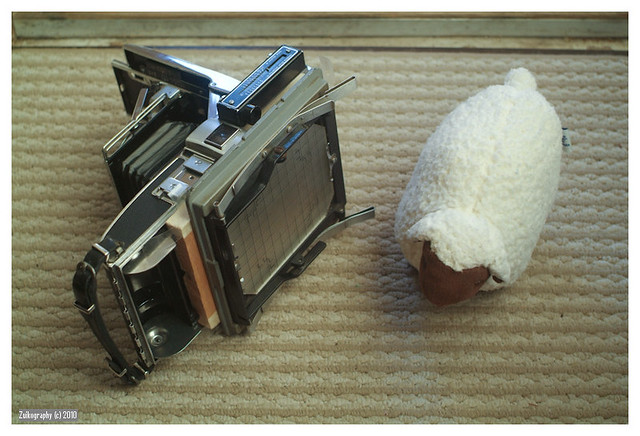
I finally was able to see where the bands of light leak come from.
It was the slit where the original film sheet come out (guess where did I forgot to put the light seal foam at :bang
. There are also two screw holes through which I can actually see the back
No wonder! I'm surprised I still can see *some* image.
So I taped the whole section with black electrical tape and looking at yesterday's negatives, I may have vanquished the last of those light leaks. I'll scan those tonight and we'll see.
Meanwhile, here's a shot of the camera before the "light-leak busting" phase began.
Fragomeni
Member
This is looking great! What type of rangefinder is that up top? Looks cool on it! You may have said this earlier but is that Graflock back or some type of spring back? Also, what is that material that the back is attached to?
I have a 110b on the way and a Graflock type back (slimmer in design) on the way. I plan to do this version with the Graflock type back so that I can use any holders I want including my Polaroid 145.
I'm actually talking to Steven from Alpenhause about maybe just trading him come Polaroid cameras toward one of his finished conversions. I love a project and all but I just want to photograph and these projects seem to be never ending with me haha.
RFH
rfhansen.wordpress.com
Shadowfox, nice job. Show us some pictures when you have run some film through it.
sienarot
Well-known
I gotta admit, I'm very intrigued by this conversion. Since I saw this thread, I've been kind of watching eBay for some potential candidates to do my own conversion. I did some reading and some people are suggesting the Polaroid 95A is another good option.
shadowfox
Darkroom printing lives
Shadowfox, nice job. Show us some pictures when you have run some film through it.
Yup, got it.
I post it in another thread, since this is yours.
Fragomeni
Member
I completed the 110b conversion last night. Went much smoother then the first conversion and this time it has a Graflock back! I'm headed to work now so I'll take some pictures and post them tonight.
Kent
Finally at home...
Amazing job!
Fragomeni
Member
Ok, quick question. I'm confused by the 110b lens/shutter. I get that it is designed to set exposure based on EV values but the shutter has regular aperture and shutter speed marking which should be able to be combined like with any other lens, or so I thought. I've found that when I set an exposure combination with just the aperture selection and shutter speed ring, the exposure come out a stop over exposed. However, when I set the exposure based on the EV selections the exposure comes out correct. To clarify what I'm talking about, I am a zone system user so I meter a scene, say a portrait. I determine that I want to place a highlight which reads EV 7 2/3 in zone 6. An exposure for this would be f5.6 @ 1/60 if using 3000 iso Fuji FP-3000b. This should be the correct exposure but on the 100b it comes out 1 stop over exposed. When I compare the exposures to one made at that exposure combination using a different and known lens/camera combo (this serves as a known or control) I find that in order to match it I need to change the exposure combination on the Polaroid by 1 stop i.e. instead of setting it to f5.6 @ 1/60 I set it to f5.6 @ 1/125 and the exposures will match. However, if I set the 110b to expose at the EV level determined by an incident meter reading then the exposure matches the exposure made by the control lens/camera combo determined by spot metering and zone system placement as I described above. Maybe Im just really tired but I cannot for the life of me figure out what's going on. Also, the shutter speeds on the 110b sound accurate. I don't understand where the 1 stop difference is coming from when I set an exposure combination the same way I do on any other lens. Is there something about the 100b Ysarex I need to know?
Fragomeni
Member
I just re-read that and it didn't seem very clear. Sorry, I am tired. Basically what I'm saying is that in order to match exposures, for some reason I need to meter and expose with the 110b as if I were using a film 1 stop/ iso higher then it actually is. I'm wondering if anyone else is experiencing this or if it is due to some obvious reason that I've just missed. In the end it doesn't really matter to me. I'll set the meter 1 stop higher iso if I have to because then the exposures match perfectly. Anyway, I digress. Any insight?
Fragomeni
Member
Well I can't believe I missed this but I did. So here is the explanation of the solution to this (wow I feel silly that this went over my head and caused all of this grief):
Using 3000 iso film, I set my meter to 3000iso and read a highlight at LV 7 2/3 (notice LV not EV, this was what I was overlooking) that I decide to place at zone 6. The shutter speed combination for LV 6 2/3 (proper exposure to render highlight at zone 6 as decided) is indeed f5.6 @ 1/60. F5.6 @ 1/60 on the 110b's EV scale is EV 11 as Bill points out. LV 6 2/3 translated to EV is EV 11! They match! I just forgot to translate the LV reading to EV! For those unfamiliar with translating LV to EV, LV=EV at iso100. When you deviate from iso 100 add or subtract the number of stops difference in iso from the LV number to get the EV number i.e. to find the EV number for an LV reading of LV 7 at iso 3000, consider that iso 3000 is 5 stops higher then iso 100 so you take the LV reading of LV 7 and add 5 to it which becomes EV 12. Simple as that.
Now that that is settled, the camera looks and works great. Pictures to come soon
Fragomeni
Member
No one has updated in a bit. How are your camera projects going?
Anyway, I've completed the 100b conversion. It went much better then my first attempt with the 800. I've detailed it here on my website where you can also see a number of pictures of the completed camera.
This was a blast. Thanks to you all for the inspiration and encouragement!
Anyway, I've completed the 100b conversion. It went much better then my first attempt with the 800. I've detailed it here on my website where you can also see a number of pictures of the completed camera.
This was a blast. Thanks to you all for the inspiration and encouragement!
keytarjunkie
no longer addicted
Wow I like that grip! I'm spray painting again tomorrow, and then calibrating the rangefinder and I'm done! Photos soon. Yes, thanks all for the inspiration, this has been such an enjoyable project.
RFH
rfhansen.wordpress.com
I have yet to do some serious photography with my Polaroid and proper sheet film. Been away for a few days. And I just bought a Mamiya 6, so I've been trying that out instead.
keytarjunkie
no longer addicted
I have yet to do some serious photography with my Polaroid and proper sheet film. Been away for a few days. And I just bought a Mamiya 6, so I've been trying that out instead.
Ooh, I'm jealous. I just bought a black Contax G2 with 28mm and 45mm, but I kinda wish I had gotten a Mamiya 6 or 7 instead (but I have a pentax 67 to hold me over). Here are some recent pictures of my polaroid, I just redid the painting today and all that's left is attaching and calibrating the rangefinder.
And my RFH-inspired back:
It's not the cleanest out there, but it's mine...
Fragomeni
Member
I dig the black!
Ezzie
E. D. Russell Roberts
@RFH and Keytarjunkie. I know I´m a bit thick, as I can´t quite understand how the springs come into play with those L brackets. Where are the springs? The brackets look to be rigidly mounted.
shadowfox
Darkroom printing lives
Keytar, that mod looks solid.
What did you use for the spacer?
What did you use for the spacer?
keytarjunkie
no longer addicted
@RFH and Keytarjunkie. I know I´m a bit thick, as I can´t quite understand how the springs come into play with those L brackets. Where are the springs? The brackets look to be rigidly mounted.
That's okay, it's really simple but I had a lot of trouble understanding it at first too. Here are some lousy pictures to better illustrate (matte black sucks all light away, so they're very bright).

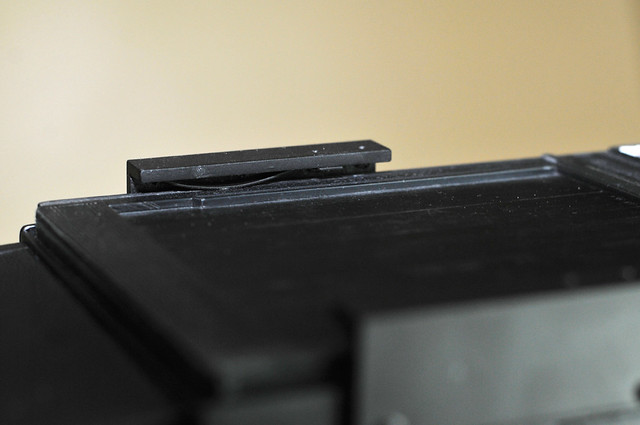
Double darkslides have a little ridge that helps them click in to where they are supposed to go, and it also helps keep out light. Because of this, the DD can't go straight in, it really needs some kind of spring in order to bend slightly outwards before locking in, and so that it can be pulled out. The springs rest between the DD and the spacers, and can be adjusted for tightness so that no light gets in. They're pretty tight, and DD's lock in with a real click.
Keytar, that mod looks solid.
What did you use for the spacer?
Just a piece of L-shaped aluminum I found in my shop's parts bin. Cut it in half, drilled holes for mounting to the frame and holes for attaching the springs.
I'm having some big problems with reattaching and calibrating the rangefinder, but I expected to...
Share:
-
This site uses cookies to help personalise content, tailor your experience and to keep you logged in if you register.
By continuing to use this site, you are consenting to our use of cookies.