
wolves3012
Mentor
This thread is intended to cover a CLA on the russian turret finder. It also shows the arrangement of the internal prisms. Many people take these apart to clean out dust etc, only to find that various bits fall out unexpectedly and they are then unsure how to reassemble them. This thread will also show you how to put them back together!
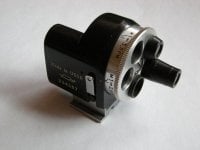
Firstly, a couple of words on the finder. It comes in two varieties, one for FED/Zorki and one for Kiev. The only difference is that the two types are mirror-images of each other, therefore the CLA is essentially the same but with obvious reversals of components. The finder has a "turret" that revolves to provide views for 28, 35, 50, 85 and 135mm lenses and has some, limited, parallax correction. The FED/Zorki type looks like this:
Firstly, a couple of words on the finder. It comes in two varieties, one for FED/Zorki and one for Kiev. The only difference is that the two types are mirror-images of each other, therefore the CLA is essentially the same but with obvious reversals of components. The finder has a "turret" that revolves to provide views for 28, 35, 50, 85 and 135mm lenses and has some, limited, parallax correction. The FED/Zorki type looks like this:
Attachments
Last edited:
wolves3012
Mentor
To CLA the finder you'll need a jewellers screwdriver set, some cotton swabs, some pure alcohol (or something similar, to clean the lenses) and some clean cotton gloves - and yes, you really will need them! A dab of grease will also be needed, the type is not critical. Finally, you'll need a bit of patience and to realise that you will NOT get it perfectly clean (unless you have access to a cleanroom!). The finder is not dust-proof either, so in use it will become dirty again in time. Bear in mind that most of, if not all, the lenses and prisms are coated glass - treat them as you would a camera lens, with care.
Ok, here goes!
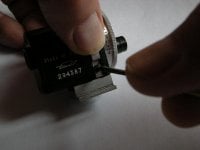
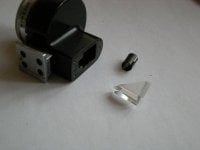
Step 1: Place your thumb over the detent ball on the side of the round part of the turret. Remove the screw holding the ball-retainer. Take the retainer off and tip the ball out (If you lose it, don't blame me - use a tray to work over!)
Ok, here goes!
Step 1: Place your thumb over the detent ball on the side of the round part of the turret. Remove the screw holding the ball-retainer. Take the retainer off and tip the ball out (If you lose it, don't blame me - use a tray to work over!)
Attachments
Last edited:
wolves3012
Mentor

wolves3012
Mentor
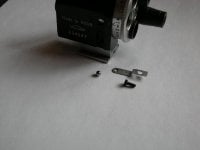
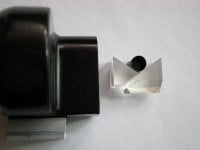
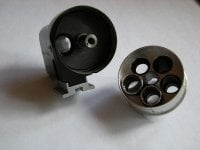
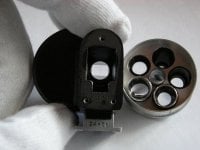
Step 3: Carefully, tip out the first prism and round spacer, then the second prism. Handle the prisms with cotton gloves - they are coated glass and very easy to mark or damage, you have been warned! The second photo below is the crucial one for those who took the finder apart without realising that it's not as simple as they thought. This shows the correct arrangement of the prisms for re-fitting them. Clean the prisms carefully and set them aside somewhere where they won't get damaged or disturbed.
Attachments
wolves3012
Mentor
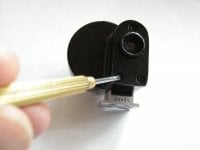
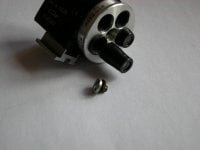
Step 4: Turn the finder over and slacken the tiny grubscrew set into the large middle screw. Don't take this out, just loosen it a turn or so. Next, remove the large centre screw, making sure that the fibre washer behind it comes with it or is not lost.
Attachments

wolves3012
Mentor
wolves3012
Mentor
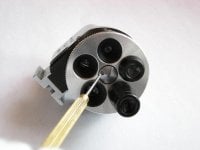
Step 6: Clean the viewing frame from the eyepiece end of the finder. It's quite recessed, use an alcohol-moistened cotton swab to clean it and a blower to remove the debris and dust. Be aware that that it will take some patience to get it satisfactorily clean and dust-free. Use an eye-loupe or magnifying glass to satisfy yourself that it really is clean enough, hold the finder over a white target to get a clear view. I can't stress enough that you need to be thorough here or you'll be disappointed when it's reassembled. Also clean the eyepiece lens.
Attachments
Last edited:
wolves3012
Mentor
Step 7: Put it all back together! As in the best manuals, reassembly is simply the reverse of disassembly. Note the following, however:
Clean the shaft that the turret revolves on and put a small amount of grease on it to make the action smooth. Likewise, a *very* tiny amount on the ball-track is helpful, although not crucial.
Take great care when replacing the prisms. Place the smaller, triangular-shaped one first, with the small flat section facing the bottom of the finder and the "point" pointing towards the eyepiece - refer to the photo above again and double-check. Next drop the spacer so that it sits at the top, then carefully insert the larger prism, with the "roof" downwards. When the prisms are in place, check very carefully that the rear face is flush with the back of the finder. Tap the housing gently to settle the prisms. If it's not flush now, firstly it is not assembled correctly and secondly you will crush the parts when you re-fit the eyepiece and cover.
It is possible to remove, disassemble and clean each of the lenses and also the viewing screen (which can also be rotated if it's out of alignment). To do so will require a small lens-spanner and I do not recommend this unless you are experienced and it's absolutely necessary. If the lenses are disassembled, I suggest these are done one at a time and re-fitted before moving on to the next. This will prevent incorrect reassembly.
Last edited:
Peter_Jones
Well-known
Excellent tutorial.
I have been through this, and much trial and error was required as, you guessed it, I mixed up the prisms. lol
I have been through this, and much trial and error was required as, you guessed it, I mixed up the prisms. lol
rbiemer
Unabashed Amateur
Thanks for this excellent thread, wolves3012!
Mine is fine now, but will eventually need this.
Rob
Mine is fine now, but will eventually need this.
Rob
geoffox23
Member
Many thanks for sharing your experience.
I'll put it to good use on my dirty finder.
I'll put it to good use on my dirty finder.
Last edited:
Bill58
Native Texan
I don't have one of these, but appreciate your diligence and effort in putting it here. We need more of these "tutorials."
Thanks,
Bill
Thanks,
Bill
Ray Settanta
Newbie
This is great! Just what I need for a recently purchased finder. Thanks very much.
steamer
Well-known
Many people take these apart to clean out dust etc, only to find that various bits fall out unexpectedly ...
Ah so it's not just me. I have a Zeiss turret finder, and when I tried to clean it up I lost the little ball bearing. Anybody have an idea about where one could find a replacement?
wolves3012
Mentor
The bearing is 3mm but you could get away with anything 2.5-3mm. Find your local ball bearing stockist and ask them. Ask nicely and I doubt they would bother to charge for a single 3mm ball.Ah so it's not just me. I have a Zeiss turret finder, and when I tried to clean it up I lost the little ball bearing. Anybody have an idea about where one could find a replacement?
steamer
Well-known
Wolves thanks a lot for the info, I'll have to look around for a 3mm bearing next week.
yossarian123
Sam I Am
I'm going to clean mine this weekend, will let you know how it turns out.
pordiosero
Member
Done! thank you so much for this howto, really helpful. Today I received a misty turret and after the CL(A?) I find it a way better.
By the way, it came without the small ball...
By the way, it came without the small ball...
wolves3012
Mentor
Someone's probably lost it before it got to you then. As noted above, a 2.5-3mm ball bearing is fine, it should not be too hard to find one.Done! thank you so much for this howto, really helpful. Today I received a misty turret and after the CL(A?) I find it a way better.
By the way, it came without the small ball...
hoddy
Member
Wegena viewfinder
Wegena viewfinder
Hi
I have recently acquired a turret finder for my Zorki which needs a CLA but its not Russian it's a Wegena made in Germany. Do you know if the procdure is likely to be very different?
Thanks
Wegena viewfinder
Hi
I have recently acquired a turret finder for my Zorki which needs a CLA but its not Russian it's a Wegena made in Germany. Do you know if the procdure is likely to be very different?
Thanks
Share:
-
This site uses cookies to help personalise content, tailor your experience and to keep you logged in if you register.
By continuing to use this site, you are consenting to our use of cookies.